Compare commits
2 Commits
| Author | SHA1 | Date | |
|---|---|---|---|

|
83e92994d1 | ||
|
|
33146f0a50 |
103
.github/workflows/build.yml
vendored
@@ -1,103 +0,0 @@
|
||||
name: Build
|
||||
|
||||
on: workflow_dispatch
|
||||
|
||||
jobs:
|
||||
buildAssets:
|
||||
runs-on: ubuntu-latest
|
||||
steps:
|
||||
- name: Python Setup
|
||||
uses: actions/setup-python@v4
|
||||
with:
|
||||
python-version: "3.11"
|
||||
architecture: x64
|
||||
|
||||
- name: Install Packages (apt)
|
||||
run: |
|
||||
sudo apt update
|
||||
sudo apt install qttools5-dev-tools latexmk texlive texlive-latex-extra
|
||||
|
||||
- name: Checkout Source
|
||||
uses: actions/checkout@v3
|
||||
|
||||
- name: Install Packages (pip)
|
||||
run: pip install -r docs/source/requirements.txt
|
||||
|
||||
- name: Build Assets
|
||||
run: python pkgutils.py qtlrelease sample manual
|
||||
|
||||
- name: Upload Artifacts
|
||||
uses: actions/upload-artifact@v3
|
||||
with:
|
||||
name: nw-assets
|
||||
path: |
|
||||
novelwriter/assets/sample.zip
|
||||
novelwriter/assets/manual.pdf
|
||||
novelwriter/assets/i18n/*.qm
|
||||
if-no-files-found: error
|
||||
retention-days: 1
|
||||
|
||||
buildLinux:
|
||||
needs: buildAssets
|
||||
runs-on: ubuntu-latest
|
||||
strategy:
|
||||
matrix:
|
||||
python-version: ["3.11"]
|
||||
linux-tag: ["manylinux_2_24_x86_64", "manylinux_2_28_x86_64"]
|
||||
steps:
|
||||
- name: Python Setup
|
||||
uses: actions/setup-python@v4
|
||||
with:
|
||||
python-version: "3.11"
|
||||
architecture: x64
|
||||
|
||||
- name: Install Packages (pip)
|
||||
run: pip install python-appimage
|
||||
|
||||
- name: Checkout Source
|
||||
uses: actions/checkout@v3
|
||||
|
||||
- name: Download Artifacts
|
||||
uses: actions/download-artifact@v3
|
||||
with:
|
||||
name: nw-assets
|
||||
path: novelwriter/assets
|
||||
|
||||
- name: Build AppImage
|
||||
run: python pkgutils.py build-appimage --linux-tag ${{ matrix.linux-tag }} --python-version ${{ matrix.python-version }}
|
||||
|
||||
- name: Upload Artifacts
|
||||
uses: actions/upload-artifact@v3
|
||||
with:
|
||||
name: novelWriter-Packages
|
||||
path: |
|
||||
dist_appimage/novelWriter*.AppImage
|
||||
dist_appimage/novelWriter*.AppImage.sha256
|
||||
if-no-files-found: error
|
||||
retention-days: 1
|
||||
|
||||
buildMac:
|
||||
needs: buildAssets
|
||||
runs-on: macos-12
|
||||
steps:
|
||||
- name: Checkout
|
||||
uses: actions/checkout@v3
|
||||
|
||||
- name: Download Artifacts
|
||||
uses: actions/download-artifact@v3
|
||||
with:
|
||||
name: nw-assets
|
||||
path: novelwriter/assets
|
||||
|
||||
- name: Build App Bundle
|
||||
run: ./setup/macos/build.sh
|
||||
|
||||
- name: Upload DMG
|
||||
uses: actions/upload-artifact@v3
|
||||
with:
|
||||
name: novelWriter-Packages
|
||||
path: |
|
||||
dist_macos/novelWriter*.dmg
|
||||
dist_macos/novelWriter*.dmg.sha256
|
||||
if-no-files-found: error
|
||||
retention-days: 1
|
||||
21
.github/workflows/syntax.yml
vendored
@@ -1,30 +1,31 @@
|
||||
name: Flake8
|
||||
name: flake8
|
||||
|
||||
on:
|
||||
push:
|
||||
branches:
|
||||
branches:
|
||||
- main
|
||||
- dev
|
||||
pull_request:
|
||||
branches:
|
||||
- main
|
||||
- dev
|
||||
|
||||
jobs:
|
||||
checkSyntax:
|
||||
runs-on: ubuntu-latest
|
||||
steps:
|
||||
- name: Python Setup
|
||||
uses: actions/setup-python@v4
|
||||
uses: actions/setup-python@v2
|
||||
with:
|
||||
python-version: 3
|
||||
architecture: x64
|
||||
- name: Checkout Source
|
||||
uses: actions/checkout@v3
|
||||
uses: actions/checkout@v2
|
||||
- name: Install flake8
|
||||
run: pip install flake8
|
||||
- name: Syntax Check
|
||||
- name: Syntax Error Check
|
||||
run: |
|
||||
flake8 --version
|
||||
flake8 novelwriter --count --show-source --statistics
|
||||
flake8 tests --count --show-source --statistics
|
||||
flake8 nw --count --select=E9,F63,F7,F82 --show-source --statistics
|
||||
flake8 tests --count --select=E9,F63,F7,F82 --show-source --statistics
|
||||
- name: Coding Style Violations
|
||||
run: |
|
||||
flake8 nw --count --max-line-length=99 --ignore E221,E226,E228,E241 --show-source --statistics
|
||||
flake8 tests --count --max-line-length=99 --ignore E221,E226,E228,E241 --show-source --statistics
|
||||
|
||||
22
.github/workflows/test_linux.yml
vendored
@@ -2,40 +2,40 @@ name: Linux
|
||||
|
||||
on:
|
||||
push:
|
||||
branches:
|
||||
branches:
|
||||
- main
|
||||
- dev
|
||||
pull_request:
|
||||
branches:
|
||||
- main
|
||||
- dev
|
||||
|
||||
jobs:
|
||||
testLinux:
|
||||
strategy:
|
||||
matrix:
|
||||
python-version: ["3.8", "3.9", "3.10", "3.11", "3.12"]
|
||||
python-version: [3.6, 3.7, 3.8, 3.9]
|
||||
runs-on: ubuntu-latest
|
||||
steps:
|
||||
- name: Python Setup
|
||||
uses: actions/setup-python@v4
|
||||
uses: actions/setup-python@v2
|
||||
with:
|
||||
python-version: ${{ matrix.python-version }}
|
||||
architecture: x64
|
||||
- name: Install Packages (apt)
|
||||
run: |
|
||||
sudo apt update
|
||||
sudo apt install libenchant-2-dev qttools5-dev-tools aspell-en
|
||||
sudo apt install libenchant-dev qttools5-dev-tools
|
||||
- name: Checkout Source
|
||||
uses: actions/checkout@v3
|
||||
uses: actions/checkout@v2
|
||||
- name: Install Dependencies (pip)
|
||||
run: |
|
||||
pip install -U -r requirements.txt -r tests/requirements.txt
|
||||
pip install --upgrade pip
|
||||
pip install -r requirements.txt
|
||||
pip install -r requirements-dev.txt
|
||||
- name: Run Build Commands
|
||||
run: python pkgutils.py qtlrelease sample
|
||||
run: python setup.py qtlrelease sample
|
||||
- name: Run Tests
|
||||
run: |
|
||||
export QT_QPA_PLATFORM=offscreen
|
||||
pytest -v --cov=novelwriter --timeout=60
|
||||
pytest -v --cov=nw --timeout=60
|
||||
- name: Upload to Codecov
|
||||
uses: codecov/codecov-action@v3
|
||||
uses: codecov/codecov-action@v1
|
||||
|
||||
25
.github/workflows/test_mac.yml
vendored
@@ -1,35 +1,36 @@
|
||||
name: MacOS
|
||||
name: macOS
|
||||
|
||||
on:
|
||||
push:
|
||||
branches:
|
||||
branches:
|
||||
- main
|
||||
- dev
|
||||
pull_request:
|
||||
branches:
|
||||
- main
|
||||
- dev
|
||||
|
||||
jobs:
|
||||
testMac:
|
||||
runs-on: macos-latest
|
||||
steps:
|
||||
- name: Python Setup
|
||||
uses: actions/setup-python@v4
|
||||
uses: actions/setup-python@v2
|
||||
with:
|
||||
python-version: "3.11"
|
||||
python-version: 3.9
|
||||
architecture: x64
|
||||
- name: Install Packages (brew)
|
||||
- name: Install Packages
|
||||
run: |
|
||||
brew install enchant
|
||||
- name: Checkout Source
|
||||
uses: actions/checkout@v3
|
||||
- name: Install Dependencies (pip)
|
||||
uses: actions/checkout@v2
|
||||
- name: Install Dependencies
|
||||
run: |
|
||||
pip install -U pyobjc -r requirements.txt -r tests/requirements.txt
|
||||
pip install --upgrade pip
|
||||
pip install -r requirements.txt
|
||||
pip install -r requirements-dev.txt
|
||||
pip install pyobjc
|
||||
- name: Run Tests
|
||||
run: |
|
||||
export QT_QPA_PLATFORM=offscreen
|
||||
pytest -v --cov=novelwriter --timeout=60
|
||||
pytest -v --cov=nw --timeout=60
|
||||
- name: Upload to Codecov
|
||||
uses: codecov/codecov-action@v3
|
||||
uses: codecov/codecov-action@v1
|
||||
|
||||
20
.github/workflows/test_win.yml
vendored
@@ -2,30 +2,30 @@ name: Windows
|
||||
|
||||
on:
|
||||
push:
|
||||
branches:
|
||||
branches:
|
||||
- main
|
||||
- dev
|
||||
pull_request:
|
||||
branches:
|
||||
- main
|
||||
- dev
|
||||
|
||||
jobs:
|
||||
testWin:
|
||||
runs-on: windows-latest
|
||||
steps:
|
||||
- name: Python Setup
|
||||
uses: actions/setup-python@v4
|
||||
uses: actions/setup-python@v2
|
||||
with:
|
||||
python-version: "3.11"
|
||||
python-version: 3.9
|
||||
architecture: x64
|
||||
- name: Checkout Source
|
||||
uses: actions/checkout@v3
|
||||
- name: Install Dependencies (pip)
|
||||
uses: actions/checkout@v2
|
||||
- name: Install Dependencies
|
||||
run: |
|
||||
pip install -U -r requirements.txt -r tests/requirements.txt
|
||||
pip install --upgrade pip
|
||||
pip install -r requirements.txt
|
||||
pip install -r requirements-dev.txt
|
||||
- name: Run Tests
|
||||
run: |
|
||||
pytest -v --cov=novelwriter --timeout=60
|
||||
pytest -v --cov=nw --timeout=60
|
||||
- name: Upload to Codecov
|
||||
uses: codecov/codecov-action@v3
|
||||
uses: codecov/codecov-action@v1
|
||||
|
||||
20
.gitignore
vendored
@@ -1,39 +1,34 @@
|
||||
# Setup/Install
|
||||
/MANIFEST
|
||||
/dist/
|
||||
/build/
|
||||
/deploy/
|
||||
/dist/
|
||||
/dist_*/
|
||||
*.spec
|
||||
*.egg-info
|
||||
setup.iss
|
||||
/novelwriter.desktop
|
||||
/novelWriter.pyw
|
||||
/setup/macos/Info.plist
|
||||
.venv
|
||||
novelwriter.desktop
|
||||
novelWriter.pyw
|
||||
|
||||
# Translations
|
||||
/novelwriter/assets/i18n/*.qm
|
||||
/nw/assets/i18n/*.qm
|
||||
.qmake.stash
|
||||
i18n/*.qm
|
||||
i18n/*.qph
|
||||
|
||||
# Documentation
|
||||
/docs/build/
|
||||
/novelwriter/assets/help/
|
||||
/novelwriter/assets/manual.pdf
|
||||
*.qch
|
||||
*.qhc
|
||||
.~lock.*
|
||||
|
||||
# Python Temp
|
||||
__pycache__
|
||||
*.pyc
|
||||
|
||||
# Sample Project
|
||||
/novelwriter/assets/sample.zip
|
||||
/nw/assets/sample.zip
|
||||
/sample/cache
|
||||
/sample/meta
|
||||
/sample/versions
|
||||
*.bak
|
||||
*.lock
|
||||
ToC.txt
|
||||
@@ -44,6 +39,9 @@ ToC.txt
|
||||
/tests/temp
|
||||
/tests/lipsum/cache
|
||||
/tests/lipsum/meta
|
||||
/tests/minimal/cache
|
||||
/tests/minimal/meta
|
||||
/tests/oldproj/cache
|
||||
/.pytest_cache
|
||||
/pytestdebug.log
|
||||
|
||||
|
||||
25
.readthedocs.yml
Normal file
@@ -0,0 +1,25 @@
|
||||
# Read the Docs configuration file
|
||||
# See https://docs.readthedocs.io/en/stable/config-file/v2.html for details
|
||||
|
||||
# Required
|
||||
version: 2
|
||||
|
||||
# Build documentation in the docs/ directory with Sphinx
|
||||
sphinx:
|
||||
configuration: docs/source/conf.py
|
||||
|
||||
# Build documentation with MkDocs
|
||||
#mkdocs:
|
||||
# configuration: mkdocs.yml
|
||||
|
||||
# Optionally build your docs in additional formats such as PDF
|
||||
formats:
|
||||
- htmlzip
|
||||
- epub
|
||||
- pdf
|
||||
|
||||
# Optionally set the version of Python and requirements required to build your docs
|
||||
python:
|
||||
version: 3.7
|
||||
install:
|
||||
- requirements: docs/source/requirements.txt
|
||||
2285
CHANGELOG.md
@@ -2,131 +2,75 @@
|
||||
|
||||
## Our Pledge
|
||||
|
||||
We as members, contributors, and leaders pledge to make participation in our
|
||||
community a harassment-free experience for everyone, regardless of age, body
|
||||
size, visible or invisible disability, ethnicity, sex characteristics, gender
|
||||
identity and expression, level of experience, education, socio-economic status,
|
||||
nationality, personal appearance, race, caste, color, religion, or sexual
|
||||
identity and orientation.
|
||||
|
||||
We pledge to act and interact in ways that contribute to an open, welcoming,
|
||||
diverse, inclusive, and healthy community.
|
||||
In the interest of fostering an open and welcoming environment, we as
|
||||
contributors and maintainers pledge to making participation in our project and
|
||||
our community a harassment-free experience for everyone, regardless of age, body
|
||||
size, disability, ethnicity, sex characteristics, gender identity and expression,
|
||||
level of experience, education, socio-economic status, nationality, personal
|
||||
appearance, race, religion, or sexual identity and orientation.
|
||||
|
||||
## Our Standards
|
||||
|
||||
Examples of behavior that contributes to a positive environment for our
|
||||
community include:
|
||||
Examples of behavior that contributes to creating a positive environment
|
||||
include:
|
||||
|
||||
* Demonstrating empathy and kindness toward other people
|
||||
* Being respectful of differing opinions, viewpoints, and experiences
|
||||
* Giving and gracefully accepting constructive feedback
|
||||
* Accepting responsibility and apologizing to those affected by our mistakes,
|
||||
and learning from the experience
|
||||
* Focusing on what is best not just for us as individuals, but for the overall
|
||||
community
|
||||
* Using welcoming and inclusive language
|
||||
* Being respectful of differing viewpoints and experiences
|
||||
* Gracefully accepting constructive criticism
|
||||
* Focusing on what is best for the community
|
||||
* Showing empathy towards other community members
|
||||
|
||||
Examples of unacceptable behavior include:
|
||||
Examples of unacceptable behavior by participants include:
|
||||
|
||||
* The use of sexualized language or imagery, and sexual attention or advances of
|
||||
any kind
|
||||
* Trolling, insulting or derogatory comments, and personal or political attacks
|
||||
* The use of sexualized language or imagery and unwelcome sexual attention or
|
||||
advances
|
||||
* Trolling, insulting/derogatory comments, and personal or political attacks
|
||||
* Public or private harassment
|
||||
* Publishing others' private information, such as a physical or email address,
|
||||
without their explicit permission
|
||||
* Publishing others' private information, such as a physical or electronic
|
||||
address, without explicit permission
|
||||
* Other conduct which could reasonably be considered inappropriate in a
|
||||
professional setting
|
||||
|
||||
## Enforcement Responsibilities
|
||||
## Our Responsibilities
|
||||
|
||||
Community leaders are responsible for clarifying and enforcing our standards of
|
||||
acceptable behavior and will take appropriate and fair corrective action in
|
||||
response to any behavior that they deem inappropriate, threatening, offensive,
|
||||
or harmful.
|
||||
Project maintainers are responsible for clarifying the standards of acceptable
|
||||
behavior and are expected to take appropriate and fair corrective action in
|
||||
response to any instances of unacceptable behavior.
|
||||
|
||||
Community leaders have the right and responsibility to remove, edit, or reject
|
||||
comments, commits, code, wiki edits, issues, and other contributions that are
|
||||
not aligned to this Code of Conduct, and will communicate reasons for moderation
|
||||
decisions when appropriate.
|
||||
Project maintainers have the right and responsibility to remove, edit, or
|
||||
reject comments, commits, code, wiki edits, issues, and other contributions
|
||||
that are not aligned to this Code of Conduct, or to ban temporarily or
|
||||
permanently any contributor for other behaviors that they deem inappropriate,
|
||||
threatening, offensive, or harmful.
|
||||
|
||||
## Scope
|
||||
|
||||
This Code of Conduct applies within all community spaces, and also applies when
|
||||
an individual is officially representing the community in public spaces.
|
||||
Examples of representing our community include using an official e-mail address,
|
||||
posting via an official social media account, or acting as an appointed
|
||||
representative at an online or offline event.
|
||||
This Code of Conduct applies both within project spaces and in public spaces
|
||||
when an individual is representing the project or its community. Examples of
|
||||
representing a project or community include using an official project e-mail
|
||||
address, posting via an official social media account, or acting as an appointed
|
||||
representative at an online or offline event. Representation of a project may be
|
||||
further defined and clarified by project maintainers.
|
||||
|
||||
## Enforcement
|
||||
|
||||
Instances of abusive, harassing, or otherwise unacceptable behavior may be
|
||||
reported to the community leaders responsible for enforcement at issues (at)
|
||||
novelwriter.io. All complaints will be reviewed and investigated promptly and
|
||||
fairly.
|
||||
reported by contacting the project leader at issues (at) novelwriter.io. All
|
||||
complaints will be reviewed and investigated and will result in a response that
|
||||
is deemed necessary and appropriate to the circumstances. The project team is
|
||||
obligated to maintain confidentiality with regard to the reporter of an incident.
|
||||
Further details of specific enforcement policies may be posted separately.
|
||||
|
||||
All community leaders are obligated to respect the privacy and security of the
|
||||
reporter of any incident.
|
||||
|
||||
## Enforcement Guidelines
|
||||
|
||||
Community leaders will follow these Community Impact Guidelines in determining
|
||||
the consequences for any action they deem in violation of this Code of Conduct:
|
||||
|
||||
### 1. Correction
|
||||
|
||||
**Community Impact**: Use of inappropriate language or other behavior deemed
|
||||
unprofessional or unwelcome in the community.
|
||||
|
||||
**Consequence**: A private, written warning from community leaders, providing
|
||||
clarity around the nature of the violation and an explanation of why the
|
||||
behavior was inappropriate. A public apology may be requested.
|
||||
|
||||
### 2. Warning
|
||||
|
||||
**Community Impact**: A violation through a single incident or series of
|
||||
actions.
|
||||
|
||||
**Consequence**: A warning with consequences for continued behavior. No
|
||||
interaction with the people involved, including unsolicited interaction with
|
||||
those enforcing the Code of Conduct, for a specified period of time. This
|
||||
includes avoiding interactions in community spaces as well as external channels
|
||||
like social media. Violating these terms may lead to a temporary or permanent
|
||||
ban.
|
||||
|
||||
### 3. Temporary Ban
|
||||
|
||||
**Community Impact**: A serious violation of community standards, including
|
||||
sustained inappropriate behavior.
|
||||
|
||||
**Consequence**: A temporary ban from any sort of interaction or public
|
||||
communication with the community for a specified period of time. No public or
|
||||
private interaction with the people involved, including unsolicited interaction
|
||||
with those enforcing the Code of Conduct, is allowed during this period.
|
||||
Violating these terms may lead to a permanent ban.
|
||||
|
||||
### 4. Permanent Ban
|
||||
|
||||
**Community Impact**: Demonstrating a pattern of violation of community
|
||||
standards, including sustained inappropriate behavior, harassment of an
|
||||
individual, or aggression toward or disparagement of classes of individuals.
|
||||
|
||||
**Consequence**: A permanent ban from any sort of public interaction within the
|
||||
community.
|
||||
Project maintainers who do not follow or enforce the Code of Conduct in good
|
||||
faith may face temporary or permanent repercussions as determined by other
|
||||
members of the project's leadership.
|
||||
|
||||
## Attribution
|
||||
|
||||
This Code of Conduct is adapted from the [Contributor Covenant][homepage],
|
||||
version 2.1, available at
|
||||
[https://www.contributor-covenant.org/version/2/1/code_of_conduct.html][v2.1].
|
||||
|
||||
Community Impact Guidelines were inspired by
|
||||
[Mozilla's code of conduct enforcement ladder][Mozilla CoC].
|
||||
|
||||
For answers to common questions about this code of conduct, see the FAQ at
|
||||
[https://www.contributor-covenant.org/faq][FAQ]. Translations are available at
|
||||
[https://www.contributor-covenant.org/translations][translations].
|
||||
This Code of Conduct is adapted from the [Contributor Covenant][homepage], version 1.4,
|
||||
available at https://www.contributor-covenant.org/version/1/4/code-of-conduct.html
|
||||
|
||||
[homepage]: https://www.contributor-covenant.org
|
||||
[v2.1]: https://www.contributor-covenant.org/version/2/1/code_of_conduct.html
|
||||
[Mozilla CoC]: https://github.com/mozilla/diversity
|
||||
[FAQ]: https://www.contributor-covenant.org/faq
|
||||
[translations]: https://www.contributor-covenant.org/translations
|
||||
|
||||
For answers to common questions about this code of conduct, see
|
||||
https://www.contributor-covenant.org/faq
|
||||
|
||||
@@ -9,7 +9,8 @@ The following contributions are welcome:
|
||||
|
||||
* Bugfixes for new or existing bugs. Please also report new bugs in the issue tracker even if you
|
||||
also provide a fix. It makes it easier to keep track of what has been fixed and when.
|
||||
* Translations via the [crowdin project page](https://crowdin.com/project/novelwriter).
|
||||
* New translations. You can read more about contributing translations
|
||||
[here](https://github.com/vkbo/novelWriter/blob/main/i18n/README.md).
|
||||
* Improvements to the documentation. Particularly if the documentation is unclear. Please don't
|
||||
make any larger changes to the documentation without discussing if with the maintainer first.
|
||||
* Adaptations, installation or packaging features targeting specific operating systems.
|
||||
@@ -75,13 +76,13 @@ style guide, but with a few exceptions. Some key points are listed below.
|
||||
**Variable and Function Names**
|
||||
|
||||
* PEP8 allows for camelCase for consistency with existing code. The Qt library uses camelCase, so
|
||||
the Python source code does too.
|
||||
the Python the source code does too.
|
||||
* The exception to the above is for constants. They should always be in upper snake case, like PEP8
|
||||
states.
|
||||
|
||||
**Spaces, Indentation and Alignment**
|
||||
|
||||
* Only indentation by multiples of 4 spaces is allowed.
|
||||
* Only indentation by 4 spaces is allowed.
|
||||
* No trailing spaces should occur on any line in the source code, including empty lines.
|
||||
* Ideally, a function should end on the same indention level as it started. Exceptions are allowed
|
||||
if it makes the code easier to follow.
|
||||
@@ -98,14 +99,14 @@ The `setup.cfg` file in the root of this project has the following settings for
|
||||
matches the above code style:
|
||||
```conf
|
||||
[flake8]
|
||||
ignore = E133,E221,E226,E228,E241,W503
|
||||
ignore = E221,E226,E228,E241
|
||||
max-line-length = 99
|
||||
exclude = docs/*
|
||||
```
|
||||
|
||||
The command line equivalent, with reporting, is:
|
||||
```bash
|
||||
flake8 . --count --ignore E133,E221,E226,E228,E241,W503 --max-line-length=99 --show-source --statistics
|
||||
flake8 . --count --ignore E221,E226,E228,E241 --max-line-length=99 --show-source --statistics
|
||||
```
|
||||
|
||||
Passing this check is required before contributions are merged. This is checked automatically when
|
||||
|
||||
44
CREDITS.md
@@ -4,59 +4,37 @@
|
||||
|
||||
* Veronica Berglyd Olsen (@vkbo)
|
||||
|
||||
## Contributors
|
||||
## Main Contributors
|
||||
|
||||
* Concept: Marian Lückhof (@Number042)
|
||||
* Internationalisation: Bruno Meneguello (@bkmeneguello)
|
||||
* Setup and Packaging: Rachel Powers (@Ryex)
|
||||
|
||||
For other contributions, see the project's [Contributors](https://github.com/vkbo/novelWriter/graphs/contributors) page.
|
||||
|
||||
## Translations
|
||||
|
||||
The default language is English (UK) with English (US) as an option. These are the original
|
||||
translators for the languages currently available:
|
||||
|
||||
* Dutch: Martijn van der Kleijn (@mvdkleijn)
|
||||
* French: Jan Lüdke (@jyhelle)
|
||||
* German: Myian (@heymyian)
|
||||
* Italian: Riccardo Mangili
|
||||
* Japanese: hebekeg (@hebekeg)
|
||||
* Latin American Spanish: Tommy Marplatt (@tmarplatt)
|
||||
* Norwegian: Veronica Berglyd Olsen (@vkbo)
|
||||
* Portuguese: Bruno Meneguello (@bkmeneguello)
|
||||
* Simplified Chinese: Qianzhi Long (@longqzh)
|
||||
|
||||
Additional larger translation contributions:
|
||||
|
||||
* French: Albert Aribaud (@aaribaud)
|
||||
|
||||
Translations are managed on [Crowdin](https://crowdin.com/project/novelwriter), and more
|
||||
contributions are listed on the project's [Members](https://crowdin.com/project/novelwriter/members) page.
|
||||
|
||||
## Libraries
|
||||
|
||||
The following libraries are dependencies of novelWriter:
|
||||
|
||||
* [Qt5](https://www.qt.io) by Qt Company
|
||||
* [PyQt5](https://www.riverbankcomputing.com/software/pyqt) by Riverbank Computing
|
||||
* [Enchant](https://abiword.github.io/enchant) by Dom Lachowicz
|
||||
* [PyEnchant](https://pyenchant.github.io/pyenchant) by Dimitri Merejkowsky
|
||||
* Qt5 by [Qt Company](https://www.qt.io/)
|
||||
* PyQt5 by [Riverbank Computing](https://www.riverbankcomputing.com/software/pyqt/)
|
||||
* lxml by [Martijn Faassen](https://lxml.de/)
|
||||
* Enchant by [Dom Lachowicz](https://abiword.github.io/enchant/)
|
||||
* PyEnchant by [Dimitri Merejkowsky](https://pyenchant.github.io/pyenchant/)
|
||||
|
||||
## Assets
|
||||
|
||||
Some of the assets bundled with novelWriter were adapted from the following sources:
|
||||
|
||||
* [Typicons](https://github.com/stephenhutchings/typicons.font) icons by Stephen Hutchings (CC BY-SA 4.0)
|
||||
* [Tomorrow](https://github.com/chriskempson/base16) syntax themes by Chris Kempson (MIT License)
|
||||
* [Owl](https://github.com/sdras/night-owl-vscode-theme) syntax themes by Sarah Drasner (MIT License)
|
||||
* [Solarized](https://github.com/altercation/solarized) themes by Ethan Schoonover (MIT License)
|
||||
|
||||
## Fonts
|
||||
|
||||
The font used for the main novelWriter logo, mimetype and text banners is:
|
||||
|
||||
* Pridi by Cadson Demak (Open Font License, Version 1.1)
|
||||
* Typicons icons by Stephen Hutchings (CC BY-SA 4.0)
|
||||
* Cantarell font by Dave Crossland (OPEN FONT LICENSE Version 1.1)
|
||||
* Tomorrow syntax themes by Chris Kempson (MIT License)
|
||||
* Owl syntax themes by Sarah Drasner (MIT License)
|
||||
* Solarized themes by Ethan Schoonover, added by @nullbasis (MIT License)
|
||||
|
||||
## Special Mentions
|
||||
|
||||
|
||||
@@ -1,6 +1,6 @@
|
||||
include pkgutils.py
|
||||
include setup.py
|
||||
include LICENSE.md
|
||||
include CREDITS.md
|
||||
include CHANGELOG.md
|
||||
recursive-include novelwriter/assets *
|
||||
recursive-include setup *
|
||||
recursive-include nw/assets *
|
||||
recursive-include sample *.nwx *.nwd
|
||||
|
||||
217
README.md
@@ -2,11 +2,15 @@
|
||||
|
||||
[](https://github.com/vkbo/novelWriter/actions/workflows/test_linux.yml)
|
||||
[](https://github.com/vkbo/novelWriter/actions/workflows/test_win.yml)
|
||||
[](https://github.com/vkbo/novelWriter/actions/workflows/test_mac.yml)
|
||||
[](https://github.com/vkbo/novelWriter/actions)
|
||||
[](https://codecov.io/gh/vkbo/novelWriter)
|
||||
[](https://github.com/vkbo/novelWriter/actions/workflows/test_mac.yml)
|
||||
[](https://github.com/vkbo/novelWriter/actions)
|
||||
[](https://codecov.io/gh/vkbo/novelWriter)
|
||||
[](https://novelwriter.readthedocs.io/en/latest/?badge=latest)
|
||||
[](https://github.com/vkbo/novelWriter/releases)
|
||||
[](https://pypi.org/project/novelWriter)
|
||||
[](https://pypi.org/project/novelWriter)
|
||||
|
||||
<img align="left" style="margin: 0 0 4px 0;" src="https://raw.githubusercontent.com/vkbo/novelWriter/main/setup/novelwriter_readme.png">
|
||||
<img align="left" style="margin: 0 16px 4px 0;" src="https://raw.githubusercontent.com/vkbo/novelWriter/main/setup/icons/scaled/icon-novelwriter-96.png">
|
||||
|
||||
novelWriter is a plain text editor designed for writing novels assembled from many smaller text
|
||||
documents. It uses a minimal formatting syntax inspired by Markdown, and adds a meta data syntax
|
||||
@@ -18,22 +22,15 @@ synchronisation tools. All text is saved as plain text files with a meta data he
|
||||
project structure is stored in a single project XML file. Other meta data is primarily saved as
|
||||
JSON files.
|
||||
|
||||
For more details, and how to install and use novelWriter, please see the main website and
|
||||
documentation.
|
||||
The full documentation is available on [readthedocs.io](https://novelwriter.readthedocs.io).
|
||||
|
||||
**Project Links**
|
||||
|
||||
* Website: [novelwriter.io](https://novelwriter.io)
|
||||
* Documentation: [docs.novelwriter.io](https://docs.novelwriter.io)
|
||||
* Internationalisation: [crowdin.com/project/novelwriter](https://crowdin.com/project/novelwriter)
|
||||
* PyPi Project: [pypi.org/project/novelWriter](https://pypi.org/project/novelWriter)
|
||||
* Social Media: [fosstodon.org/@novelwriter](https://fosstodon.org/@novelwriter)
|
||||
The full credits are listed in [CREDITS.md](https://github.com/vkbo/novelWriter/blob/main/CREDITS.md).
|
||||
|
||||
## Implementation
|
||||
|
||||
novelWriter is written with Python 3 (3.8+) using Qt5 and PyQt5 (5.10+), and is released on Linux,
|
||||
Windows and macOS. It can in principle run on any Operating System that also supports Qt, PyQt and
|
||||
Python.
|
||||
The application is written in Python 3 (3.6+) using Qt5 and PyQt5 (5.3+). It is developed on Linux,
|
||||
but should in principle work fine on other operating systems as well as long as dependencies are
|
||||
met. It is regularly tested on Debian and Ubuntu Linux, Windows, and macOS.
|
||||
|
||||
## Project Contributions
|
||||
|
||||
@@ -44,25 +41,183 @@ existing code unless there is a very good reason for doing so.
|
||||
|
||||
Fixes and patches are welcome. Contributions related to packaging and installing novelWriter will
|
||||
also be appreciated, but please make an issue or a discussion topic first. Before contributing any
|
||||
code, please also read the full
|
||||
[Contributing Guide](https://github.com/vkbo/novelWriter/blob/main/CONTRIBUTING.md).
|
||||
code, please read the full [Contributing Guide](https://github.com/vkbo/novelWriter/blob/main/CONTRIBUTING.md).
|
||||
|
||||
Project credits are available in [CREDITS.md](https://github.com/vkbo/novelWriter/blob/main/CREDITS.md).
|
||||
New translations are always welcome. Please read the additional
|
||||
[instructions](https://github.com/vkbo/novelWriter/blob/main/i18n/README.md) for further details.
|
||||
|
||||
### Translations
|
||||
## Key Features
|
||||
|
||||
New translations are always welcome. This project uses Crowdin to maintain translations, and you
|
||||
can contribute translations at the [Crowdin project page](https://crowdin.com/project/novelwriter).
|
||||
If you have any questions, feel free to post them to the
|
||||
[Translations of novelWriter](https://github.com/vkbo/novelWriter/issues/93) issue thread.
|
||||
Some key features of novelWriter are listed below. Consult the
|
||||
[documentation](https://novelwriter.readthedocs.io) for more information.
|
||||
|
||||
For more details, and how to use Qt Linguist for translations, see the
|
||||
[i18n instructions](https://github.com/vkbo/novelWriter/blob/main/i18n/README.md).
|
||||
### Formatting Codes
|
||||
|
||||
## Licence
|
||||
Although novelWriter is a plain text editor, it uses a Markdown-like syntax to allow for a minimal
|
||||
set of formatting that is useful for the specific task of writing novels.
|
||||
|
||||
This is Open Source software, and novelWriter is licenced under GPLv3. See the
|
||||
| Code | Usage | Description |
|
||||
|------------|----------|-------------|
|
||||
| `#` | Prefix | Headings level 1 to 4. |
|
||||
| `_` | Wrapped | Emphasised (italicised) text. |
|
||||
| `**` | Wrapped | Strongly emphasised (bold) text. |
|
||||
| `~~` | Wrapped | Strikethrough text. |
|
||||
| `%` | Prefix | A comment; does not count towards the word count.<sup>1</sup> |
|
||||
| `@` | Prefix | The following text is parsed as a keyword/value command for meta data. |
|
||||
| `>` | Prefix | The paragraph is indented one tab width from the left.<sup>2</sup> |
|
||||
| `<` | Suffix | The paragraph is indented one tab width from the right.<sup>2</sup> |
|
||||
| `>>` | Prefix | The paragraph is right-aligned.<sup>2</sup> |
|
||||
| `<<` | Suffix | The paragraph is left-aligned.<sup>2</sup> |
|
||||
| `>>`, `<<` | Wrapped | The paragraph is centred.<sup>2</sup> |
|
||||
|
||||
<sup>1</sup> If the first word of the comment is `synopsis:`, the comment is indexed and treated as the
|
||||
synopsis for the section of text where it occurs. These synopsis comments can be used to build an
|
||||
outline and exported to external documents.
|
||||
|
||||
<sup>2</sup> The indent and alignment codes are available from version 1.4.
|
||||
|
||||
In additions:
|
||||
|
||||
* A variety of thin and non-breaking spaces are supported. Some of them depend on the system
|
||||
running at least Qt 5.9. Earlier versions of Qt will unfortunately strip them out when saving.
|
||||
* Tabs can be used in the text, and should be properly aligned in both editor and viewer. This can
|
||||
be used to make simple tables and lists. Note that for HTML exports, most browsers will treat a
|
||||
tab as a space, so it may not show up like expected. Open Document exports should produce the
|
||||
expected result.
|
||||
|
||||
### Export Formats
|
||||
|
||||
The core export formats of novelWriter are Open Document and HTML5. Open Document is an open
|
||||
standard for office type documents that is supported by most office applications. See
|
||||
[Open Document > Application Support](https://en.wikipedia.org/wiki/OpenDocument#Application_support)
|
||||
for more details.
|
||||
|
||||
You can also export the entire project as a single novelWriter-flavour document. These can later be
|
||||
imported again into novelWriter. In addition, printing and export to PDF is offered through the Qt
|
||||
library, although with limitations to formatting.
|
||||
|
||||
### Colour Themes
|
||||
|
||||
The editor has syntax highlighting for the features it supports, and includes a set of different
|
||||
syntax highlighting themes. Optional GUI themes are also available, including dark themes.
|
||||
|
||||
### Easy Organising of Project Files
|
||||
|
||||
The structure of the project is shown on the left hand side of the main window. Project files are
|
||||
organised into root folders, indicating what class of file they are. The most important root folder
|
||||
is the `Novel` folder, which contains all of the files that make up the novel itself. Each root
|
||||
folder can have subfolders. Subfolders have no impact on the final project structure, they are
|
||||
there for you to organise your files in whatever way you want.
|
||||
|
||||
The editor supports four levels of headings, which determine what level the following text belongs
|
||||
to. Headings of level one signify a book or partition title. Headings of level two signify the
|
||||
start of a new chapter. Headings of level three signify the start of a new scene. Headings of level
|
||||
four can be used internally in each scene to create separate sections.
|
||||
|
||||
Each novel file can be assigned a layout format, which shows up as a flag next to the item in the
|
||||
project tree. These are mostly to help the user track what they contain, but they also have some
|
||||
impact on the layout of the exported document. See the
|
||||
[documentation](https://novelwriter.readthedocs.io) for further details.
|
||||
|
||||
### Project Notes
|
||||
|
||||
Supporting notes can be added for the story plot, characters, locations, story timeline, etc. These
|
||||
have their separate root folders and are optional to use.
|
||||
|
||||
### Visualisation of Story Elements
|
||||
|
||||
The different notes can be assigned tags, which other files can refer back to using `@`-prefixed
|
||||
meta keywords. This information can be used to display an outline of the story, showing where each
|
||||
scene connects to the plot, and which characters, etc. occur in them. In addition, the tags
|
||||
themselves are clickable in the document view pane, and control-clickable in the editor. They make
|
||||
it possible to quickly navigate between the documents while writing.
|
||||
|
||||
## Standard Installation
|
||||
|
||||
For a regular installation, it is recommended that you download one of the minimal zip files from
|
||||
the [Releases](https://github.com/vkbo/novelWriter/releases) page or the
|
||||
[novelwriter.io](https://novelwriter.io/) website.
|
||||
The [documentation](https://novelwriter.readthedocs.io/) has detailed install instructions for
|
||||
[Linux](https://novelwriter.readthedocs.io/en/latest/setup_linux.html),
|
||||
[Windows](https://novelwriter.readthedocs.io/en/latest/setup_windows.html), and
|
||||
[macOS](https://novelwriter.readthedocs.io/en/latest/setup_mac.html).
|
||||
They are pretty straightforward.
|
||||
|
||||
## Running from Source
|
||||
|
||||
If you want to run novelWriter directly from the source code, you must run the `novelWriter.py`
|
||||
file from command line.
|
||||
|
||||
**Note:** You may need to replace `python` with `python3` and `pip` with `pip3` in the instructions
|
||||
below on some systems. You may also want to add the `--user` flag for `pip` to install in your user
|
||||
space only.
|
||||
|
||||
### Dependencies
|
||||
|
||||
Dependencies can generally be installed from PyPi with:
|
||||
```bash
|
||||
pip install -r requirements.txt
|
||||
```
|
||||
|
||||
### Additional Steps for Linux
|
||||
|
||||
On Linux, you can most likely find the dependencies in your distribution's repository. On Ubuntu
|
||||
and Debian, run:
|
||||
```bash
|
||||
sudo apt install python3-pyqt5 python3-lxml python3-enchant
|
||||
```
|
||||
|
||||
If you want to set up a launcher and icons on Linux, you can run:
|
||||
```bash
|
||||
python setup.py xdg-install
|
||||
```
|
||||
|
||||
### Additional Steps for macOS
|
||||
|
||||
First, make sure you have properly set up Python3 with Homebrew. If not, check their
|
||||
[documentation](https://docs.brew.sh/Homebrew-and-Python).
|
||||
In addition, the following steps are necessary to install all dependencies:
|
||||
```bash
|
||||
brew install enchant
|
||||
pip3 install --user -r requirements.txt
|
||||
pip3 install --user pyobjc
|
||||
```
|
||||
|
||||
### Additional Steps for Windows
|
||||
|
||||
Windows does not by default come with Python installed. If you haven't installed it already, get it
|
||||
from [python.org/downloads](https://www.python.org/downloads/). Remember to select "Add Python to
|
||||
PATH" during the installation.
|
||||
|
||||
The script `windows_install.bat` in the `setup` folder can be used to create desktop and start menu
|
||||
icons for novelWriter. The script will also install dependencies for you from PyPi.
|
||||
|
||||
### Internationalisation
|
||||
|
||||
If you install from source, you must build the translation files yourself if you want to switch to
|
||||
a different GUI language than British English. This requires that you have the Qt translation
|
||||
framework installed. Check the specific instruction in the README in the `i18n` source folder for
|
||||
how to build the translation files.
|
||||
|
||||
## Debugging
|
||||
|
||||
If you need to debug novelWriter, you must run it from the command line. It takes a few parameters,
|
||||
which can be listed with the switch `--help`. The `--info`, `--debug` or `--verbose` flags are
|
||||
particularly useful for increasing logging output for debugging.
|
||||
|
||||
## Licenses
|
||||
|
||||
This is Open Source software, and novelWriter is licensed under GPLv3. See the
|
||||
[GNU General Public License website](https://www.gnu.org/licenses/gpl-3.0.en.html) for more
|
||||
details, or consult the [License](https://github.com/vkbo/novelWriter/blob/main/LICENSE.md)
|
||||
document. Bundled assets and their licences are listed in the
|
||||
[Credits](https://github.com/vkbo/novelWriter/blob/main/CREDITS.md) document.
|
||||
details, or consult the [LICENSE](https://github.com/vkbo/novelWriter/blob/main/LICENSE.md) file.
|
||||
|
||||
Bundled assets and their licenses are listed in
|
||||
[CREDITS](https://github.com/vkbo/novelWriter/blob/main/CREDITS.md).
|
||||
|
||||
## Screenshots
|
||||
|
||||
**novelWriter with default system theme:**
|
||||

|
||||
|
||||
**novelWriter with dark theme:**
|
||||
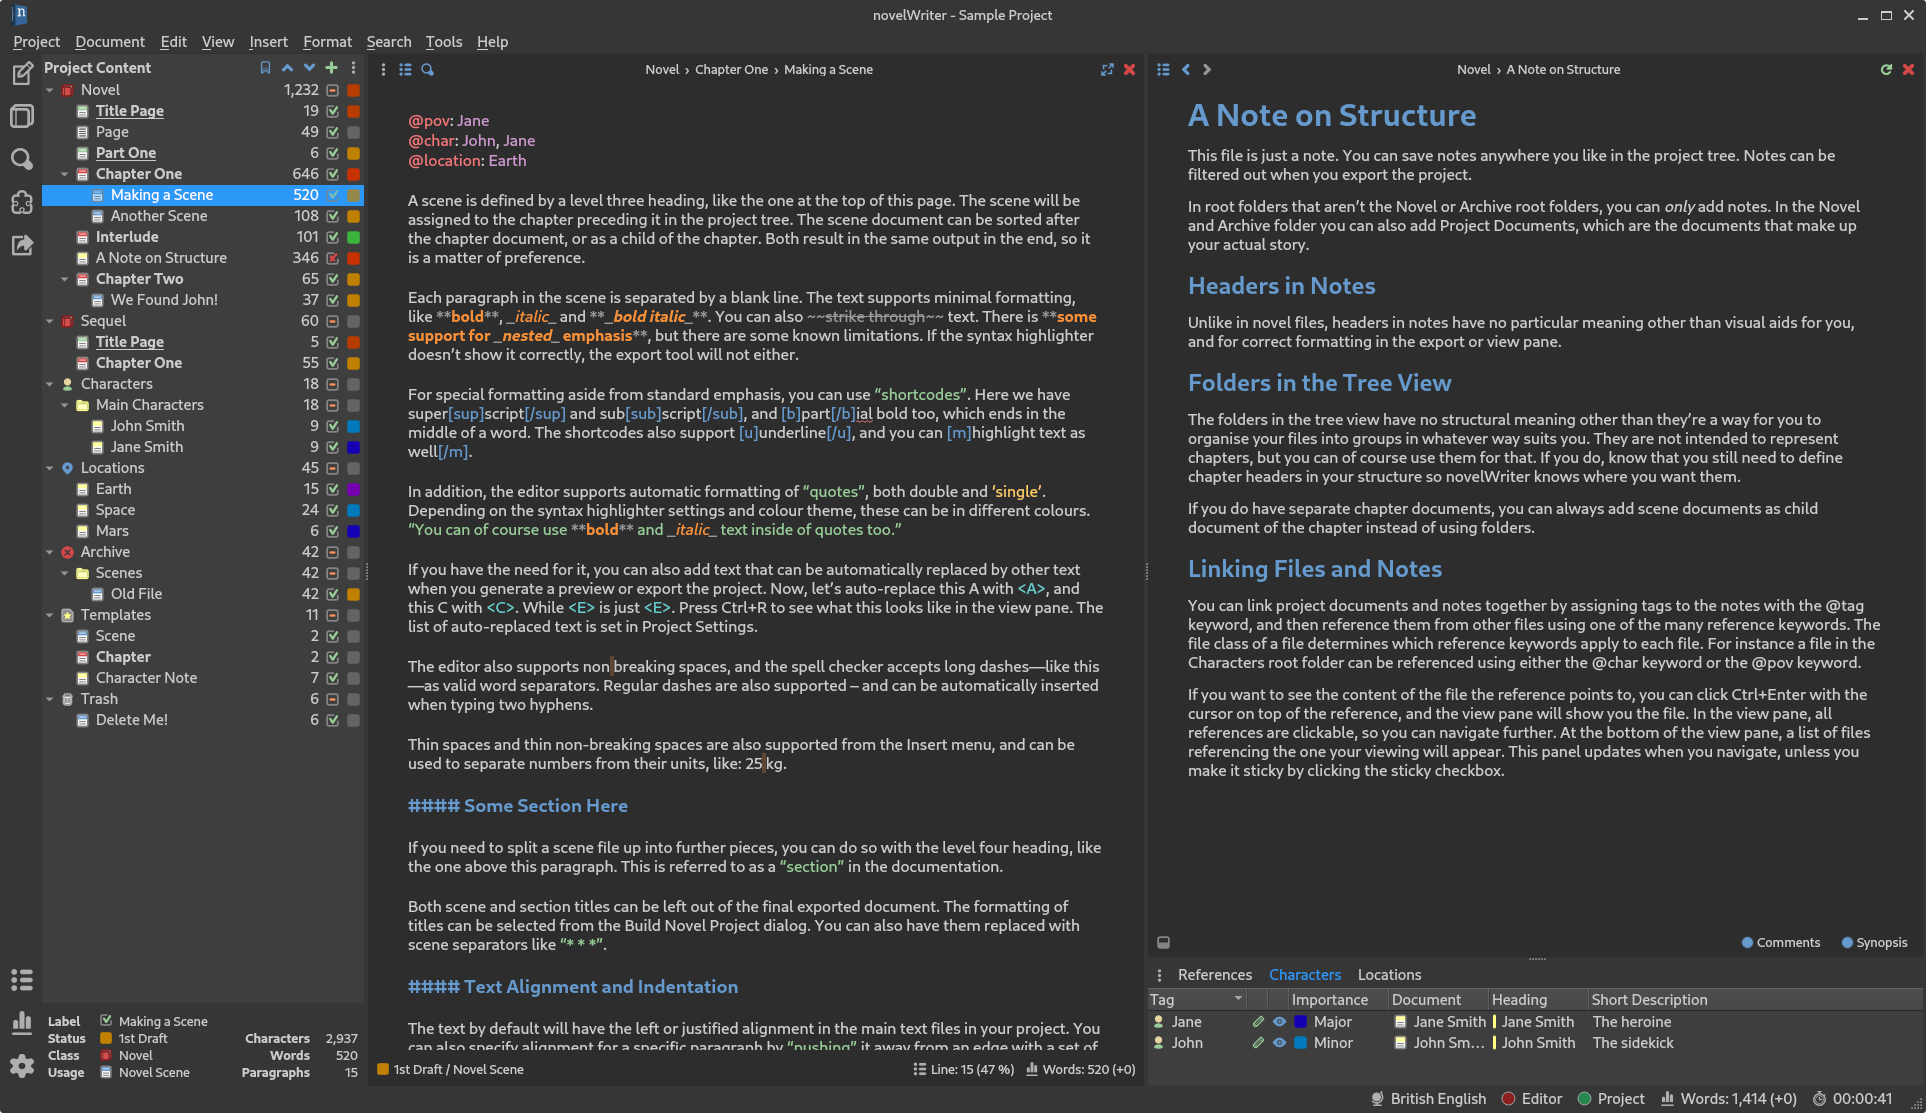
|
||||
|
||||
27
docs/source/_static/css/custom.css
Normal file
@@ -0,0 +1,27 @@
|
||||
/*
|
||||
* Custom CSS Rules for Sphinx RTD Theme
|
||||
*/
|
||||
|
||||
.kbd {
|
||||
background-color: #eeeeee;
|
||||
border: 1px solid #b4b4b4;
|
||||
border-radius: 3px;
|
||||
color: #333333;
|
||||
display: inline-block;
|
||||
font-size: 0.85em;
|
||||
font-weight: 400;
|
||||
line-height: 1;
|
||||
padding: 2px 4px;
|
||||
margin-left: 1px;
|
||||
margin-right: 1px;
|
||||
white-space: nowrap;
|
||||
}
|
||||
|
||||
.tight-table td {
|
||||
white-space: normal !important;
|
||||
vertical-align: text-top;
|
||||
}
|
||||
|
||||
pre span.go {
|
||||
color: #333333 !important;
|
||||
}
|
||||
@@ -1,14 +0,0 @@
|
||||
span.guilabel {
|
||||
font-weight: 400;
|
||||
}
|
||||
|
||||
.nw-sidebar-title {
|
||||
height: unset;
|
||||
max-height: unset;
|
||||
flex-direction: column;
|
||||
justify-content: center;
|
||||
gap: .25rem;
|
||||
font-size: 1.25rem;
|
||||
font-weight: normal;
|
||||
text-align: center;
|
||||
}
|
||||

|
Before Width: | Height: | Size: 27 KiB |

|
Before Width: | Height: | Size: 26 KiB |

|
Before Width: | Height: | Size: 30 KiB |
@@ -1,3 +0,0 @@
|
||||
{% if docstitle %}
|
||||
<p class="nw-sidebar-title">{{ docstitle }}</p>
|
||||
{% endif %}
|
||||
@@ -1,84 +1,140 @@
|
||||
"""
|
||||
Configuration file for the Sphinx documentation builder.
|
||||
Documentation: http://www.sphinx-doc.org/en/master/config
|
||||
"""
|
||||
#
|
||||
# Configuration file for the Sphinx documentation builder.
|
||||
#
|
||||
# This file does only contain a selection of the most common options. For a
|
||||
# full list see the documentation:
|
||||
# http://www.sphinx-doc.org/en/master/config
|
||||
|
||||
# -- Imports -----------------------------------------------------------------
|
||||
# -- Path setup --------------------------------------------------------------
|
||||
|
||||
# If extensions (or modules to document with autodoc) are in another directory,
|
||||
# add these directories to sys.path here. If the directory is relative to the
|
||||
# documentation root, use os.path.abspath to make it absolute, like shown here.
|
||||
#
|
||||
# import sys
|
||||
# sys.path.insert(0, os.path.abspath("."))
|
||||
import os
|
||||
import time
|
||||
import datetime
|
||||
import sphinx_rtd_theme # noqa: F401
|
||||
|
||||
# -- Project Information -----------------------------------------------------
|
||||
# -- Project information -----------------------------------------------------
|
||||
|
||||
project = "novelWriter"
|
||||
copyright = f"{datetime.date.today().year}"
|
||||
copyright = "2018–2021, Veronica Berglyd Olsen"
|
||||
author = "Veronica Berglyd Olsen"
|
||||
|
||||
initFile = os.path.join(
|
||||
os.path.dirname(__file__), os.pardir, os.pardir,
|
||||
"novelwriter", "__init__.py"
|
||||
)
|
||||
with open(initFile) as inFile:
|
||||
for aLine in inFile:
|
||||
if aLine.startswith("__version__"):
|
||||
release = aLine.split('"')[1].strip()
|
||||
break
|
||||
else:
|
||||
release = "unknown"
|
||||
# The short X.Y version
|
||||
version = "1.4"
|
||||
# The full version, including alpha/beta/rc tags
|
||||
release = "1.4"
|
||||
|
||||
version = release.partition("-")[0]
|
||||
|
||||
# -- General Configuration ---------------------------------------------------
|
||||
# -- General configuration ---------------------------------------------------
|
||||
|
||||
os.environ["TZ"] = "Europe/Oslo"
|
||||
time.tzset()
|
||||
|
||||
needs_sphinx = "5.0"
|
||||
extensions = ["sphinx_design"]
|
||||
# needs_sphinx = "1.0"
|
||||
extensions = [
|
||||
"sphinx_rtd_theme",
|
||||
]
|
||||
templates_path = ["_templates"]
|
||||
source_suffix = ".rst"
|
||||
master_doc = "index"
|
||||
today_fmt = "%A, %d %B %Y at %H:%M"
|
||||
language = "en"
|
||||
language = None
|
||||
exclude_patterns = []
|
||||
pygments_style = None
|
||||
|
||||
# -- Options for HTML Output -------------------------------------------------
|
||||
# -- Options for HTML output -------------------------------------------------
|
||||
|
||||
html_theme = "sphinx_book_theme"
|
||||
html_title = f"Version {release}"
|
||||
html_static_path = ["_static"]
|
||||
html_css_files = ["custom.css"]
|
||||
html_theme = "sphinx_rtd_theme"
|
||||
html_logo = "images/novelwriter.png"
|
||||
html_theme_options = {
|
||||
"logo": {
|
||||
"image_light": "_static/novelwriter-light.png",
|
||||
"image_dark": "_static/novelwriter-dark.png",
|
||||
},
|
||||
"show_toc_level": 2,
|
||||
"show_navbar_depth": 1,
|
||||
"repository_url": "https://github.com/vkbo/novelwriter",
|
||||
"navigation_with_keys": True,
|
||||
"use_repository_button": True,
|
||||
"use_issues_button": True,
|
||||
"pygment_light_style": "tango",
|
||||
"pygment_dark_style": "dracula",
|
||||
}
|
||||
html_sidebars = {
|
||||
"**": ["navbar-logo", "sidebar-title", "sbt-sidebar-nav"],
|
||||
# Toc options
|
||||
"collapse_navigation": True,
|
||||
"sticky_navigation": True,
|
||||
"navigation_depth": 3,
|
||||
"includehidden": True,
|
||||
"titles_only": False,
|
||||
"logo_only": True,
|
||||
}
|
||||
|
||||
# -- Options for LaTeX Output ------------------------------------------------
|
||||
html_static_path = ["_static"]
|
||||
html_css_files = [
|
||||
"css/custom.css",
|
||||
]
|
||||
|
||||
# Custom sidebar templates, must be a dictionary that maps document names
|
||||
# to template names.
|
||||
# The default sidebars (for documents that don"t match any pattern) are
|
||||
# defined by theme itself. Builtin themes are using these templates by
|
||||
# default: ``["localtoc.html", "relations.html", "sourcelink.html",
|
||||
# "searchbox.html"]``.
|
||||
# html_sidebars = {}
|
||||
|
||||
# -- Options for HTMLHelp output ---------------------------------------------
|
||||
|
||||
# Output file base name for HTML help builder.
|
||||
htmlhelp_basename = "novelWriterDoc"
|
||||
|
||||
# -- Options for LaTeX output ------------------------------------------------
|
||||
|
||||
latex_elements = {
|
||||
"papersize": "a4paper",
|
||||
"pointsize": "11pt",
|
||||
"preamble": (
|
||||
"\\usepackage[utf8]{inputenc}\n"
|
||||
"\\DeclareUnicodeCharacter{2212}{\\textendash}\n"
|
||||
),
|
||||
"figure_align": "htbp",
|
||||
# The paper size ("letterpaper" or "a4paper").
|
||||
#
|
||||
# "papersize": "letterpaper",
|
||||
|
||||
# The font size ("10pt", "11pt" or "12pt").
|
||||
#
|
||||
# "pointsize": "10pt",
|
||||
|
||||
# Additional stuff for the LaTeX preamble.
|
||||
#
|
||||
# "preamble": "",
|
||||
|
||||
# Latex figure (float) alignment
|
||||
#
|
||||
# "figure_align": "htbp",
|
||||
}
|
||||
latex_logo = "_static/novelwriter-pdf.png"
|
||||
|
||||
# Grouping the document tree into LaTeX files. List of tuples
|
||||
# (source start file, target name, title,
|
||||
# author, documentclass [howto, manual, or own class]).
|
||||
latex_documents = [(
|
||||
master_doc, "manual.tex", "User Guide", author, "manual"
|
||||
master_doc, "novelWriter.tex", "novelWriter Documentation",
|
||||
author, "manual"
|
||||
)]
|
||||
|
||||
# -- Options for manual page output ------------------------------------------
|
||||
|
||||
# One entry per manual page. List of tuples
|
||||
# (source start file, name, description, authors, manual section).
|
||||
man_pages = [(
|
||||
master_doc, "novelwriter", "novelWriter Documentation", [author], 1
|
||||
)]
|
||||
|
||||
# -- Options for Texinfo output ----------------------------------------------
|
||||
|
||||
# Grouping the document tree into Texinfo files. List of tuples
|
||||
# (source start file, target name, title, author,
|
||||
# dir menu entry, description, category)
|
||||
texinfo_documents = [(
|
||||
master_doc, "novelWriter", "novelWriter Documentation", author,
|
||||
"novelWriter", "Markdown-like editor for novels.", "Miscellaneous"
|
||||
)]
|
||||
|
||||
# -- Options for Epub output -------------------------------------------------
|
||||
|
||||
# Bibliographic Dublin Core info.
|
||||
epub_title = project
|
||||
|
||||
# The unique identifier of the text. This can be a ISBN number
|
||||
# or the project homepage.
|
||||
# epub_identifier = ""
|
||||
|
||||
# A unique identification for the text.
|
||||
# epub_uid = ""
|
||||
|
||||
# A list of files that should not be packed into the epub file.
|
||||
epub_exclude_files = ["search.html"]
|
||||
|
||||

|
Before Width: | Height: | Size: 62 KiB |

|
Before Width: | Height: | Size: 54 KiB |

|
Before Width: | Height: | Size: 86 KiB |

|
Before Width: | Height: | Size: 154 KiB |

|
Before Width: | Height: | Size: 7.1 KiB |

|
Before Width: | Height: | Size: 18 KiB |

|
Before Width: | Height: | Size: 99 KiB |

|
Before Width: | Height: | Size: 241 KiB |

|
Before Width: | Height: | Size: 137 KiB |

|
Before Width: | Height: | Size: 26 KiB |

|
Before Width: | Height: | Size: 36 KiB |

|
Before Width: | Height: | Size: 147 KiB |

|
Before Width: | Height: | Size: 273 KiB |

|
Before Width: | Height: | Size: 26 KiB |

|
Before Width: | Height: | Size: 124 KiB |
BIN
docs/source/images/novelwriter.png
Normal file

|
After Width: | Height: | Size: 22 KiB |

|
Before Width: | Height: | Size: 30 KiB |
BIN
docs/source/images/python_win_install.png
Normal file

|
After Width: | Height: | Size: 96 KiB |

|
Before Width: | Height: | Size: 542 KiB After Width: | Height: | Size: 423 KiB |

|
Before Width: | Height: | Size: 562 KiB After Width: | Height: | Size: 431 KiB |

|
Before Width: | Height: | Size: 335 KiB |
@@ -1,89 +1,94 @@
|
||||
######################
|
||||
novelWriter User Guide
|
||||
######################
|
||||
#####################
|
||||
novelWriter |release|
|
||||
#####################
|
||||
|
||||
| **Release Version:** |release|
|
||||
| **Updated:** |today|
|
||||
.. image:: https://github.com/vkbo/novelWriter/workflows/python%203.8/badge.svg?branch=main
|
||||
:target: https://github.com/vkbo/novelWriter/actions
|
||||
:alt: Python Tests
|
||||
|
||||
novelWriter is an open source plain text editor designed for writing novels assembled from many
|
||||
smaller text documents. It uses a minimal formatting syntax inspired by Markdown, and adds a meta
|
||||
data syntax for comments, synopsis, and cross-referencing. It is designed to be a simple text
|
||||
editor that allows for easy organisation of text and notes, using human readable text files as
|
||||
storage for robustness.
|
||||
.. image:: https://codecov.io/gh/vkbo/novelWriter/branch/main/graph/badge.svg
|
||||
:target: https://codecov.io/gh/vkbo/novelWriter
|
||||
:alt: Code Coverage
|
||||
|
||||
.. figure:: images/screenshot_multi.png
|
||||
:class: dark-light
|
||||
:align: center
|
||||
:width: 500
|
||||
.. image:: https://readthedocs.org/projects/novelwriter/badge/?version=latest
|
||||
:target: https://novelwriter.readthedocs.io/en/latest/?badge=latest
|
||||
:alt: Documentation
|
||||
|
||||
The project storage is suitable for version control software, and also well suited for file
|
||||
synchronisation tools. All text is saved as plain text files with a meta data header. The core
|
||||
project structure is stored in a single project XML file. Other meta data is saved as JSON files.
|
||||
See the :ref:`a_breakdown_storage` section for more details.
|
||||
.. image:: https://img.shields.io/github/v/release/vkbo/novelwriter
|
||||
:target: https://github.com/vkbo/novelWriter/releases
|
||||
:alt: GitHub Release
|
||||
|
||||
.. image:: https://img.shields.io/pypi/v/novelwriter
|
||||
:target: https://pypi.org/project/novelWriter/
|
||||
:alt: PyPI
|
||||
|
||||
.. image:: https://img.shields.io/pypi/pyversions/novelwriter
|
||||
:target: https://pypi.org/project/novelWriter/
|
||||
:alt: Python Version
|
||||
|
||||
**Last Updated:** |today|
|
||||
|
||||
novelWriter is a markdown-like text editor designed for writing novels and larger projects of many
|
||||
smaller plain text documents. It uses its own flavour of markdown that supports a meta data syntax
|
||||
for comments, synopsis and cross-referencing between documents. The idea is to have a simple text
|
||||
editor which allows for easy organisation of text documents and notes, built on a plain text file
|
||||
project repository for robustness.
|
||||
|
||||
The plain text storage is suitable for version control software, and also well suited for file
|
||||
synchronisation tools. The core project structure is stored in a single project XML file. Other
|
||||
meta data is primarily saved as JSON files.
|
||||
|
||||
Any operating system that can run Python 3 and has the Qt 5 libraries should be able to run
|
||||
novelWriter. It runs fine on Linux, Windows and MacOS, and users have tested it on other platforms
|
||||
as well. novelWriter can also be run directly from the Python source, or installed from packages or
|
||||
with pip. See :ref:`a_started` for more details.
|
||||
novelWriter. It runs fine on Linux, Windows and macOS, and users have tested it on other platforms
|
||||
too. novelWriter can be run directly from the Python source, or installed from the pip tool or via
|
||||
the provided setup script. See :ref:`a_started`, or one or the setup instructions for your
|
||||
operating system for further details.
|
||||
|
||||
**Useful Links**
|
||||
|
||||
* Website: https://novelwriter.io
|
||||
* Documentation: https://docs.novelwriter.io
|
||||
* Internationalisation: https://crowdin.com/project/novelwriter
|
||||
* Documentation: https://novelwriter.readthedocs.io
|
||||
* Source Code: https://github.com/vkbo/novelWriter
|
||||
* Source Releases: https://github.com/vkbo/novelWriter/releases
|
||||
* Issue Tracker: https://github.com/vkbo/novelWriter/issues
|
||||
* Feature Discussions: https://github.com/vkbo/novelWriter/discussions
|
||||
* PyPi Project: https://pypi.org/project/novelWriter
|
||||
* Social Media: https://fosstodon.org/@novelwriter
|
||||
|
||||
|
||||
.. toctree::
|
||||
:hidden:
|
||||
|
||||
Main Page <self>
|
||||
|
||||
.. toctree::
|
||||
:maxdepth: 1
|
||||
:maxdepth: 2
|
||||
:caption: Introduction
|
||||
:hidden:
|
||||
|
||||
int_introduction
|
||||
int_overview
|
||||
int_started
|
||||
int_howto
|
||||
int_customise
|
||||
int_glossary
|
||||
setup_linux
|
||||
setup_mac
|
||||
setup_windows
|
||||
|
||||
|
||||
.. toctree::
|
||||
:maxdepth: 1
|
||||
:caption: Using novelWriter
|
||||
:hidden:
|
||||
:maxdepth: 2
|
||||
:caption: Usage
|
||||
|
||||
usage_breakdown
|
||||
usage_project
|
||||
usage_writing
|
||||
usage_format
|
||||
usage_interface
|
||||
usage_shortcuts
|
||||
usage_projects
|
||||
usage_structure
|
||||
usage_notes
|
||||
usage_export
|
||||
usage_typography
|
||||
usage_projectformat
|
||||
|
||||
|
||||
.. toctree::
|
||||
:maxdepth: 1
|
||||
:caption: Organising Your Project
|
||||
:hidden:
|
||||
:maxdepth: 2
|
||||
:caption: Under the Hood
|
||||
|
||||
project_overview
|
||||
project_structure
|
||||
project_references
|
||||
project_manuscript
|
||||
tech_technical
|
||||
|
||||
.. toctree::
|
||||
:maxdepth: 1
|
||||
:caption: Additional Topics
|
||||
:hidden:
|
||||
|
||||
tech_locations
|
||||
tech_storage
|
||||
tech_source
|
||||
tech_tests
|
||||
Indices and Tables
|
||||
==================
|
||||
|
||||
* :ref:`genindex`
|
||||
* :ref:`modindex`
|
||||
* :ref:`search`
|
||||
|
||||
@@ -1,188 +0,0 @@
|
||||
.. _a_custom:
|
||||
|
||||
**************
|
||||
Customisations
|
||||
**************
|
||||
|
||||
.. _Enchant: https://abiword.github.io/enchant
|
||||
.. _Free Desktop: https://cgit.freedesktop.org/libreoffice/dictionaries/tree/
|
||||
|
||||
There are a few ways you can customise novelWriter yourself. Currently, you can add new GUI themes,
|
||||
your own syntax themes, and install additional dictionaries.
|
||||
|
||||
|
||||
.. _a_custom_dict:
|
||||
|
||||
Spell Check Dictionaries
|
||||
========================
|
||||
|
||||
novelWriter uses Enchant_ as the spell checking tool. Depending on your operating system, it may or
|
||||
may not load all installed spell check dictionaries automatically.
|
||||
|
||||
Linux and MacOS
|
||||
---------------
|
||||
|
||||
On Linux and MacOS, you generally only have to install hunspell, aspell or myspell dictionaries on
|
||||
your system like you do for other applications. See your distro or OS documentation for how to do
|
||||
this. These dictionaries should show up as available spell check languages in novelWriter.
|
||||
|
||||
Windows
|
||||
-------
|
||||
|
||||
For Windows, English is included with the installation. For other languages you have to download
|
||||
and add dictionaries yourself.
|
||||
|
||||
**Install Tool**
|
||||
|
||||
A small tool to assist with this can be found under :guilabel:`Tools > Add Dictionaries`. It will
|
||||
import spell checking dictionaries from Free Office or Libre Office extensions. The dictionaries
|
||||
are then installed in the install location for the Enchant library.
|
||||
|
||||
**Manual Install**
|
||||
|
||||
If you prefer to do this manually or want to use a different source than the ones mentioned above,
|
||||
You need to get compatible dictionary files for your language. You need two files files ending with
|
||||
``.aff`` and ``.dic``. These files must then be copied to the following location:
|
||||
|
||||
``C:\Users\<USER>\AppData\Local\enchant\hunspell``
|
||||
|
||||
This assumes your user profile is stored at ``C:\Users\<USER>``. The last one or two folders may
|
||||
not exist, so you may need to create them.
|
||||
|
||||
You can find the various dictionaries on the `Free Desktop`_ website.
|
||||
|
||||
.. note::
|
||||
The Free Desktop link points to a repository, and what may look like file links inside the
|
||||
dictionary folder are actually links to web pages. If you right-click and download those, you
|
||||
get HTML files, not dictionaries!
|
||||
|
||||
In order to download the actual dictionary files, right-click the "plain" label at the end of
|
||||
each line and download that.
|
||||
|
||||
|
||||
.. _a_custom_theme:
|
||||
|
||||
Syntax and GUI Themes
|
||||
=====================
|
||||
|
||||
Adding your own GUI and syntax themes is relatively easy, although it requires that you manually
|
||||
edit config files with colour values. The themes are defined by simple plain text config files with
|
||||
meta data and colour settings.
|
||||
|
||||
In order to make your own versions, first copy one of the existing files to your local computer and
|
||||
modify it as you like.
|
||||
|
||||
* The existing syntax themes are stored in
|
||||
`novelwriter/assets/syntax <https://github.com/vkbo/novelWriter/tree/main/novelwriter/assets/syntax>`_.
|
||||
* The existing GUI themes are stored in
|
||||
`novelwriter/assets/themes <https://github.com/vkbo/novelWriter/tree/main/novelwriter/assets/themes>`_.
|
||||
* The existing icon themes are stored in
|
||||
`novelwriter/assets/icons <https://github.com/vkbo/novelWriter/tree/main/novelwriter/assets/icons>`_.
|
||||
|
||||
Remember to also change the name of your theme by modifying the ``name`` setting at the top of the
|
||||
file, otherwise you may not be able to distinguish them in :guilabel:`Preferences`.
|
||||
|
||||
For novelWriter to be able to locate the custom theme files, you must copy them to the
|
||||
:ref:`a_locations_data` location in your home or user area. There should be a folder there named
|
||||
``syntax`` for syntax themes, just ``themes`` for GUI themes, and ``icons`` for icon themes. These
|
||||
folders are created the first time you start novelWriter.
|
||||
|
||||
Once the files are copied there, they should show up in :guilabel:`Preferences` with the label you
|
||||
set as ``name`` inside the file.
|
||||
|
||||
.. versionadded:: 2.0
|
||||
The ``icontheme`` value was added to GUI themes. Make sure you set this value in existing custom
|
||||
themes. Otherwise, novelWriter will try to guess your icon theme, and may not pick the most
|
||||
suitable one.
|
||||
|
||||
|
||||
Gustom GUI and Icons Theme
|
||||
--------------------------
|
||||
|
||||
A GUI theme ``.conf`` file consists of the following settings:
|
||||
|
||||
.. code-block:: cfg
|
||||
|
||||
[Main]
|
||||
name = My Custom Theme
|
||||
description = A description of my custom theme
|
||||
author = Jane Doe
|
||||
credit = John Doe
|
||||
url = https://example.com
|
||||
license = CC BY-SA 4.0
|
||||
licenseurl = https://creativecommons.org/licenses/by-sa/4.0/
|
||||
icontheme = typicons_light
|
||||
|
||||
[Palette]
|
||||
window = 100, 100, 100
|
||||
windowtext = 100, 100, 100
|
||||
base = 100, 100, 100
|
||||
alternatebase = 100, 100, 100
|
||||
text = 100, 100, 100
|
||||
tooltipbase = 100, 100, 100
|
||||
tooltiptext = 100, 100, 100
|
||||
button = 100, 100, 100
|
||||
buttontext = 100, 100, 100
|
||||
brighttext = 100, 100, 100
|
||||
highlight = 100, 100, 100
|
||||
highlightedtext = 100, 100, 100
|
||||
link = 100, 100, 100
|
||||
linkvisited = 100, 100, 100
|
||||
|
||||
[GUI]
|
||||
statusnone = 100, 100, 100
|
||||
statussaved = 100, 100, 100
|
||||
statusunsaved = 100, 100, 100
|
||||
|
||||
In the Main section you must at least define the ``name`` and ``icontheme`` settings. The
|
||||
``icontheme`` settings should correspond to one of the internal icon themes, either
|
||||
``typicons_light`` or ``typicons_dark``, or to an icon theme in your custom icons directory. The
|
||||
setting must match the icon theme's folder name.
|
||||
|
||||
The Palette values correspond to the Qt enum values for QPalette::ColorRole, see the
|
||||
`Qt documentation <https://doc.qt.io/qt-5.15/qpalette.html#ColorRole-enum>`_ for more details. The
|
||||
colour values are RGB numbers on the format ``r, g, b`` where each is an integer from to 255.
|
||||
Omitted values are not loaded and will use default values.
|
||||
|
||||
|
||||
Custom Syntax Theme
|
||||
-------------------
|
||||
|
||||
A syntax theme ``.conf`` file consists of the following settings:
|
||||
|
||||
.. code-block:: cfg
|
||||
|
||||
[Main]
|
||||
name = My Syntax Theme
|
||||
author = Jane Doe
|
||||
credit = John Doe
|
||||
url = https://example.com
|
||||
license = CC BY-SA 4.0
|
||||
licenseurl = https://creativecommons.org/licenses/by-sa/4.0/
|
||||
|
||||
[Syntax]
|
||||
background = 255, 255, 255
|
||||
text = 0, 0, 0
|
||||
link = 0, 0, 0
|
||||
headertext = 0, 0, 0
|
||||
headertag = 0, 0, 0
|
||||
emphasis = 0, 0, 0
|
||||
straightquotes = 0, 0, 0
|
||||
doublequotes = 0, 0, 0
|
||||
singlequotes = 0, 0, 0
|
||||
hidden = 0, 0, 0
|
||||
shortcode = 0, 0, 0
|
||||
keyword = 0, 0, 0
|
||||
value = 0, 0, 0
|
||||
spellcheckline = 0, 0, 0
|
||||
errorline = 0, 0, 0
|
||||
replacetag = 0, 0, 0
|
||||
modifier = 0, 0, 0
|
||||
|
||||
In the Main section, you must define at least the ``name`` setting. The Syntax colour values are
|
||||
RGB numbers of the format ``r, g, b`` where each is an integer from to 255. Omitted values default
|
||||
to black, except ``background`` which defaults to white,
|
||||
|
||||
.. versionadded:: 2.2
|
||||
The `shortcode` syntax colour entry was added, so you need to update your custom themes if you
|
||||
made any before version 2.2.
|
||||
@@ -1,64 +0,0 @@
|
||||
.. _a_glossary:
|
||||
|
||||
********
|
||||
Glossary
|
||||
********
|
||||
|
||||
.. glossary::
|
||||
:sorted:
|
||||
|
||||
Root Folder
|
||||
A "Root Folder" is a top level folder of the project tree in novelWriter. Each type of root
|
||||
folder has a specific icon to identify it. For an overview of available root folder types,
|
||||
see :ref:`a_proj_roots`.
|
||||
|
||||
Novel Documents
|
||||
These are documents that are created under a "Novel" :term:`root folder`. They behave
|
||||
differently than :term:`Project Notes`, and have some more restrictions. For instance, they
|
||||
can not exist in folders intended only for project notes. See the :ref:`a_struct` chapter for
|
||||
more details.
|
||||
|
||||
Project Notes
|
||||
Project Notes are unrestricted documents that can be placed anywhere in your project. You
|
||||
should not use these documents for story elements, only for notes. Project notes are the
|
||||
source files used by the Tags and References system. See the :ref:`a_references` chapter for
|
||||
more details on how to use them.
|
||||
|
||||
Tag
|
||||
A tag is a user defined value assigned as a tag to a section of your :term:`Project Notes`.
|
||||
It is optional, and can be defined once per heading. It is set using the :term:`keyword`
|
||||
syntax ``@tag: value``, where ``value`` is the user defined part. Each tag can be referenced
|
||||
in another file using one of the :term:`reference` keywords. See :ref:`a_references` chapter
|
||||
for more details.
|
||||
|
||||
Reference
|
||||
A reference is one of a set of :term:`keywords<keyword>` that can be used to link to a
|
||||
:term:`tag` in another document. The reference keywords are specific to the different
|
||||
:term:`root folder` types. A full overview is available in the :ref:`a_references` chapter.
|
||||
|
||||
Project Index
|
||||
The project index is a record of all headings in a project, with all their meta data like
|
||||
synopsis comments, :term:`tags<tag>` and :term:`references<reference>`. The project index is
|
||||
kept up to date automatically, but can also be regenerated manually from the
|
||||
:guilabel:`Tools` menu or by pressing :kbd:`F9`.
|
||||
|
||||
Context Menu
|
||||
A context menu is a menu that pops up when you right click something in the user interface.
|
||||
In novelWriter, you can often also open a context menu by pressing the keyboard shortcut
|
||||
:kbd:`Ctrl+.`.
|
||||
|
||||
Headings
|
||||
Each level of headings in :term:`Novel Documents` have a specific meaning in terms of the
|
||||
structure of the story. That is, they determine what novelWriter considers a partition, a
|
||||
chapter, a scene or a text section. For :term:`Project Notes`, the header levels don't
|
||||
matter. For more details on headings in novel documents, see :ref:`a_struct_heads`.
|
||||
|
||||
Keyword
|
||||
A keyword in novelWriter is a special command you put in the text of your documents. They are
|
||||
not standard Markdown, but are used in novelWriter to add information that is interpreted by
|
||||
the application. For instance, keywords are used for :term:`tags<tag>` and
|
||||
:term:`references<reference>`.
|
||||
|
||||
Keywords must always be on their own line, and the first character of the line must always be
|
||||
the ``@`` character. The keyword must also always be followed by a ``:`` character, and the
|
||||
values passed to the command are added after this, separated by commas.
|
||||
@@ -1,83 +0,0 @@
|
||||
.. _a_howto:
|
||||
|
||||
*************
|
||||
Tips & Tricks
|
||||
*************
|
||||
|
||||
.. _Discussions Page: https://github.com/vkbo/novelWriter/discussions
|
||||
|
||||
This is a list of hopefully helpful little tips on how to get the most out of novelWriter.
|
||||
|
||||
.. note::
|
||||
This section will be expanded over time. If you would like to have something added, feel free to
|
||||
contribute, or start a discussion on the project's `Discussions Page`_.
|
||||
|
||||
|
||||
Managing the Project
|
||||
====================
|
||||
|
||||
.. dropdown:: Merge Multiple Documents Into One
|
||||
:animate: fade-in-slide-down
|
||||
|
||||
If you need to merge a set of documents in your project into a single document, you can achieve
|
||||
this by first making a new folder for just that purpose, and drag all the files you want merged
|
||||
into this folder. Then you can right click the folder, select :guilabel:`Transform` and
|
||||
:guilabel:`Merge Documents in Folder`.
|
||||
|
||||
In the dialog that pops up, the documents will be in the same order as in the folder, but you
|
||||
can also rearrange them here of you wish. See :ref:`a_ui_tree_split_merge` for more details.
|
||||
|
||||
|
||||
Layout Tricks
|
||||
=============
|
||||
|
||||
.. dropdown:: Create a Simple Table
|
||||
:animate: fade-in-slide-down
|
||||
|
||||
The formatting tools available in novelWriter don't allow for complex structures like tables.
|
||||
However, the editor does render tabs in a similar way that regular word processors do. You can
|
||||
set the width of a tab in :guilabel:`Preferences`.
|
||||
|
||||
The tab key should have the same distance in the editor as in the viewer, so you can align text
|
||||
in columns using the tab key, and it should look the same when viewed next to the editor.
|
||||
|
||||
This is most suitable for your notes, as the result in exported documents cannot be guaranteed
|
||||
to match.
|
||||
|
||||
|
||||
Organising Your Text
|
||||
====================
|
||||
|
||||
.. dropdown:: Add Introductory Text to Chapters
|
||||
:animate: fade-in-slide-down
|
||||
|
||||
Sometimes chapters have a short preface, like a brief piece of text or a quote to set the stage
|
||||
before the first scene begins.
|
||||
|
||||
If you add separate files for chapters and scenes, the chapter file is the perfect place to add
|
||||
such text. Separating chapter and scene files also allows you to make scene files child
|
||||
documents of the chapter (added in novelWriter 2.0).
|
||||
|
||||
.. dropdown:: Distinguishing Soft and Hard Scene Breaks
|
||||
:animate: fade-in-slide-down
|
||||
|
||||
Depending on your writing style, you may need to separate between soft and hard scene breaks
|
||||
within chapters. Like for instance if you switch point-of-view character often.
|
||||
|
||||
In such cases you may want to use the scene heading for hard scene breaks and section headings
|
||||
for soft scene breaks. the :guilabel:`Build Manuscript` tool will let you add separate
|
||||
formatting for the two when you generate your manuscript. You can for instance add the common
|
||||
"``* * *``" for hard breaks and select to hide section breaks, which will just insert an empty
|
||||
paragraph in their place. See :ref:`a_manuscript_settings` for more details.
|
||||
|
||||
|
||||
Other Tools
|
||||
===========
|
||||
|
||||
.. dropdown:: Convert Project to/from yWriter Format
|
||||
:animate: fade-in-slide-down
|
||||
|
||||
There is a tool available that lets you convert a `yWriter <http://spacejock.com/yWriter7.html>`_
|
||||
project to a novelWriter project, and vice versa.
|
||||
|
||||
The tool is available at `peter88213.github.io/yw2nw <https://peter88213.github.io/yw2nw/>`__
|
||||
@@ -1,84 +1,117 @@
|
||||
.. _a_intro:
|
||||
|
||||
************
|
||||
Key Features
|
||||
Introduction
|
||||
************
|
||||
|
||||
.. _Snowflake: https://www.advancedfictionwriting.com/articles/snowflake-method/
|
||||
.. _Markdown: https://en.wikipedia.org/wiki/Markdown
|
||||
novelWriter is a simple, multi-document plain text editor using a modified markdown syntax to apply
|
||||
simple formatting to the text. It is designed for writing novels, and allows for the component
|
||||
documents to be ordered freely to create the desired structure of the novel. More details about how
|
||||
projects are structured is covered in :ref:`a_struct`.
|
||||
|
||||
At its core, novelWriter is a multi-document plain text editor. It uses a markup syntax inspired by
|
||||
Markdown_ to apply simple formatting to the text. It is designed for writing fiction, so the
|
||||
formatting features available are limited to those relevant for this purpose. It is *not* suitable
|
||||
for technical writing, and it is *not* a full-featured Markdown editor.
|
||||
In addition, the project can contain notes on the various plot elements, characters, locations,
|
||||
etc, that make up the story. These notes are organised in a set of category-specific top-level
|
||||
folders referred to as "root" folders, and each entry can be tagged and cross-referenced from
|
||||
within the novel documents and notes. These tags make it possible to inter-link documents, and
|
||||
generate an overview of the entire novel project and how the various documents and plot elements
|
||||
are interconnected. The tag and reference syntax is covered in :ref:`a_proj` and :ref:`a_notes`.
|
||||
|
||||
Your novel project is organised as a collection of separate plain text documents instead of a
|
||||
single, large document. The idea is to make it easier to reorganise your project structure without
|
||||
having to cut and paste text between chapters.
|
||||
These additional features are not standard in markdown, but are available through special meta
|
||||
keywords described in :ref:`a_struct_tags`. Syntax highlighting is provided to make it easier to
|
||||
verify that the markdown tags are used correctly.
|
||||
|
||||
There are two kinds of documents in your project: :term:`Novel Documents` are documents that are
|
||||
part of your story. The other kind of documents are :term:`Project Notes`. These are intended for
|
||||
your notes about your characters, your world building, and so on.
|
||||
An overview of the supported markdown syntax is covered in :ref:`a_ui`.
|
||||
|
||||
You can at any point split the individual documents by their headers up into multiple documents, or
|
||||
merge multiple documents into single documents. This makes it easier to use variations of the
|
||||
Snowflake_ method for writing. You can start by writing larger structure-focused documents, like
|
||||
one per act for instance, and later effortlessly split these up into scenes by their headers.
|
||||
|
||||
Below are some key features of novelWriter.
|
||||
.. _a_intro_design:
|
||||
|
||||
**Focus on writing**
|
||||
The aim of the user interface is to let you focus on writing instead of spending time formatting
|
||||
text. Formatting is therefore limited to a small set of formatting tags for simple things like
|
||||
text emphasis and paragraph alignment. When you really want to focus on just writing, you can
|
||||
switch the editor into :guilabel:`Focus Mode` where only the text editor panel itself is
|
||||
visible, and the project structure view is hidden away.
|
||||
Design Philosophy
|
||||
=================
|
||||
|
||||
**Keep an eye on your notes**
|
||||
The main window can optionally show a document viewer to the right of the editor. This view
|
||||
panel is intended for displaying another scene document, your character notes, plot notes, or any
|
||||
other document you may need to reference while writing. It is not intended as a preview panel
|
||||
for the document you're editing, but if you wish, you can also use it for this purpose.
|
||||
The user interface of novelWriter is intended to be as minimalistic as practically possible, while
|
||||
at the same time provide a complete set of features needed for writing a novel.
|
||||
|
||||
**Organise your documents how you like**
|
||||
You can split your novel project up into as many individual documents as you want to. When you
|
||||
build the project into a manuscript, they are all glued together in the top-to-bottom order in
|
||||
which they appear in the project tree. You can use as few text documents as you like, but
|
||||
splitting the project up into chapters and scenes means you can easily reorder them using the
|
||||
drag-and-drop feature of the project tree. You can also start out with a few documents and then
|
||||
later split them into multiple documents based on their headers.
|
||||
.. note::
|
||||
novelWriter is not intended to be a full office type word processor. It doesn't support images,
|
||||
links, tables, and other complex structures and objects often needed for such documents.
|
||||
Formatting is limited to headers, and bold, italicised and strikethrough text.
|
||||
|
||||
**Multi-novel project support**
|
||||
As of novelWriter 2.0, you can have multiple Novel type root folders in a project. This allows
|
||||
you to keep a series of individual novels with the same characters and world building in the
|
||||
same project, and create manuscripts for them individually.
|
||||
.. tip::
|
||||
If you do need to align information in rows and columns in your notes, you can achieve this with
|
||||
tabs and line breaks. The tab stop width can be specified in :guilabel:`Preferences`.
|
||||
|
||||
**Keep track of your plot elements**
|
||||
All notes in your project can be assigned a :term:`tag` that you can :term:`reference` from any
|
||||
other document or note. In fact, you can add a new tag under each heading of a note if you need
|
||||
to be able to reference specific sections of it.
|
||||
The main window does not have a toolbar like many other applications do. This reduces clutter, and
|
||||
since the documents are formatted with markdown tags, is more or less redundant. However, all
|
||||
formatting features supported are available through convenient keyboard shortcuts. They are also
|
||||
available in the main menu so you don't have to look up the syntax every time until you've
|
||||
memorised it. A full list of shortcuts can be found in the :ref:`a_kb` section.
|
||||
|
||||
**Get an overview of your story**
|
||||
In the :guilabel:`Outline View` on the main window you can see an outline of all the chapters,
|
||||
scenes, and sections of your project. If they have any references in them, these are listed in
|
||||
additional columns. You can also add a synopsis to each chapter or scene, which can be listed
|
||||
here as well. You have the option to add or remove columns of information from this outline. A
|
||||
subset of the outline information is also available in the :guilabel:`Novel View` as an
|
||||
alternative view to the project tree.
|
||||
In addition, novelWriter has a :guilabel:`Focus Mode` where all the user interface elements other
|
||||
than the document editor itself are hidden away.
|
||||
|
||||
**Get an overview of your story elements**
|
||||
Under the document viewer panel you will find a series of tabs that shows the different story
|
||||
elements you have created tags for. The tabs are sorted into Characters, Plots, etc, depending
|
||||
on which categories you are using in your story. This panel can be hidden when you don't need it
|
||||
to free up space.
|
||||
The colour scheme of the user interface defaults to that of the host operating system. In addition,
|
||||
other light and dark themes are provided, and can be enabled in :guilabel:`Preferences` from the
|
||||
:guilabel:`Tools` menu. A number of syntax highlighting themes are also available in
|
||||
:guilabel:`Preferences`. A set of icon themes in colour and greyscale are also offered. The icons
|
||||
are based on the Typicons_ icon set designed by Stephen Hutchings.
|
||||
|
||||
**Building your manuscript**
|
||||
Whether you want to assemble a manuscript, or export all your notes, or generate an outline of
|
||||
your chapters and scenes with a synopsis, you can use the :guilabel:`Build Manuscript` tool to
|
||||
do so. The tool lets you select what information you want to include in the generated document,
|
||||
and how it is formatted. You can send the result to a printer, a PDF, or to an Open Document
|
||||
file that can be opened by most office type word processors. You can also generate the result
|
||||
as HTML, or Markdown, both suitable for further conversion to other formats.
|
||||
The main window is split in two, or optionally three, panels. The left-most panel contains the
|
||||
project tree and all the documents in your project. The second panel is the document editor, and
|
||||
the optional third panel is a document viewer which can view any document in your project
|
||||
independently of the document editor. It is not intended as a preview window, although you can use
|
||||
it for this, but for viewing your notes next to your editor while you're writing.
|
||||
|
||||
A second tab is also available on the main window. This is the :guilabel:`Outline` tab where the
|
||||
entire novel structure can be displayed, with all the tags and references listed. Depending on how
|
||||
you structure your novel documents, this outline can be quite different from your project tree.
|
||||
Your project tree lists individual documents, your Outline tree lists the structure of the novel
|
||||
itself in terms of partitions, chapters and scenes as it appears in the text of the documents.
|
||||
|
||||
.. _Typicons: https://github.com/stephenhutchings/typicons.font
|
||||
|
||||
|
||||
.. _a_intro_project:
|
||||
|
||||
Project Layout
|
||||
==============
|
||||
|
||||
You are free to organise your project documents as you wish into subfolders, and split the text
|
||||
between documents in whatever way suits you. All that matters to novelWriter is the linear order
|
||||
the documents appear at in the project tree (top to bottom). The chapters, scenes and sections of
|
||||
the novel are determined by the headings within those documents.
|
||||
|
||||
The four heading levels (**H1** to **H4**) are treated as follows:
|
||||
|
||||
* **H1** is used for the book title, and for partitions.
|
||||
* **H2** is used for chapter tiles.
|
||||
* **H3** is used for scene titles – optionally replaced by separators.
|
||||
* **H4** is for section titles within scenes, if such granularity is needed.
|
||||
|
||||
This header level structure is only taken into account for novel documents. For the project notes,
|
||||
the header levels have no structural meaning, and the user is free to do whatever they want. See
|
||||
:ref:`a_struct` and :ref:`a_notes` for more details.
|
||||
|
||||
|
||||
.. _a_intro_export:
|
||||
|
||||
Project Export
|
||||
==============
|
||||
|
||||
The project can at any time be exported to a range of different formats through the
|
||||
:guilabel:`Build Novel Project` tool. Natively, novelWriter supports export to Open Document,
|
||||
HTML5, and various flavours of Markdown.
|
||||
|
||||
The HTML5 export format is suitable for conversion by a number of other tools like Pandoc, or for
|
||||
importing into word processors if the Open Document format isn't suitable. In addition, printing
|
||||
and printing to PDF is also possible.
|
||||
|
||||
It is also possible to export the content of the project to a JSON file. This is useful if you want
|
||||
to write your own processing script in for instance Python as the entire novel can be read into a
|
||||
Python dictionary with a couple of lines of code.
|
||||
|
||||
A number of filter options can be applied to the produced document, allowing you to export a draft
|
||||
manuscript, a reference document of notes, an outline based on chapter and scene titles with a
|
||||
synopsis each, and so on. See :ref:`a_export` for more details on export features and formats.
|
||||
|
||||
|
||||
.. _a_intro_screenshots:
|
||||
@@ -86,12 +119,12 @@ Below are some key features of novelWriter.
|
||||
Screenshots
|
||||
===========
|
||||
|
||||
.. figure:: images/screenshot_default.png
|
||||
:class: dark-light
|
||||
**novelWriter with default system theme:**
|
||||
|
||||
novelWriter with light colour theme
|
||||
.. image:: images/screenshot_default.png
|
||||
:width: 800
|
||||
|
||||
.. figure:: images/screenshot_dark.png
|
||||
:class: dark-light
|
||||
**novelWriter with dark theme:**
|
||||
|
||||
novelWriter with dark colour theme
|
||||
.. image:: images/screenshot_dark.png
|
||||
:width: 800
|
||||
|
||||
@@ -1,92 +0,0 @@
|
||||
.. _a_overview:
|
||||
|
||||
********
|
||||
Overview
|
||||
********
|
||||
|
||||
.. only:: html
|
||||
|
||||
.. image:: images/python_powered.png
|
||||
:align: right
|
||||
:width: 220
|
||||
|
||||
novelWriter is built as a cross-platform application using `Python 3 <https://www.python.org/>`_ as
|
||||
the programming language, and `Qt 5 <https://www.qt.io/>`_ for the user interface.
|
||||
|
||||
novelWriter is built for Linux first, and this is where it works best. However, it also runs fine
|
||||
on Windows and MacOS due to the cross-platform framework it's built on. The author of the
|
||||
application doesn't own a Mac, so on-going Mac support is dependent on user feedback and user
|
||||
contributions.
|
||||
|
||||
Spell checking in novelWriter is provided by a third party library called
|
||||
`Enchant <https://abiword.github.io/enchant/>`_. Please see the section on :ref:`a_custom_dict` for
|
||||
how to install spell checking languages.
|
||||
|
||||
For install instructions, see :ref:`a_started`.
|
||||
|
||||
|
||||
Using novelWriter
|
||||
=================
|
||||
|
||||
In order to use novelWriter effectively, you need to know the basics of how it works. The following
|
||||
chapters will explain the main principles. It starts with the basics, and gets more detailed as you
|
||||
read on.
|
||||
|
||||
:ref:`a_breakdown` – Essential Information
|
||||
This chapter explains the basics of how the application works and what it can and cannot do.
|
||||
|
||||
:ref:`a_ui_project` – Recommended Reading
|
||||
This chapter will give you a more detailed explanation of how you can use the user interface
|
||||
components to organise and view your project work.
|
||||
|
||||
:ref:`a_ui_writing` – Recommended Reading
|
||||
This chapter will give you a more detailed explanation of how the text editor and viewer work.
|
||||
|
||||
:ref:`a_fmt` – Essential Information
|
||||
This chapter covers how you should format your text. The editor is plain text, so text
|
||||
formatting requires some basic markup. The structure of your novel is also inferred from how you
|
||||
use headings. Tags and references are implemented by special keywords.
|
||||
|
||||
:ref:`a_kb` – Optional / Lookup
|
||||
This chapter lists all the keyboard shortcuts in novelWriter and what they do. Most of the
|
||||
shortcuts are also listed next to their menu entries inside the app, or in tool tips. This
|
||||
chapter is mostly for reference.
|
||||
|
||||
:ref:`a_typ` – Optional
|
||||
This chapter gives you an overview of the special typographical symbols available in
|
||||
novelWriter. The auto-replace feature can handle the insertion of standard quote symbols for
|
||||
your language, and other special characters. If you use any symbols aside from these, their
|
||||
intended use is explained here.
|
||||
|
||||
:ref:`a_prjfmt` – Optional
|
||||
This chapter is more technical and has an overview of changes made to the way your project data
|
||||
is stored. The format has changed a bit from time to time, and sometimes the changes require
|
||||
that you make small modifications to your project. Everything you need to know is listed in this
|
||||
chapter.
|
||||
|
||||
|
||||
Organising Your Projects
|
||||
========================
|
||||
|
||||
In addition to managing a collection of plain text files, novelWriter can interpret and map the
|
||||
structure of your novel and show you additional information about its flow and content. In order
|
||||
to take advantage of these features, you must structure your text in a specific way and add some
|
||||
meta data for it to extract.
|
||||
|
||||
:ref:`a_proj` – Essential Information
|
||||
This chapter explains how you organise the content of your project, and how to set up automated
|
||||
backups of your work.
|
||||
|
||||
:ref:`a_struct` – Essential Information
|
||||
This chapter covers the way your novel's structure is encoded into the text documents. It
|
||||
explains how the different levels of headings are used, and some special formatting for
|
||||
different kinds of headings.
|
||||
|
||||
:ref:`a_references` - Recommended Reading
|
||||
This chapter explains how you organise your notes, and how the Tags and References system works.
|
||||
This system lets you cross-link your documents in your project, and display these references in
|
||||
the application interface.
|
||||
|
||||
:ref:`a_manuscript` - Recommended Reading
|
||||
This chapter explains how the :guilabel:`Manuscript Build` tool works, how you can control the
|
||||
way chapter titles are formatted, and how scene and section breaks are handled.
|
||||
@@ -4,175 +4,167 @@
|
||||
Getting Started
|
||||
***************
|
||||
|
||||
.. _Enchant: https://abiword.github.io/enchant/
|
||||
.. _GitHub: https://github.com/vkbo/novelWriter
|
||||
.. _main website: https://novelwriter.io
|
||||
.. _PPA: https://launchpad.net/~vkbo/+archive/ubuntu/novelwriter
|
||||
.. _Pre-Release PPA: https://launchpad.net/~vkbo/+archive/ubuntu/novelwriter-pre
|
||||
.. _GitHub: https://github.com/vkbo/novelWriter/releases
|
||||
.. _PyPi: https://pypi.org/project/novelWriter/
|
||||
.. _python.org: https://www.python.org/downloads/
|
||||
.. _Releases: https://github.com/vkbo/novelWriter/releases
|
||||
.. _AppImage: https://appimage.org/
|
||||
|
||||
Ready-made packages and installers for novelWriter are available for all major platforms, including
|
||||
Linux, Windows and MacOS. See below for install instructions for each platform.
|
||||
This section contains brief guides to how you can get novelWriter running on your computer. These
|
||||
are the methods currently supported by the developer. Packages may also be available in other
|
||||
package managers, but those are not managed by the developer. No installers are provided at this
|
||||
time, but it is fairly straightforward to set up novelWriter with the provided install scripts.
|
||||
|
||||
You can also install novelWriter from the Python Package Index (PyPi). See :ref:`a_started_pip`.
|
||||
Installing from PyPi does not set up icon launchers, so you will either have to do this yourself,
|
||||
or start novelWriter from the command line.
|
||||
As novelWriter matures, more options for how to install it and get it running will be added. For
|
||||
non-Windows users the install process is at the present time best suited for people used to working
|
||||
with the command line. But even if you're not, the install process is fairly straightforward.
|
||||
|
||||
Spell checking in novelWriter is provided by a third party library called Enchant_. Generally, it
|
||||
should pull dictionaries from your operating system automatically. However, on Windows they must be
|
||||
installed manually. See :ref:`a_custom_dict` for more details.
|
||||
|
||||
|
||||
.. _a_started_windows:
|
||||
|
||||
Installing on Windows
|
||||
=====================
|
||||
|
||||
You can install novelWriter with both Python and library dependencies embedded using the Windows
|
||||
Installer (setup.exe) file from the `main website`_, or from the Releases_ page on GitHub_.
|
||||
Installing it should be straightforward.
|
||||
|
||||
If you have any issues, try uninstalling the previous version and making a fresh install. If you
|
||||
already had a version installed via a different method, you should uninstall that first as having
|
||||
multiple installations has been known to cause problems.
|
||||
The next pages have specific install instructions for the various operating systems novelWriter can
|
||||
run on. The instructions below are supplementary information, instructions for alterbative methods,
|
||||
and additional build options.
|
||||
|
||||
.. note::
|
||||
The novelWriter installer is not signed because Microsoft doesn't currently provide a way for
|
||||
non-profit open source projects to properly sign their installers. The novelWriter project
|
||||
doesn't have the funding to pay for commercial software signing certificates. You will therefore
|
||||
see an additional warning about this when you download the installer.
|
||||
The text below assumes the command ``python`` corresponds to a Python 3 executable. Python 2 is
|
||||
now deprecated, but many systems still have both Python 2 and 3. For such systems, the command
|
||||
``python3`` may be needed instead. On Linux, the scripts can also be made executable and run
|
||||
without the ``python`` command. Likewise, ``pip`` may need to be replaced with ``pip3``.
|
||||
|
||||
|
||||
.. _a_started_linux:
|
||||
.. _a_started_depend:
|
||||
|
||||
Installing on Linux
|
||||
Dependencies
|
||||
============
|
||||
|
||||
novelWriter has been designed to rely on as few dependencies as possible. Aside from the packages
|
||||
needed to communicate with the Qt GUI libraries, only one package is required for handling the XML
|
||||
format of the main project file. Everything else is handled with standard Python libraries.
|
||||
|
||||
The following Python packages are needed to run novelWriter:
|
||||
|
||||
* ``pyqt5`` – needed for connecting with the Qt5 libraries.
|
||||
* ``lxml`` – needed for full XML support.
|
||||
* ``pyenchant`` – needed for efficient spell checking (optional).
|
||||
|
||||
PyQt/Qt should be at least 5.3, but ideally 5.10 or higher for nearly all features to work. For
|
||||
instance, searching using regular expressions with full Unicode support requires 5.13. There is no
|
||||
known minimum version requirement for package ``lxml``, but the code was originally written with
|
||||
4.2, which is therefore set as the minimum. It may work on lower versions. You have to test it.
|
||||
|
||||
Optionally, a package can be installed to interface with the Enchant spell checking libaries, but
|
||||
this isn't strictly required. If no external spell checking library is available, novelWriter falls
|
||||
back to using the internal ``difflib`` of Python to check spelling. This is a slower and less
|
||||
sophisticated spell checker than the full spell checking libaries. The spell check library must be
|
||||
at least 3.0 to work with Windows. On Linux, 2.0 also works fine.
|
||||
|
||||
If you install from PyPi, these dependencies should be installed automatically. If you install from
|
||||
source, dependencies can still be installed from PyPi with:
|
||||
|
||||
.. code-block:: console
|
||||
|
||||
pip install -r requirements.txt
|
||||
|
||||
|
||||
.. _a_started_install:
|
||||
|
||||
Installing via PyPi
|
||||
===================
|
||||
|
||||
A Debian package can be downloaded from the `main website`_, or from the Releases_ page on GitHub_.
|
||||
This package should work on both Debian, Ubuntu and Linux Mint, at least.
|
||||
The application is written in Python 3 using Qt5 via PyQt5. It is developed on Linux, but it should
|
||||
in principle work fine on other operating systems as long as dependencies are met.
|
||||
|
||||
If you prefer, you can also add the novelWriter repository on Launchpad to your package manager.
|
||||
|
||||
|
||||
Ubuntu
|
||||
------
|
||||
|
||||
You can add the Ubuntu PPA_ and install novelWriter with the following commands.
|
||||
|
||||
.. code-block:: bash
|
||||
|
||||
sudo add-apt-repository ppa:vkbo/novelwriter
|
||||
sudo apt update
|
||||
sudo apt install novelwriter
|
||||
|
||||
If you want the `Pre-Release PPA`_ instead, add the ``ppa:vkbo/novelwriter-pre`` repository.
|
||||
|
||||
|
||||
Debian and Mint
|
||||
---------------
|
||||
|
||||
Since this is a pure Python package, the Launchpad PPA can in principle also be used on Debian or
|
||||
Mint. However, the above command will fail to add the signing key, as it is Ubuntu-specific.
|
||||
|
||||
Instead, run the following commands to add the repository and key:
|
||||
|
||||
.. code-block:: bash
|
||||
|
||||
sudo gpg --no-default-keyring --keyring /usr/share/keyrings/novelwriter-ppa-keyring.gpg --keyserver hkp://keyserver.ubuntu.com:80 --recv-keys F19F1FCE50043114
|
||||
echo "deb [signed-by=/usr/share/keyrings/novelwriter-ppa-keyring.gpg] http://ppa.launchpad.net/vkbo/novelwriter/ubuntu jammy main" | sudo tee /etc/apt/sources.list.d/novelwriter.list
|
||||
|
||||
Then run the update and install commands as for Ubuntu:
|
||||
|
||||
.. code-block:: bash
|
||||
|
||||
sudo apt update
|
||||
sudo apt install novelwriter
|
||||
|
||||
.. note::
|
||||
You may need to use the Ubuntu 20.04 (focal) packages for Debian 11 or earlier. The newer Ubuntu
|
||||
packages use a different compression algorithm that may not be supported.
|
||||
|
||||
.. tip::
|
||||
If you get an error message like ``gpg: failed to create temporary file`` when importing the key
|
||||
from the Ubuntu keyserver, try creating the folder it fails on, and import the key again:
|
||||
|
||||
.. code-block:: bash
|
||||
|
||||
sudo mkdir /root/.gnupg/
|
||||
|
||||
|
||||
AppImage Releases
|
||||
-----------------
|
||||
|
||||
For other Linux distros than the ones mentioned above, the primary option is AppImage_. These are
|
||||
completely standalone images for the app that include the necessary environment to run novelWriter.
|
||||
They can of course be run on any Linux distro, if you prefer this to native packages.
|
||||
|
||||
.. note::
|
||||
novelWriter generally don't support Python versions that have reached end of life. If your Linux
|
||||
distro still uses older Python versions and novelWriter won't run, you may want to try the
|
||||
AppImage instead.
|
||||
|
||||
|
||||
.. _a_started_macos:
|
||||
|
||||
Installing on MacOS
|
||||
===================
|
||||
|
||||
You can install novelWriter with both its Python and library dependencies embedded using the DMG
|
||||
application image file from the `main website`_, or from the Releases_ page on GitHub_. Installing
|
||||
it should be straightforward.
|
||||
|
||||
* Download the DMG file and open it. Then drag the novelWriter icon to the :guilabel:`Applications`
|
||||
folder on the right. This will install it into your :guilabel:`Applications`.
|
||||
* The first time you try to launch it, it will say that the bundle cannot be verified, simply press
|
||||
the :guilabel:`Open` button to add an exception.
|
||||
* If you are not presented with an :guilabel:`Open` button in the dialog launch the application
|
||||
again by right clicking on the application in Finder and selecting :guilabel:`Open` from the
|
||||
context menu.
|
||||
|
||||
The context menu can also be accessed by option-clicking if you have a one button mouse. This is
|
||||
done by holding down the option key on your keyboard and clicking on the application in Finder.
|
||||
|
||||
.. note::
|
||||
The novelWriter DMG is not signed because Apple doesn't currently provide a way for non-profit
|
||||
open source projects to properly sign their installers. The novelWriter project doesn't have the
|
||||
funding to pay for commercial software signing certificates.
|
||||
|
||||
|
||||
.. _a_started_pip:
|
||||
|
||||
Installing from PyPi
|
||||
====================
|
||||
|
||||
novelWriter is also available on the Python Package Index, or PyPi_. This install method works on
|
||||
all supported operating systems.
|
||||
You can download the latest version of novelWriter from the source repository on GitHub_.
|
||||
novelWriter is also hosted on PyPi_, and can be installed on all operating systems that support Qt5
|
||||
and Python 3. It is regularly tested on Linux, Windows and macOS. The latest version of novelWriter
|
||||
is |release|.
|
||||
|
||||
To install from PyPi you must first have the ``python`` and ``pip`` commands available on your
|
||||
system. You can download Python from `python.org`_. It is recommended that you install the latest
|
||||
version. If you are on Windows, also make sure to select the "Add Python to PATH" option during
|
||||
installation.
|
||||
|
||||
system. If you don't, see specific instructions for your operating system in this documentation.
|
||||
To install novelWriter from PyPi, use the following command:
|
||||
|
||||
.. code-block:: bash
|
||||
.. code-block:: console
|
||||
|
||||
pip install novelwriter
|
||||
|
||||
To upgrade an existing installation, use:
|
||||
|
||||
.. code-block:: bash
|
||||
.. code-block:: console
|
||||
|
||||
pip install --upgrade novelwriter
|
||||
|
||||
When installing via pip, novelWriter can be launched from command line with:
|
||||
|
||||
.. code-block:: bash
|
||||
.. code-block:: console
|
||||
|
||||
novelwriter
|
||||
novelWriter
|
||||
|
||||
Make sure the install location for pip is in your PATH variable. This is not always the case by
|
||||
default, and then you may get a "Not Found" error when running the ``novelwriter`` command.
|
||||
default.
|
||||
|
||||
|
||||
.. _a_started_i18n:
|
||||
|
||||
Building the Translation Files
|
||||
==============================
|
||||
|
||||
If you installed novelWriter from a package, the translation files should be pre-built and
|
||||
included. If you're running novelWriter from the source code, you will need to generate the files
|
||||
yourself. The files you need will be written to the ``nw/assets/i18n`` folder, and will have the
|
||||
``.qm`` file extension.
|
||||
|
||||
You can build the ``.qm`` files with:
|
||||
|
||||
.. code-block:: console
|
||||
|
||||
python3 setup.py qtlrelease
|
||||
|
||||
This requires that the Qt Linguist tool is installed on your system. On Ubuntu and Debian, the
|
||||
needed package is called `qttools5-dev-tools`.
|
||||
|
||||
.. note::
|
||||
If you want to improve novelWriter with translation files for another language, or update an
|
||||
existing translation, instructions for how to contribute can be found in the README file in the
|
||||
``i18n`` folder of the source code.
|
||||
|
||||
|
||||
.. _a_started_docs:
|
||||
|
||||
Building the Documentation
|
||||
==========================
|
||||
|
||||
If you installed novelWriter from a package, the documentation should be bre-built and included. If
|
||||
you're running novelWriter from the source code, a local copy of this documentation can be
|
||||
generated. It requires the following Python packages on Debian and Ubuntu.
|
||||
|
||||
* ``python3-sphinx``
|
||||
* ``python3-sphinx-rtd-theme``
|
||||
* ``python3-sphinxcontrib.qthelp``
|
||||
|
||||
Or from PyPi:
|
||||
|
||||
.. code-block:: console
|
||||
|
||||
pip install sphinx sphinx-rtd-theme sphinxcontrib-qthelp
|
||||
|
||||
The documentation can then be built from the ``docs`` folder in the source code by running:
|
||||
|
||||
.. code-block:: console
|
||||
|
||||
make html
|
||||
|
||||
If successful, the documentation should be available in the ``docs/build/html`` folder and you can
|
||||
open the ``index.html`` file in your browser.
|
||||
|
||||
The documentation can also be built for the Qt Assistant. To build the help packages from the
|
||||
documentation source, run the following from the root source folder:
|
||||
|
||||
.. code-block:: console
|
||||
|
||||
python setup.py qthelp
|
||||
|
||||
The setup script will copy the generated files into the ``nw/assets/help`` folder, and novelWriter
|
||||
will detect the presence of the files and redirect the menu help entry to open help locally instead
|
||||
of sending the user to the website. Pressing the :kbd:`F1` key will in any case try to open help
|
||||
locally first, then send you to the website as a fallback.
|
||||
|
||||
.. note::
|
||||
In order for the local version of help to work, the Qt Assistant must be installed on the local
|
||||
computer. If it isn't available, or novelWriter cannot find it, the help feature will fall back
|
||||
to redirecting you to the documentation website.
|
||||
|
||||
@@ -1,185 +0,0 @@
|
||||
.. _a_manuscript:
|
||||
|
||||
***********************
|
||||
Building the Manuscript
|
||||
***********************
|
||||
|
||||
You can at any time build a manuscript, an outline of your notes, or any other type of document
|
||||
from the text in your project. All of this is handled by the :guilabel:`Manuscript Build` tool.
|
||||
You can activate it from the sidebar, the :guilabel:`Tools` menu, or by pressing :kbd:`F5`.
|
||||
|
||||
.. versionadded:: 2.1
|
||||
This tool is new for version 2.1. A simpler tool was used for earlier versions. The simpler tool
|
||||
only allows you to define a single set of options for the build, but otherwise has much the same
|
||||
functionality.
|
||||
|
||||
|
||||
.. _a_manuscript_main:
|
||||
|
||||
The Manuscript Build Tool
|
||||
=========================
|
||||
|
||||
.. figure:: images/fig_manuscript_build.png
|
||||
|
||||
The :guilabel:`Manuscript Build` tool main window.
|
||||
|
||||
The main window of the :guilabel:`Manuscript Build` tool contains a list of all the builds you have
|
||||
defined, a selection of settings, and a few buttons to generate preview, open the print dialog, or
|
||||
run the build to create a manuscript document.
|
||||
|
||||
|
||||
.. _a_manuscript_settings:
|
||||
|
||||
Build Settings
|
||||
==============
|
||||
|
||||
Each build definition can be edited by opening it in the :guilabel:`Manuscript Build Settings`
|
||||
dialog, either by double-clicking or by selecting it and pressing the edit button in the toolbar.
|
||||
|
||||
.. tip::
|
||||
You can keep the :guilabel:`Manuscript Build Settings` dialog open while testing the different
|
||||
options, and just hit the :guilabel:`Apply` button. You can test the result of your settings
|
||||
by pressing the :guilabel:`Preview` button in the main :guilabel:`Manuscript Build` window.
|
||||
When you're happy with the result, you can close the settings.
|
||||
|
||||
|
||||
Document Selection
|
||||
------------------
|
||||
|
||||
.. figure:: images/fig_build_settings_selections.png
|
||||
|
||||
The :guilabel:`Selections` page of the :guilabel:`Manuscript Build Settings` dialog.
|
||||
|
||||
The :guilabel:`Selections` page of the :guilabel:`Manuscript Build Settings` dialog allows you to
|
||||
fine tune which documents are included in the build. They are indicated by a green arrow icon in
|
||||
the last column. On the right you have some filter options for selecting content of a specific
|
||||
type, and a set of switches for which root folders to include.
|
||||
|
||||
You can override the result of these filters by marking one or more documents and selecting to
|
||||
explicitly include or exclude them by using the buttons below the tree view. The last button can be
|
||||
used to reset the override and return control to the filter settings.
|
||||
|
||||
In the figure, the green arrow icon and the blue pin icon indicates which documents are included,
|
||||
and the red forbidden icon indicates that a document is explicitly excluded.
|
||||
|
||||
|
||||
Formatting Headings
|
||||
-------------------
|
||||
|
||||
.. figure:: images/fig_build_settings_headings.png
|
||||
|
||||
The :guilabel:`Headings` page of the :guilabel:`Manuscript Build Settings` dialog.
|
||||
|
||||
The :guilabel:`Headings` page of the :guilabel:`Manuscript Build Settings` dialog allows you to set
|
||||
how the headings in your :term:`Novel Documents` are formatted. By default, the title is just
|
||||
copied as-is, indicated by the ``{Title}`` format. You can change this to for instance add chapter
|
||||
numbers and scene numbers like shown int he figure above.
|
||||
|
||||
Clicking the edit button next to a format will copy the formatting string into the edit box where
|
||||
it can be modified, and where a syntax highlighter will help indicate which parts are automatically
|
||||
generated by the build tool. The :guilabel:`Insert` button is a dropdown list of these formats, and
|
||||
selecting one will insert it at the position of the cursor.
|
||||
|
||||
Any text you add that isn't highlighted in colours will remain in your formatted titles.
|
||||
``{Title}`` will always be replaced by the text in the heading from your documents.
|
||||
|
||||
You can preview the result of these format strings by clicking :guilabel:`Apply`, and then clicking
|
||||
:guilabel:`Preview` in the :guilabel:`Manuscript Build` tool main window.
|
||||
|
||||
Scene Separators
|
||||
^^^^^^^^^^^^^^^^
|
||||
|
||||
If you don't want any titles for your scenes (or for your sections if you have them), you can leave
|
||||
the formatting boxes empty. If so, an empty paragraph will be inserted between the scenes or
|
||||
sections instead, resulting in a gap in the text. You can also switch on the :guilabel:`Hide`
|
||||
setting, which will ignore them completely. That is, there won't even be an extra gap inserted.
|
||||
|
||||
Alternatively, if you want a separator text between them, like the common ``* * *``, you can enter
|
||||
the desired separator text as the format. If the format is any piece of static text, it will always
|
||||
be treated as a separator.
|
||||
|
||||
|
||||
Output Settings
|
||||
---------------
|
||||
|
||||
The :guilabel:`Content`, :guilabel:`Format` and :guilabel:`Output` pages of the
|
||||
:guilabel:`Manuscript Build Settings` dialog control a number of other settings for the output.
|
||||
Some of these only apply to specific output formats, which is indicated by the section headings on
|
||||
the settings pages.
|
||||
|
||||
|
||||
.. _a_manuscript_build:
|
||||
|
||||
Building Manuscript Documents
|
||||
=============================
|
||||
|
||||
.. figure:: images/fig_build_build.png
|
||||
|
||||
The :guilabel:`Manuscript Build` dialog used for writing the actual manuscript documents.
|
||||
|
||||
When you press the :guilabel:`Build` button on the :guilabel:`Build Manuscript` tool main window, a
|
||||
special file dialog opens up. This is where you pick your desired output format and where to write
|
||||
the file.
|
||||
|
||||
On the left side of the dialog is a list of all the available file formats, and on the right, a
|
||||
list of the documents which are included based on the build definition you selected. You can choose
|
||||
an output path, and set a base file name as well. The file extension will be added automatically.
|
||||
|
||||
To generate the manuscript document, press the :guilabel:`Build` button. A small progress bar will
|
||||
show the build progress, but for small projects it may pass very fast.
|
||||
|
||||
|
||||
File Formats
|
||||
------------
|
||||
|
||||
Currently, four document formats are supported.
|
||||
|
||||
Open Document Format
|
||||
The Build tool can produce either an ``.odt`` file, or an ``.fodt`` file. The latter is just a
|
||||
flat version of the document format as a single XML file. Most rich text editors support the
|
||||
former, and only a few the latter.
|
||||
|
||||
novelWriter HTML
|
||||
The HTML format writes a single ``.htm`` file with minimal style formatting. The HTML document
|
||||
is suitable for further processing by document conversion tools like Pandoc, for importing in
|
||||
word processors, or for printing from browser.
|
||||
|
||||
novelWriter Markup
|
||||
This is simply a concatenation of the project documents selected by the filters into a ``.txt``
|
||||
file. The documents are stacked together in the order they appear in the project tree, with
|
||||
comments, tags, etc. included if they are selected. This is a useful format for exporting the
|
||||
project for later import back into novelWriter.
|
||||
|
||||
Standard/Extended Markdown
|
||||
The Markdown format comes in both Standard and Extended flavour. The *only* difference in terms
|
||||
of novelWriter functionality is the support for strikethrough text, which is not supported by
|
||||
the Standard flavour.
|
||||
|
||||
|
||||
Additional Formats
|
||||
------------------
|
||||
|
||||
In addition to the above document formats, the novelWriter HTML and Markup formats can also be
|
||||
wrapped in a JSON file. These files will have a meta data entry and a body entry. For HTML, also
|
||||
the accompanying CSS styles used by the preview are included.
|
||||
|
||||
The text body is saved in a two-level list. The outer list contains one entry per document, in the
|
||||
order they appear in the project tree. Each document is then split up into a list as well, with one
|
||||
entry per paragraph it contains.
|
||||
|
||||
These files are mainly intended for scripted post-processing for those who want that option. A JSON
|
||||
file can be imported directly into a Python dict object or a PHP array, to mentions a few options.
|
||||
|
||||
|
||||
.. _a_manuscript_print:
|
||||
|
||||
Print and PDF
|
||||
=============
|
||||
|
||||
The :guilabel:`Print` button allows you to print the content in the preview window. You can either
|
||||
print to one of your system's printers, or select PDF as your output format from the printer icon
|
||||
on the print dialog.
|
||||
|
||||
.. note::
|
||||
The paper format should in all cases default to whatever your system default is. If you want to
|
||||
change it, you have to select it from the :guilabel:`Print Preview` dialog.
|
||||
@@ -1,342 +0,0 @@
|
||||
.. _a_proj:
|
||||
|
||||
**************
|
||||
Novel Projects
|
||||
**************
|
||||
|
||||
New projects can be created from the :guilabel:`Project` menu by selecting :guilabel:`New Project`.
|
||||
This will open the :guilabel:`New Project Wizard` that will assist you in creating a bare bone
|
||||
project suited to your needs.
|
||||
|
||||
A novelWriter project requires a dedicated folder for storing its files on the local file system.
|
||||
If you're interested in the details, you can have a look at the chapter :ref:`a_storage`.
|
||||
|
||||
A list of recently opened projects is maintained, and displayed in the :guilabel:`Open Project`
|
||||
dialog. A project can be removed from this list by selecting it and pressing the :kbd:`Del` key or
|
||||
by clicking the :guilabel:`Remove` button.
|
||||
|
||||
Project-specific settings are available in :guilabel:`Project Settings` in the :guilabel:`Project`
|
||||
menu. See further details below in the :ref:`a_proj_settings` section. Details about the project,
|
||||
including word counts, and a table of contents with word and page counts, is available through the
|
||||
:guilabel:`Project Details` dialog.
|
||||
|
||||
|
||||
.. _a_proj_roots:
|
||||
|
||||
Project Roots
|
||||
=============
|
||||
|
||||
Projects are structured into a set of top level folders called "Root Folders". They are visible in
|
||||
the project tree at the left side of the main window.
|
||||
|
||||
The :term:`novel documents` go into a root folder of type :guilabel:`Novel`. :term:`Project notes`
|
||||
go into the other root folders. These other root folder types are intended for your notes on the
|
||||
various elements of your story. Using them is of course entirely optional.
|
||||
|
||||
A new project may not have all of the root folders present, but you can add the ones you want from
|
||||
the project tree tool bar.
|
||||
|
||||
Each root folder has one or more :term:`reference` :term:`keyword` associated with it that is used
|
||||
to reference them from other documents and notes. The intended usage of each type of root folder is
|
||||
listed below. However, aside from the :guilabel:`Novel` folder, no restrictions are applied by the
|
||||
application on what you put in them. You can use them however you want.
|
||||
|
||||
The root folder system is closely connected to how the Tags and References system works. For more
|
||||
details, see the :ref:`a_references` chapter.
|
||||
|
||||
:guilabel:`Novel`
|
||||
This is the root folder type for text that goes into the final novel or novels. This class of
|
||||
documents have other rules and features than the project notes. See :ref:`a_struct` for more
|
||||
details.
|
||||
|
||||
:guilabel:`Plot`
|
||||
This is the root folder type where main plots can be outlined. It is optional, but adding at
|
||||
least brief notes can be useful in order to tag plot elements for the :guilabel:`Outline View`.
|
||||
Tags in this folder can be references using the ``@plot`` keyword.
|
||||
|
||||
:guilabel:`Characters`
|
||||
Character notes go in this root folder type. These are especially important if you want to use
|
||||
the :guilabel:`Outline View` to see which character appears where, which part of the story is
|
||||
told from a specific character's point-of-view, or focusing on a particular character's
|
||||
storyline. Tags in this type of folder can be referenced using the ``@pov`` keyword for
|
||||
point-of-view characters, ``@focus`` for a focus character, or the ``@char`` keyword for any
|
||||
other character present.
|
||||
|
||||
:guilabel:`Locations`
|
||||
The locations folder type is for various scene locations that you want to track. Tags in this
|
||||
folder can be references using the ``@location`` keyword.
|
||||
|
||||
:guilabel:`Timeline`
|
||||
If the story has multiple plot timelines or jumps in time within the same plot, this folder type
|
||||
can be used to track this. Tags in this type of folder can be references using the ``@time``
|
||||
keyword.
|
||||
|
||||
:guilabel:`Objects`
|
||||
Important objects in the story, for instance objects that change hands often, can be tracked
|
||||
here. Tags in this type of folder can be references using the ``@object`` keyword.
|
||||
|
||||
:guilabel:`Entities`
|
||||
Does your plot have many powerful organisations or companies? Or other entities that are part of
|
||||
the plot? They can be organised here. Tags in this type of folder can be references using the
|
||||
``@entity`` keyword.
|
||||
|
||||
:guilabel:`Custom`
|
||||
The custom root folder type can be used for tracking anything else not covered by the above
|
||||
options. Tags in this folder type can be references using the ``@custom`` keyword.
|
||||
|
||||
The root folders correspond to the categories of tags that can be used to reference them. For more
|
||||
information about the tags listed, see :ref:`a_references_references`.
|
||||
|
||||
.. note::
|
||||
You can rename root folders to whatever you want. However, this doesn't change the reference
|
||||
keyword or what they do.
|
||||
|
||||
.. versionadded:: 2.0
|
||||
As of version 2.0, you can make multiple root folders of each kind to split up your project.
|
||||
|
||||
|
||||
.. _a_proj_roots_del:
|
||||
|
||||
Deleted Documents
|
||||
-----------------
|
||||
|
||||
Deleted documents will be moved into a special :guilabel:`Trash` root folder. Documents in the
|
||||
trash folder can then be deleted permanently, either individually, or by emptying the trash from
|
||||
the menu. Documents in the trash folder are removed from the :term:`project index` and cannot be
|
||||
referenced.
|
||||
|
||||
A document or a folder can be deleted from the :guilabel:`Project` menu, or by pressing
|
||||
:kbd:`Ctrl+Shift+Del`. Root folders can only be deleted when they are empty.
|
||||
|
||||
|
||||
.. _a_proj_roots_out:
|
||||
|
||||
Archived Documents
|
||||
------------------
|
||||
|
||||
If you don't want to delete a document, or put it in the :guilabel:`Trash` folder where it may be
|
||||
deleted accidentally, but still want it out of your main project tree, you can create an
|
||||
:guilabel:`Archive` root folder and move it there.
|
||||
|
||||
You can drag any document to this folder and preserve its settings. The document will always be
|
||||
excluded from the :guilabel:`Build Manuscript` tool. It is also removed from the
|
||||
:term:`project index`, so the tags and references defined in it will not show up anywhere else.
|
||||
|
||||
|
||||
.. _a_proj_roots_orphaned:
|
||||
|
||||
Recovered Documents
|
||||
-------------------
|
||||
|
||||
If novelWriter crashes or otherwise exits without saving the project state, or if you're using a
|
||||
file synchronisation tool that runs out of sync, there may be files in the project folder that
|
||||
aren't tracked in the core project file. These files, when discovered, are recovered and added back
|
||||
into the project.
|
||||
|
||||
The discovered files are scanned for metadata that give clues as to where the document may
|
||||
previously have been located in the project. The project loading routine will try to put them back
|
||||
as close as possible to this location, if it still exists. Generally, it will be appended to the
|
||||
end of the folder where it previously was located. If that folder doesn't exist, it will try to add
|
||||
it to the correct root folder type. If it cannot figure out which root folder is correct, the
|
||||
document will be added to the :guilabel:`Novel` root folder. Finally, if the :guilabel:`Novel`
|
||||
folder is missing, one will be created.
|
||||
|
||||
If the title of the document can be recovered, the word "Recovered:" will be added as a prefix to
|
||||
indicate that it may need further attention. If the title cannot be determined, the document will
|
||||
be named after its internal key, which is a string of characters and numbers.
|
||||
|
||||
|
||||
.. _a_proj_roots_lock:
|
||||
|
||||
Project Lockfile
|
||||
----------------
|
||||
|
||||
To prevent lost documents caused by file conflicts when novelWriter projects are synchronised via
|
||||
file synchronisation tools, a project lockfile is written to the project folder. If you try to open
|
||||
a project which has such a file present, you will be presented with a warning, and some information
|
||||
about where else novelWriter thinks the project is also open. You will be given the option to
|
||||
ignore this warning, and continue opening the project at your own risk.
|
||||
|
||||
.. note::
|
||||
If, for some reason, novelWriter crashes, the lock file may remain even if there are no other
|
||||
instances keeping the project open. In such a case it is safe to ignore the lock file warning
|
||||
when re-opening the project.
|
||||
|
||||
.. warning::
|
||||
If you choose to ignore the warning and continue opening the project, and multiple instances of
|
||||
the project are in fact open, you are likely to cause inconsistencies and create diverging
|
||||
project files, potentially resulting in loss of data and orphaned files. You are not likely to
|
||||
lose any actual text unless both instances have the same document open in the editor, and
|
||||
novelWriter will try to resolve project inconsistencies the next time you open the project.
|
||||
|
||||
|
||||
.. _a_proj_roots_dirs:
|
||||
|
||||
Using Folders in the Project Tree
|
||||
---------------------------------
|
||||
|
||||
Folders, aside from root folders, have no structural significance to the project. When novelWriter
|
||||
is processing the documents in a project, like for instance when you create a manuscript from it,
|
||||
these folders are ignored. Only the order of the documents themselves matter.
|
||||
|
||||
The folders are there purely as a way for you to organise the documents in meaningful sections and
|
||||
to be able to collapse and hide them in the project tree when you're not working on those
|
||||
documents.
|
||||
|
||||
.. versionadded:: 2.0
|
||||
As of version 2.0 it is possible to add child documents to other documents. This is particularly
|
||||
useful when you create chapters and scenes. If you add separate scene documents, you should also
|
||||
add separate chapter documents, even if they only contain a chapter heading. You can then add
|
||||
scene documents as child items to the chapters.
|
||||
|
||||
|
||||
.. _a_proj_files:
|
||||
|
||||
Project Documents
|
||||
=================
|
||||
|
||||
New documents can be created from the toolbar in the :guilabel:`Project Tree`, or by pressing
|
||||
:kbd:`Ctrl+N`. This will open the create new item menu and let you choose between a number of
|
||||
pre-defined documents and folders. You will be prompted for a label for the new item.
|
||||
|
||||
You can always rename an item by selecting :guilabel:`Rename Item` from the :guilabel:`Project`
|
||||
menu, or by pressing :kbd:`F2`.
|
||||
|
||||
Other settings for project items are available from the context menu that you can activate by
|
||||
right-clicking on an item in the tree. The :guilabel:`Transform` submenu includes options for
|
||||
converting, splitting, or merging items. See :ref:`a_ui_tree_split_merge` for more details on the
|
||||
latter two.
|
||||
|
||||
|
||||
.. _a_proj_files_counts:
|
||||
|
||||
Word Counts
|
||||
-----------
|
||||
|
||||
A character, word and paragraph count is maintained for each document, as well as for each section
|
||||
of a document following a :term:`heading<headings>`. The word count and change of words in the
|
||||
current session is displayed in the footer of any document open in the editor, and all stats are
|
||||
shown in the details panel below the :guilabel:`Project Tree` for any document selected in the
|
||||
project or novel trees.
|
||||
|
||||
The word counts are not updated in real time, but run in the background every few seconds for as
|
||||
long as the document is being actively edited.
|
||||
|
||||
A total project word count is displayed in the status bar. The total count depends on the sum of
|
||||
the values in the project tree, which again depend on an up to date :term:`project index`. If the
|
||||
counts seem wrong, a full project word recount can be initiated by rebuilding the project's index.
|
||||
Either from the :guilabel:`Tools` menu, or by pressing :kbd:`F9`.
|
||||
|
||||
|
||||
.. _a_proj_settings:
|
||||
|
||||
Project Settings
|
||||
================
|
||||
|
||||
The :guilabel:`Project Settings` can be accessed from the :guilabel:`Project` menu, or by pressing
|
||||
:kbd:`Ctrl+Shift+,`. This will open a dialog box, with a set of tabs.
|
||||
|
||||
|
||||
Settings Tab
|
||||
------------
|
||||
|
||||
The :guilabel:`Settings` tab holds the project name, title, and author settings.
|
||||
|
||||
The :guilabel:`Project Name` can be set to a different value than the :guilabel:`Novel Title`. The
|
||||
difference between them is simply that the :guilabel:`Project Name` is used for the GUI (main
|
||||
window title) and for generating backup files. The intention is that the :guilabel:`Project Name`
|
||||
should remain unchanged throughout the project's lifetime, otherwise the name of exported files and
|
||||
backup files may change too.
|
||||
|
||||
The :guilabel:`Novel Title` and :guilabel:`Authors` settings are used when building the manuscript,
|
||||
for some formats.
|
||||
|
||||
If your project is in a different language than your main spell checking language is set to, you
|
||||
can override the default setting here. You can also override the automatic backup setting. The
|
||||
project language can also be changed from the :guilabel:`Tools` menu.
|
||||
|
||||
|
||||
Status and Importance Tabs
|
||||
--------------------------
|
||||
|
||||
Each document or folder of type :guilabel:`Novel` can be given a *Status* label accompanied by a
|
||||
coloured icon, and each document or folder of the remaining types can be given an *Importance*
|
||||
label.
|
||||
|
||||
These labels are there purely for your convenience, and you are not required to use them for any
|
||||
other features to work. No other part of novelWriter accesses this information. The intention is to
|
||||
use these to indicate at what stage of completion each novel document is, or how important the
|
||||
content of a note is to the story. You don't have to use them this way, that's just what they were
|
||||
intended for, but you can make them whatever you want.
|
||||
|
||||
See also :ref:`a_ui_tree_status`.
|
||||
|
||||
.. note::
|
||||
The status or importance level currently in use by one or more documents cannot be deleted, but
|
||||
they can be edited.
|
||||
|
||||
|
||||
Auto-Replace Tab
|
||||
----------------
|
||||
|
||||
A set of automatically replaced keywords can be added in this tab. The keywords in the left column
|
||||
will be replaced by the text in the right column when documents are opened in the viewer. They will
|
||||
also be applied to manuscript builds.
|
||||
|
||||
The auto-replace feature will replace text in angle brackets that is in this list. The syntax
|
||||
highlighter will add an alternate colour to text matching the syntax, but it doesn't check if the
|
||||
text is in this list.
|
||||
|
||||
.. note::
|
||||
A keyword cannot contain spaces. The angle brackets are added by default, and when used in the
|
||||
text are a part of the keyword to be replaced. This is to ensure that parts of the text aren't
|
||||
unintentionally replaced by the content of the list.
|
||||
|
||||
|
||||
.. _a_proj_backup:
|
||||
|
||||
Backup
|
||||
======
|
||||
|
||||
An automatic backup system is built into novelWriter. In order to use it, a backup path to where
|
||||
the backup files are to be stored must be provided in :guilabel:`Preferences`.
|
||||
|
||||
Backups can be run automatically when a project is closed, which also implies it is run when the
|
||||
application itself is closed. Backups are date stamped zip files of the project files in the
|
||||
project folder (files not strictly a part of the project are ignored). The zip archives are stored
|
||||
in a subfolder of the backup path. The subfolder will have the same name as the
|
||||
:guilabel:`Project Name` as defined in :ref:`a_proj_settings`.
|
||||
|
||||
The backup feature, when configured, can also be run manually from the :guilabel:`Tools` menu.
|
||||
It is also possible to disable automated backups for a given project in
|
||||
:guilabel:`Project Settings`.
|
||||
|
||||
.. note::
|
||||
For the backup to be able to run, the :guilabel:`Project Name` must be set in
|
||||
:guilabel:`Project Settings`. This value is used to generate the name and path of the backups.
|
||||
Without it, the backup will not run at all, but it will produce a warning message.
|
||||
|
||||
|
||||
.. _a_proj_stats:
|
||||
|
||||
Writing Statistics
|
||||
==================
|
||||
|
||||
When you work on a project, a log file records when you opened it, when you closed it, and the
|
||||
total word counts of your novel documents and notes at the end of the session, provided that the
|
||||
session lasted either more than 5 minutes, or that the total word count changed. For more details
|
||||
about the log file, see :ref:`a_storage`.
|
||||
|
||||
A tool to view the content of the log file is available in the :guilabel:`Tools` menu under
|
||||
:guilabel:`Writing Statistics`. You can also launch it by pressing :kbd:`F6`, or find it on the
|
||||
sidebar.
|
||||
|
||||
The tool will show a list of all your sessions, and a set of filters to apply to the data. You can
|
||||
also export the filtered data to a JSON file or to a CSV file that can be opened by a spreadsheet
|
||||
application like for instance Libre Office Calc or Excel.
|
||||
|
||||
.. versionadded:: 1.2
|
||||
As of version 1.2, the log file also stores how much of the session time was spent idle. The
|
||||
definition of idle here is that the novelWriter main window loses focus, or the user hasn't made
|
||||
any changes to the currently open document in five minutes. The number of minutes can be altered
|
||||
in :guilabel:`Preferences`.
|
||||
@@ -1,202 +0,0 @@
|
||||
.. _a_references:
|
||||
|
||||
*******************
|
||||
Tags and References
|
||||
*******************
|
||||
|
||||
In novelWriter there are no forms or tables to fill in to define the characters, locations and
|
||||
other elements of your story. Instead, you can mark your :term:`project notes` as representing
|
||||
these story elements by creating a :term:`tag`. Whenever you want to link a piece of your story to
|
||||
a note defining a story element, like a character, you create a :term:`reference` back to that tag.
|
||||
You can also cross-link your project notes in the same way.
|
||||
|
||||
This is perhaps one of the features that makes novelWriter different from other, similar
|
||||
applications. It is therefore not always obvious to new users how this is supposed to work, so
|
||||
this chapter hopes to explains in more detail how to use the tags and references system.
|
||||
|
||||
.. tip::
|
||||
If you find the Tags and Reference system difficult to follow just from reading this chapter,
|
||||
you can create a new project in novelWriter and select to "Fill the project with example files"
|
||||
in the :guilabel:`New Project Wizard`. The example project contains several examples of tags and
|
||||
references.
|
||||
|
||||
|
||||
.. _a_references_metadata:
|
||||
|
||||
Metadata in novelWriter
|
||||
=======================
|
||||
|
||||
The structure of your novelWriter project is inferred from the :term:`headings` within the
|
||||
documents, not the documents themselves. See :ref:`a_struct_heads` for more details. Therefore,
|
||||
metadata is also associated with headings, and not the documents directly.
|
||||
|
||||
If you split your project into separate documents for each scene, this distinction may not matter.
|
||||
However, there are several benefits to using documents at a larger structural scale when starting
|
||||
your project. For instance, it may make more sense to define all your scenes, and even chapters, in
|
||||
a single document at first, or perhaps a document per act. You can later split these documents up
|
||||
using the document split feature. See :ref:`a_ui_tree_split_merge` for more details.
|
||||
|
||||
The implication here is that you can treat each heading as an independent element of your notes
|
||||
that can be referenced somewhere else. In order to make it possible to reference a header section,
|
||||
you need to assign it a tag.
|
||||
|
||||
|
||||
.. _a_references_tags:
|
||||
|
||||
How to Use Tags
|
||||
===============
|
||||
|
||||
A "tag" in novelWriter is a word or phrase that you define as belonging to a heading. Tags are set
|
||||
by using the ``@tags`` :term:`keyword`. The full format of a tag is ``@tag: tagname``, where
|
||||
``tagname`` is an identifier of your choosing. You can only set *one* tag per heading, and the tag
|
||||
has to be unique across all documents in the project.
|
||||
|
||||
.. versionadded:: 2.2
|
||||
Tags are now case insensitive.
|
||||
|
||||
After the tags have been defined, they can then be referenced in the novel documents, or
|
||||
cross-referenced in other notes. they will also show up in the :guilabel:`Outline View` and in the
|
||||
back-reference panel when a document is opened in the viewer.
|
||||
|
||||
The syntax highlighter will indicate to you that the keyword is correctly used and that the tag is
|
||||
allowed, that is, the tag is unique. Duplicate tags should be detected as long as the index is up
|
||||
to date. An invalid tag should have a green wiggly line under it, and will not receive the syntax
|
||||
colour that valid tags do.
|
||||
|
||||
The tag is the only part of these notes that novelWriter uses. The rest of the document content is
|
||||
there for you to use in whatever way you wish. Of course, the content of the documents can be added
|
||||
to the manuscript, or an outline document. If you want to compile a single document of all your
|
||||
notes, you can do this from the :guilabel:`Manuscript Build` tool.
|
||||
|
||||
Example of a heading with a tag for a character of the story:
|
||||
|
||||
.. code-block:: none
|
||||
|
||||
# Jane Doe
|
||||
|
||||
@tag: Jane
|
||||
|
||||
Some information about the character Jane Doe.
|
||||
|
||||
When this is done in a document in a :term:`Root Folder` of type "Characters", the tag is
|
||||
automatically treated as an available character in your project, and you will be able to reference
|
||||
it in any of your other documents using the reference keywords for characters. It will also show up
|
||||
in the Character tab in the Reference panel below the document viewer, and in the reference
|
||||
auto-completer menu in the editor when you fill in references. See :ref:`a_ui_view` and
|
||||
:ref:`a_references_completer`.
|
||||
|
||||
It is the root folder type that defines what category of story elements the tag is indexed under.
|
||||
See the :ref:`a_proj_roots` section for an overview of available root folder types. They are also
|
||||
covered in the next section.
|
||||
|
||||
|
||||
.. _a_references_references:
|
||||
|
||||
How to Use References
|
||||
=====================
|
||||
|
||||
Each heading of any level in your project can contain references to tags set in project notes. The
|
||||
references are gathered by the indexer and used to generate the :guilabel:`Outline View`, among
|
||||
other things.
|
||||
|
||||
References are set as a :term:`keyword` and a list of corresponding tags. The valid keywords are
|
||||
listed below. The format of a reference line is ``@keyword: value1, [value2] ... [valueN]``. All
|
||||
reference keywords allow multiple values.
|
||||
|
||||
``@pov``
|
||||
The point-of-view character for the current section. The target must be a note tag in a
|
||||
:guilabel:`Character` type root folder.
|
||||
|
||||
``@focus``
|
||||
The character that has the focus for the current section. This can be used in cases where the
|
||||
focus is not a point-of-view character. The target must be a note tag in a :guilabel:`Character`
|
||||
type root folder.
|
||||
|
||||
``@char``
|
||||
Other characters in the current section. The target must be a note tag in a
|
||||
:guilabel:`Character` type root folder. This should not include the point-of-view or focus
|
||||
character if those references are used.
|
||||
|
||||
``@plot``
|
||||
The plot or subplot advanced in the current section. The target must be a note tag in a
|
||||
:guilabel:`Plot` type root folder.
|
||||
|
||||
``@time``
|
||||
The timelines touched by the current section. The target must be a note tag in a
|
||||
:guilabel:`Timeline` type root folder.
|
||||
|
||||
``@location``
|
||||
The location the current section takes place in. The target must be a note tag in a
|
||||
:guilabel:`Locations` type root folder.
|
||||
|
||||
``@object``
|
||||
Objects present in the current section. The target must be a note tag in a :guilabel:`Object`
|
||||
type root folder.
|
||||
|
||||
``@entity``
|
||||
Entities present in the current section. The target must be a note tag in a
|
||||
:guilabel:`Entities` type root folder.
|
||||
|
||||
``@custom``
|
||||
Custom references in the current section. The target must be a note tag in a :guilabel:`Custom`
|
||||
type root folder. The custom folder are for any other category of notes you may want to use.
|
||||
|
||||
The syntax highlighter will alert the user that the tags and references are used correctly, and
|
||||
that the tags referenced exist.
|
||||
|
||||
.. note::
|
||||
The highlighter may be mistaken if the index of defined tags is out of date. If so, press
|
||||
:kbd:`F9` to regenerate it, or select :guilabel:`Rebuild Index` from the :guilabel:`Tools` menu.
|
||||
In general, the index for a document is regenerated when it is saved, so this shouldn't normally
|
||||
be necessary.
|
||||
|
||||
.. tip::
|
||||
If you add a reference in the editor to a tag that doesn't yet exist, you can right-click it and
|
||||
select :guilabel:`Create Note for Tag`. This will generate a new project note automatically with
|
||||
the new tag defined. In order for this to be possible, a root folder for that category of
|
||||
references must already exist.
|
||||
|
||||
One note can also reference another note in the same way novel documents do. When the note is
|
||||
opened in the document viewer, the references become clickable links, making it easier to follow
|
||||
connections in the plot. You can follow links in the document editor by clicking them with the
|
||||
mouse while holding down the :kbd:`Ctrl` key. Clicked links are always opened in the view panel.
|
||||
|
||||
Project notes don't show up in the :guilabel:`Outline View`, so referencing between notes is only
|
||||
meaningful if you want to be able to click-navigate between them, or of course if you just want to
|
||||
highlight that two notes are related.
|
||||
|
||||
.. tip::
|
||||
If you cross-reference between notes and export your project as an HTML document using the
|
||||
:guilabel:`Manuscript Build` tool, the cross-references become clickable links in the exported
|
||||
HTML document as well.
|
||||
|
||||
Example of a novel document with references to characters and plots:
|
||||
|
||||
.. code-block:: none
|
||||
|
||||
## Chapter 1
|
||||
|
||||
@pov: Jane
|
||||
|
||||
### Scene 1
|
||||
|
||||
@char: John, Sam
|
||||
@plot: Main
|
||||
|
||||
Once upon a time ...
|
||||
|
||||
|
||||
.. _a_references_completer:
|
||||
|
||||
The References Auto-Completer
|
||||
-----------------------------
|
||||
|
||||
An auto-completer context menu will show up automatically in the document editor when you type the
|
||||
character ``@`` on a new line. It will first suggest tag or reference keywords for you to add, and
|
||||
after the ``:`` has been added, suggest references from the list of tags you have already defined.
|
||||
|
||||
You can use the auto-completer to add multiple references with a ``,`` between them, and even type
|
||||
new ones. New references can be created by right-clicking on them and selecting
|
||||
:guilabel:`Create Note for Tag` from the menu.
|
||||
|
||||
.. versionadded:: 2.2
|
||||
@@ -1,113 +0,0 @@
|
||||
.. _a_struct:
|
||||
|
||||
***************
|
||||
Novel Structure
|
||||
***************
|
||||
|
||||
This chapter covers the structure of a novel project.
|
||||
|
||||
There are two different types of documents in a project, :guilabel:`Novel Documents` and
|
||||
:guilabel:`Project Notes`. Novel documents can only live in a :guilabel:`Novel` type root folder.
|
||||
You can also move them to :guilabel:`Archive` and :guilabel:`Trash` of course.
|
||||
|
||||
The :guilabel:`Project Tree` can distinguish between the different header levels of the novel
|
||||
documents using coloured icons, and optionally add emphasis on the label, set in
|
||||
:guilabel:`Preferences`.
|
||||
|
||||
|
||||
.. _a_struct_heads:
|
||||
|
||||
Importance of Headings
|
||||
======================
|
||||
|
||||
Subfolders under root folders have no impact on the structure of the novel itself. The structure is
|
||||
instead dictated by the heading level of the headings within the documents.
|
||||
|
||||
Four levels of headings are supported, signified by the number of hashes (``#``) preceding the
|
||||
title. See also the :ref:`a_fmt` section for more details about the markup syntax.
|
||||
|
||||
.. note::
|
||||
The header levels are not only important when generating the manuscript, they are also used by
|
||||
the indexer when building the outline tree in the :guilabel:`Outline View` as well as in the
|
||||
:guilabel:`Novel Tree`. Each heading also starts a new region where new Tags and References
|
||||
can be defined. See :ref:`a_references` for more details.
|
||||
|
||||
The syntax for the four basic header types, and the two special header types, is listed in section
|
||||
:ref:`a_fmt_head`. The meaning of the four levels for the structure of your novel is as follows:
|
||||
|
||||
**Header Level 1: Partition**
|
||||
This header level signifies that the text refers to a top level partition. This is useful when
|
||||
you want to split the manuscript up into books, parts, or acts. These headings are not required.
|
||||
The novel title itself should use the special header level ``#!`` covered in :ref:`a_fmt_head`.
|
||||
|
||||
**Header Level 2: Chapter**
|
||||
This header level signifies a chapter level partition. Each time you want to start a new
|
||||
chapter, you must add such a heading. If you choose to split your manuscript up into one
|
||||
document per scene, you need a single chapter document with just the heading. You can of course
|
||||
also add a synopsis and reference keywords to the chapter document. If you want to open the
|
||||
chapter with a quote or other introductory text that isn't part of a scene, this is also where
|
||||
you'd put that text.
|
||||
|
||||
**Header Level 3: Scene**
|
||||
This header level signifies a scene level partition. You must provide a title text, but the
|
||||
title text can be replaced with a scene separator or just skipped entirely when you build your
|
||||
manuscript.
|
||||
|
||||
**Header Level 4: Section**
|
||||
This header level signifies a sub-scene level partition, usually called a "section" in the
|
||||
documentation and the user interface. These can be useful if you want to change references
|
||||
mid-scene, like if you change the point-of-view character. You are free to use sections as you
|
||||
wish, and you can filter them out of the final manuscript just like with scene titles.
|
||||
|
||||
Page breaks are automatically added before level 1 and 2 headers when you build your project to a
|
||||
format that supports page breaks, or when you print the document directly from the
|
||||
:guilabel:`Manuscript Build` tool. If you want page breaks in other places, you have to specify
|
||||
them manually. See :ref:`a_fmt_break`.
|
||||
|
||||
.. tip::
|
||||
There are multiple options of how to process novel titles when building the manuscript. For
|
||||
instance, chapter numbers can be applied automatically, and so can scene numbers if you want
|
||||
them in a draft manuscript. See the :ref:`a_manuscript` page for more details.
|
||||
|
||||
|
||||
.. _a_struct_heads_title:
|
||||
|
||||
Novel Title and Front Matter
|
||||
----------------------------
|
||||
|
||||
It is recommended that you add a document at the very top of each Novel root folder with the novel
|
||||
title as the first line. You should modify the level 1 header format code with an ``!`` in order to
|
||||
render it as a document title that is excluded from any automatic Table of Content in a manuscript
|
||||
build document, like so:
|
||||
|
||||
``#! My Novel``
|
||||
|
||||
The title is by default centred on the page. You can add more text to the page as you wish, like
|
||||
for instance the author's name and details.
|
||||
|
||||
If you want an additional page of text after the title page, starting on a fresh page, you can add
|
||||
``[NEW PAGE]`` on a line by itself, and continue the text after it. This will insert a page break
|
||||
before the text. See also :ref:`a_fmt_break`.
|
||||
|
||||
|
||||
.. _a_struct_heads_unnum:
|
||||
|
||||
Unnumbered Chapter Headings
|
||||
---------------------------
|
||||
|
||||
If you use the automatic numbering feature for your chapters, but you want to keep some special
|
||||
chapters separate from this, you cam add an ``!`` to the level 2 header formatting code to tell the
|
||||
build tool to skip these chapters.
|
||||
|
||||
``##! Unnumbered Chapter Title``
|
||||
|
||||
There is a separate formatting feature for such chapters in the :guilabel:`Manuscript Build` tool
|
||||
as well. See the :ref:`a_manuscript` page for more details. When building a document of a format
|
||||
that supports page breaks, also unnumbered chapters will have a page break added just like for
|
||||
normal chapters.
|
||||
|
||||
.. Note::
|
||||
Previously, you could also disable the automatic numbering of a chapter by adding an ``*`` as
|
||||
the first character of the chapter title itself. This feature has been dropped in favour of the
|
||||
current format in order to keep level 1 and 2 headers consistent. Please update your chapter
|
||||
headings if you've used this syntax.
|
||||
@@ -1,6 +1 @@
|
||||
sphinx-book-theme
|
||||
sphinx>=5.0
|
||||
sphinx-favicon
|
||||
sphinx-design
|
||||
pygments>=2.7
|
||||
docutils>=0.17.1
|
||||
sphinx_rtd_theme
|
||||
|
||||
110
docs/source/setup_linux.rst
Normal file
@@ -0,0 +1,110 @@
|
||||
.. _a_setup_linux:
|
||||
|
||||
**************
|
||||
Setup on Linux
|
||||
**************
|
||||
|
||||
.. _GitHub: https://github.com/vkbo/novelWriter/releases
|
||||
.. _main website: https://novelwriter.io
|
||||
|
||||
This is a brief guide to how you can get novelWriter running on a Linux computer. There are
|
||||
currently no install package of novelWriter for Linux, so it is recommended that you download
|
||||
either the full source or minimal package and extract it to a practical location on your system and
|
||||
run the ``setup.py`` script.
|
||||
|
||||
|
||||
Running from Source
|
||||
===================
|
||||
|
||||
To run novelWriter from source, download the latest source package from the release page on
|
||||
GitHub_ or the `main website`_, or if you have git running on your computer, you can also clone the
|
||||
repository.
|
||||
|
||||
|
||||
Step 1: Installing Dependencies
|
||||
-------------------------------
|
||||
|
||||
The dependencies of novelWriter are generally available from Linux distro repositories. For Debian
|
||||
and Ubuntu, they can be installed with:
|
||||
|
||||
.. code-block:: console
|
||||
|
||||
sudo apt install python3-pyqt5 python3-lxml python3-enchant
|
||||
|
||||
If you prefer to install dependencies via PyPi, or the repository dependencies are out of date, you
|
||||
can install them with:
|
||||
|
||||
.. code-block:: console
|
||||
|
||||
pip3 install --user -r requirements.txt
|
||||
|
||||
|
||||
Step 2: Install Package (Optional)
|
||||
----------------------------------
|
||||
|
||||
You can install novelWriter to the default location for Python packages using ``setuptools``. This
|
||||
step is optional as you can also just put the novelWriter program folder wherever you like
|
||||
yourself. For instance in ``/opt/novelWriter``, and then run Step 3 to set up icons and launcher.
|
||||
|
||||
To install novelWriter to the default location, it requires that you have ``setuptools`` installed
|
||||
on your system. If you don't have it installed, it can usually be installed from your distro's
|
||||
repository. For Debian and Ubuntu this is achieved with:
|
||||
|
||||
.. code-block:: console
|
||||
|
||||
sudo apt install python3-setuptools
|
||||
|
||||
The package is also available from PyPi:
|
||||
|
||||
.. code-block:: console
|
||||
|
||||
pip3 install --user setuptools
|
||||
|
||||
With ``setuptools`` in place, novelWriter can be installed to the user space with:
|
||||
|
||||
.. code-block:: console
|
||||
|
||||
./setup.py install --user
|
||||
|
||||
This should install novelWriter as ``~/.local/bin/novelWriter``. If you instead want to install for
|
||||
all users, i.e. as ``/usr/local/bin/novelWriter``, run:
|
||||
|
||||
.. code-block:: console
|
||||
|
||||
sudo ./setup.py install
|
||||
|
||||
This is equivalent to what the ``pip`` installer does. It puts novelWriter in the location on your
|
||||
system where Python packages are usually kept. This is not really the best suited location for a
|
||||
GUI application like novelWriter, so you may instead copy the entire source to a suiteable location
|
||||
yourself.
|
||||
|
||||
|
||||
Step 3: Create Launcher Icons
|
||||
-----------------------------
|
||||
|
||||
Regardless of where you extract or install the source files, you can set up a standard icon and a
|
||||
launcher. To set up this desktop launcher, the needed icons, and the project file association,
|
||||
run the following from inside the novelWriter folder at the installed or final location:
|
||||
|
||||
.. code-block:: console
|
||||
|
||||
./setup.py xdg-install
|
||||
|
||||
By default, this command installs the launcher and icons for the current user only. To install for
|
||||
all users, run the script with the ``sudo`` command.
|
||||
|
||||
.. tip::
|
||||
All options of the setup script can be listed with: ``./setup.py help``.
|
||||
|
||||
|
||||
Uninstalling Icons
|
||||
==================
|
||||
|
||||
The steps taken by the ``xdg-install`` step can be reversed by running:
|
||||
|
||||
.. code-block:: console
|
||||
|
||||
./setup.py xdg-uninstall
|
||||
|
||||
This will remove the desktop launcher and icons from the system. As above, whether this is done on
|
||||
the current user, or system wide, depends on whether this command is called with ``sudo`` or not.
|
||||
74
docs/source/setup_mac.rst
Normal file
@@ -0,0 +1,74 @@
|
||||
.. _a_setup_mac:
|
||||
|
||||
**************
|
||||
Setup on macOS
|
||||
**************
|
||||
|
||||
.. _GitHub: https://github.com/vkbo/novelWriter/releases
|
||||
.. _main website: https://novelwriter.io
|
||||
.. _brew docs: https://docs.brew.sh/Homebrew-and-Python
|
||||
|
||||
This is a brief guide to how you can get novelWriter running on macOS. There are currently no
|
||||
install package of novelWriter for macOS, so it is recommended that you download either the full
|
||||
source or minimal package and extract it to a practical location on your system and
|
||||
run it.
|
||||
|
||||
|
||||
Running from Source
|
||||
===================
|
||||
|
||||
To run novelWriter from source, download the latest source package from the release page on
|
||||
GitHub_ or the `main website`_, or if you have git running on your computer, you can also clone the
|
||||
repository.
|
||||
|
||||
|
||||
Step 1: Installing Dependencies
|
||||
-------------------------------
|
||||
|
||||
These instructions assume you're using brew, and have Python and pip set up. If not, see the
|
||||
`brew docs`_ for help. Main requirements are installed via the requirements file. You also need to
|
||||
install the ``pyobjc`` package, so you should run:
|
||||
|
||||
.. code-block:: console
|
||||
|
||||
pip3 install --user -r requirements.txt
|
||||
pip3 install --user pyobjc
|
||||
|
||||
For spell checking you may also need to install the enchant package. It comes with a lot of default
|
||||
dictionaries.
|
||||
|
||||
.. code-block:: console
|
||||
|
||||
brew install enchant
|
||||
|
||||
With the dependencies in place, you can launch the ``novelWriter.py`` script directly to run
|
||||
novelWriter.
|
||||
|
||||
|
||||
Step 2: Install Package (Optional)
|
||||
----------------------------------
|
||||
|
||||
You can install novelWriter to the correct location for Python packages with:
|
||||
|
||||
.. code-block:: console
|
||||
|
||||
./setup.py install --user
|
||||
|
||||
This requires that the package ``setuptools`` is installed on your system. If not, it can be
|
||||
installed with:
|
||||
|
||||
.. code-block:: console
|
||||
|
||||
pip3 install --user setuptools
|
||||
|
||||
This is method of install is equivalent to what the ``pip`` installer does. It puts novelWriter in
|
||||
the location on your system where Python packages are usually kept. This is not really the best
|
||||
suited location for a GUI application like novelWriter, so you may instead copy the entire source
|
||||
to a suiteable location yourself.
|
||||
|
||||
After this, you should be able to launch novelWriter by running ``novelWriter`` in a command line
|
||||
window.
|
||||
|
||||
.. note::
|
||||
Right now there isn't a better integration with macOS available. Contributions from someone more
|
||||
familiar with macOS would be very much appreciated.
|
||||
149
docs/source/setup_windows.rst
Normal file
@@ -0,0 +1,149 @@
|
||||
.. _a_setup_win:
|
||||
|
||||
****************
|
||||
Setup on Windows
|
||||
****************
|
||||
|
||||
This is a brief guide to how you can get novelWriter running on a Windows computer.
|
||||
|
||||
Unlike other operating systems, Windows does not come prepared with an environment to run Python
|
||||
applications, so you must first install Python. After that, running novelWriter is straightforward.
|
||||
|
||||
.. tip::
|
||||
If you have any problems, you can always open a question on the project's discussions_ page.
|
||||
This requires a GitHub account.
|
||||
|
||||
.. _discussions: https://github.com/vkbo/novelWriter/discussions
|
||||
|
||||
|
||||
.. _a_setup_win_installer:
|
||||
|
||||
Using the Installer
|
||||
===================
|
||||
|
||||
The installer for Windows is no longer provided. See the `installer issue`_ for more info on why.
|
||||
You can still create the installer yourself if you want to. It can be generated with the provided
|
||||
``setup.py`` script. use the script's ``help`` command to get further instructions.
|
||||
|
||||
Please use the "Running from Source" option below instead. It has been improved and a script has
|
||||
been added that does nearly the same thing.
|
||||
|
||||
.. _installer issue: https://github.com/vkbo/novelWriter/issues/640
|
||||
|
||||
|
||||
.. _a_setup_win_source:
|
||||
|
||||
Running from Source
|
||||
===================
|
||||
|
||||
To run novelWriter from source, download the latest source zip file from the release page on
|
||||
GitHub_, or from the `main website`_. You can download the "Minimal Windows" zip file. It is a
|
||||
minimal version of the source that contains only the files needed for running on Windows. You can
|
||||
also download the full source if you wish.
|
||||
|
||||
In order to make novelWriter run on your system, you must first have Python installed (Step 1).
|
||||
Thereafter, a script will do the rest of the job (Step 2). Alternatively, you can run this step
|
||||
manually from the command prompt if you wish to.
|
||||
|
||||
.. tip::
|
||||
If your system already has all the dependencies installed, you can run novelWriter directly from
|
||||
the extracted folder by double-clicking the ``novelWriter.pyw`` file. However, running the
|
||||
script also adds start icons.
|
||||
|
||||
.. _GitHub: https://github.com/vkbo/novelWriter/releases
|
||||
.. _main website: https://novelwriter.io
|
||||
|
||||
|
||||
Step 1: Installing Python
|
||||
-------------------------
|
||||
|
||||
If you already have Python installed, you can skip this step. If you don't have it installed, you
|
||||
can download it from the python.org_ website. novelWriter should work with Python 3.6 or higher,
|
||||
but it is recommended that you install the latest version of Python.
|
||||
|
||||
Make sure you select the "Add Python to PATH" option during installation, otherwise the ``python``
|
||||
command will not work in the command line window.
|
||||
|
||||
.. image:: images/python_win_install.png
|
||||
:width: 600
|
||||
|
||||
.. _python.org: https://www.python.org/downloads/windows
|
||||
|
||||
|
||||
Step 2: Dependencies and Icons
|
||||
------------------------------
|
||||
|
||||
**Alternative A: By Script**
|
||||
|
||||
Open the folder where you extracted novelWriter, and double-click the file named
|
||||
``windows_install.bat``. This should open a command line window and run the setup script to install
|
||||
dependencies, and add desktop and start menu icons.
|
||||
|
||||
.. note::
|
||||
If you downloaded the full source package, the file may be in the ``setup`` subfolder.
|
||||
|
||||
The script will also check that it can find Python on your system and alert you if it cannot run
|
||||
it. If you are sure you have installed it, but the script cannot find it, you probably didn't
|
||||
install it with the "Add Python to PATH" option mentioned in Step 1.
|
||||
|
||||
.. note::
|
||||
If you upgrade Python to a newer version and the path to ``pythonw.exe`` has therefore changed,
|
||||
you may need to run this script again. You can also run it to upgrade dependencies to the latest
|
||||
version.
|
||||
|
||||
**Alternative B: Manual Installation**
|
||||
|
||||
The above alternative can also be run manually.
|
||||
|
||||
Open the windows command prompt. It can be launched by pressing the :kbd:`Win` key and typing "cmd".
|
||||
The "Command Prompt" app should then be in the list of applications.
|
||||
|
||||
With the command prompt open, navigate to the folder where you extracted the novelWriter source,
|
||||
and run the following commands:
|
||||
|
||||
.. code-block:: console
|
||||
|
||||
pip install --user pywin32 -r requirements.txt
|
||||
python setup.py win-install
|
||||
|
||||
The first command will install the dependencies on your system from the `Python Package Index`_,
|
||||
and the second command will create a desktop icon and a start menu icon. That should be all that
|
||||
you need.
|
||||
|
||||
.. _Python Package Index: https://pypi.org/
|
||||
|
||||
|
||||
Uninstalling
|
||||
============
|
||||
|
||||
**Alternative A: By Script**
|
||||
|
||||
Open the folder where you keep the novelWriter files, and double-click the file named
|
||||
``windows_uninstall.bat``. This should open a command line window and run the setup script to
|
||||
remove the main dependency packages and remove desktop and start menu icons.
|
||||
|
||||
.. note::
|
||||
If you downloaded the full source package, the file may be in the ``setup`` subfolder.
|
||||
|
||||
If you plan to also remove Python from your system, you must run the above script first as it needs
|
||||
Python in order to run.
|
||||
|
||||
.. note::
|
||||
Due to limitations of the ``pip`` installer, dependencies of the dependencies will not be
|
||||
removed, only the ones the setup script directly installed.
|
||||
|
||||
**Alternative B: Manual Uninstallation**
|
||||
|
||||
Like for the install process, the script just runs two commands. You can of course run them
|
||||
yourself if you wish. They are:
|
||||
|
||||
.. code-block:: console
|
||||
|
||||
python setup.py win-uninstall
|
||||
pip uninstall -r requirements.txt
|
||||
|
||||
There may be other packages on your system installed by ``pip``. To list all packages, run:
|
||||
|
||||
.. code-block:: console
|
||||
|
||||
pip freeze --user
|
||||
@@ -1,58 +0,0 @@
|
||||
.. _a_locations:
|
||||
|
||||
**************
|
||||
File Locations
|
||||
**************
|
||||
|
||||
.. _QStandardPaths: https://doc.qt.io/qt-5/qstandardpaths.html
|
||||
|
||||
novelWriter will create a few files on your system outside of the application folder itself. These
|
||||
file locations are described in this chapter.
|
||||
|
||||
|
||||
.. _a_locations_conf:
|
||||
|
||||
Configuration
|
||||
=============
|
||||
|
||||
The general configuration of novelWriter, including everything that is in :guilabel:`Preferences`,
|
||||
is saved in one central configuration file. The location of this file depends on your operating
|
||||
system. The system paths are provided by the Qt QStandardPaths_ class and its ``ConfigLocation``
|
||||
value.
|
||||
|
||||
The standard paths are:
|
||||
|
||||
* Linux: ``~/.config/novelwriter/novelwriter.conf``
|
||||
* MacOS: ``~/Library/Preferences/novelwriter/novelwriter.conf``
|
||||
* Windows: ``C:\Users\<USER>\AppData\Local\novelwriter\novelwriter.conf``
|
||||
|
||||
Here, ``~`` corresponds to the user's home directory on Linux and MacOS, and ``<USER>`` is the
|
||||
user's username on Windows.
|
||||
|
||||
.. note::
|
||||
These are the standard operating system defined locations. If your system has been set up in a
|
||||
different way, these locations may also be different.
|
||||
|
||||
|
||||
.. _a_locations_data:
|
||||
|
||||
Application Data
|
||||
================
|
||||
|
||||
novelWriter also stores a bit of data that is generated by the user's actions. This includes the
|
||||
list of recent projects form the :guilabel:`Open Project` dialog. Custom themes should also be
|
||||
saved here. The system paths are provided by the Qt QStandardPaths_ class and its
|
||||
``AppDataLocation`` value.
|
||||
|
||||
The standard paths are:
|
||||
|
||||
* Linux: ``~/.local/share/novelwriter/``
|
||||
* MacOS: ``~/Library/Application Support/novelwriter/``
|
||||
* Windows: ``C:\Users\<USER>\AppData\Roaming\novelwriter\``
|
||||
|
||||
Here, ``~`` corresponds to the user's home directory on Linux and MacOS, and ``<USER>`` is the
|
||||
user's username on Windows.
|
||||
|
||||
.. note::
|
||||
These are the standard operating system defined locations. If your system has been set up in a
|
||||
different way, these locations may also be different.
|
||||
@@ -1,164 +0,0 @@
|
||||
.. _a_source:
|
||||
|
||||
*******************
|
||||
Running from Source
|
||||
*******************
|
||||
|
||||
.. _GitHub: https://github.com/vkbo/novelWriter/releases
|
||||
.. _PyPi: https://pypi.org/project/novelWriter/
|
||||
.. _Sphinx Docs: https://www.sphinx-doc.org/
|
||||
|
||||
This chapter describes various ways of running novelWriter directly from the source code, and how
|
||||
to build the various components like the translation files and documentation.
|
||||
|
||||
.. note::
|
||||
The text below assumes the command ``python`` corresponds to a Python 3 executable. Python 2 is
|
||||
now deprecated, but on many systems the command ``python3`` may be needed instead. Likewise,
|
||||
``pip`` may need to be replaced with ``pip3``.
|
||||
|
||||
Most of the custom commands for building packages of novelWriter, or building assets, are contained
|
||||
in the ``pkgutils.py`` script in the root of the source code. You can list the available commands
|
||||
by running:
|
||||
|
||||
.. code-block:: bash
|
||||
|
||||
python pkgutils.py help
|
||||
|
||||
|
||||
.. _a_source_depend:
|
||||
|
||||
Dependencies
|
||||
============
|
||||
|
||||
novelWriter has been designed to rely on as few dependencies as possible. Only the Python wrapper
|
||||
for the Qt GUI libraries is required. The package for spell checking is optional, but recommended.
|
||||
Everything else is handled with standard Python libraries.
|
||||
|
||||
The following Python packages are needed to run all features of novelWriter:
|
||||
|
||||
* ``PyQt5`` – needed for connecting with the Qt5 libraries.
|
||||
* ``PyEnchant`` – needed for spell checking (optional).
|
||||
|
||||
PyQt/Qt should be at least 5.10, but ideally 5.13 or higher for all features to work. For instance,
|
||||
searching using regular expressions with full Unicode support requires 5.13.
|
||||
|
||||
If you want spell checking, you must install the ``PyEnchant`` package. The spell check library
|
||||
must be at least 3.0 to work with Windows. On Linux, 2.0 also works fine.
|
||||
|
||||
If you install from PyPi, these dependencies should be installed automatically. If you install from
|
||||
source, dependencies can still be installed from PyPi with:
|
||||
|
||||
.. code-block:: bash
|
||||
|
||||
pip install -r requirements.txt
|
||||
|
||||
.. note::
|
||||
On Linux distros, the Qt library is usually split up into multiple packages. In some cases,
|
||||
secondary dependencies may not be installed automatically. For novelWriter, the library files
|
||||
for renderring the SVG icons may be left out and needs to be installed manually. This is the
|
||||
case on for instance Arch Linux.
|
||||
|
||||
|
||||
.. _a_source_install:
|
||||
|
||||
Build and Install from Source
|
||||
=============================
|
||||
|
||||
If you want to install novelWriter directly from the source available on GitHub_, you must first
|
||||
build the package using the Python Packaging Authority's build tool. It can be installed with:
|
||||
|
||||
.. code-block:: bash
|
||||
|
||||
pip install build
|
||||
|
||||
On Debian-based systems the tool can also be installed with:
|
||||
|
||||
.. code-block:: bash
|
||||
|
||||
sudo apt install python3-build
|
||||
|
||||
With the tool installed, run the following command from the root of the novelWriter source code:
|
||||
|
||||
.. code-block:: bash
|
||||
|
||||
python -m build --wheel
|
||||
|
||||
This should generate a ``.whl`` file in the ``dist/`` folder at your current location. The wheel
|
||||
file can then be installed on your system. Here with example version number 2.0.7, but yours may be
|
||||
different:
|
||||
|
||||
.. code-block:: bash
|
||||
|
||||
pip install --user dist/novelWriter-2.0.7-py3-none-any.whl
|
||||
|
||||
|
||||
.. _a_source_i18n:
|
||||
|
||||
Building the Translation Files
|
||||
==============================
|
||||
|
||||
If you installed novelWriter from a package, the translation files should be pre-built and
|
||||
included. If you're running novelWriter from the source code, you will need to generate the files
|
||||
yourself. The files you need will be written to the ``novelwriter/assets/i18n`` folder, and will
|
||||
have the ``.qm`` file extension.
|
||||
|
||||
You can build the ``.qm`` files with:
|
||||
|
||||
.. code-block:: bash
|
||||
|
||||
python pkgutils.py qtlrelease
|
||||
|
||||
This requires that the Qt Linguist tool is installed on your system. On Ubuntu and Debian, the
|
||||
needed package is called ``qttools5-dev-tools``.
|
||||
|
||||
.. note::
|
||||
If you want to improve novelWriter with translation files for another language, or update an
|
||||
existing translation, instructions for how to contribute can be found in the ``README.md`` file
|
||||
in the ``i18n`` folder of the source code.
|
||||
|
||||
|
||||
.. _a_source_sample:
|
||||
|
||||
Building the Example Project
|
||||
============================
|
||||
|
||||
In order to be able to create new projects from example files, you need a ``sample.zip`` file in
|
||||
the ``assets`` folder of the source. This file can be built from the ``pkgutils.py`` script by
|
||||
running:
|
||||
|
||||
.. code-block:: bash
|
||||
|
||||
python pkgutils.py sample
|
||||
|
||||
|
||||
.. _a_source_docs:
|
||||
|
||||
Building the Documentation
|
||||
==========================
|
||||
|
||||
A local copy of this documentation can be generated as HTML. This requires installing some Python
|
||||
packages from PyPi:
|
||||
|
||||
.. code-block:: bash
|
||||
|
||||
pip install -r docs/source/requirements.txt
|
||||
|
||||
The documentation can then be built from the root folder in the source code by running:
|
||||
|
||||
.. code-block:: bash
|
||||
|
||||
make -C docs html
|
||||
|
||||
If successful, the documentation should be available in the ``docs/build/html`` folder and you can
|
||||
open the ``index.html`` file in your browser.
|
||||
|
||||
You can also build a PDF manual from the documentation using the ``pkgutils.py`` script:
|
||||
|
||||
.. code-block:: bash
|
||||
|
||||
python pkgutils.py manual
|
||||
|
||||
This will build the documentation as a PDF using LaTeX. The file will then be copied into the
|
||||
assets folder and made available in the :guilabel:`Help` menu in novelWriter. The Sphinx build
|
||||
system has a few extra dependencies when building the PDF. Please check the `Sphinx Docs`_ for more
|
||||
details.
|
||||
@@ -1,165 +0,0 @@
|
||||
.. _a_storage:
|
||||
|
||||
******************
|
||||
How Data is Stored
|
||||
******************
|
||||
|
||||
.. _documentation: https://docs.novelwriter.io/
|
||||
|
||||
This chapter contains details of how novelWriter stores and handles the project data.
|
||||
|
||||
|
||||
Project Structure
|
||||
=================
|
||||
|
||||
All novelWriter files are written with utf-8 encoding. Since Python automatically converts Unix
|
||||
line endings to Windows line endings on Windows systems, novelWriter does not make any adaptations
|
||||
to the formatting on Windows systems. This is handled entirely by the Python standard library.
|
||||
Python also handles this when working on the same files on both Windows and Unix-based operating
|
||||
systems.
|
||||
|
||||
|
||||
Main Project File
|
||||
-----------------
|
||||
|
||||
The project itself requires a dedicated folder for storing its files, where novelWriter will create
|
||||
its own "file system" where the project's folder and file hierarchy is described in a project XML
|
||||
file. This is the main project file in the project's root folder with the name ``nwProject.nwx``.
|
||||
This file also contains all the meta data required for the project (except the index data), and a
|
||||
number of related project settings.
|
||||
|
||||
If this file is lost or corrupted, the structure of the project is lost, although not the text
|
||||
itself. It is important to keep this file backed up, either through the built-in backup tool, or
|
||||
your own backup solution.
|
||||
|
||||
The project XML file is indent-formatted, and is suitable for diff tools and version control since
|
||||
most of the file will stay static, although a timesetamp is set in the meta section on line 2, and
|
||||
various meta data entries incremented, on each save.
|
||||
|
||||
.. only:: not html
|
||||
|
||||
A full project file format specification is available in the online documentation_.
|
||||
|
||||
.. only:: html
|
||||
|
||||
A full description of the current file format is available in the
|
||||
:download:`File Format Spec 1.5 <fileformatspec15.pdf>` document, available as a PDF.
|
||||
|
||||
|
||||
Project Documents
|
||||
=================
|
||||
|
||||
All the project documents are saved in a subfolder of the main project folder named ``content``.
|
||||
Each document has a file handle based on a 52 bit random number, represented as a hexadecimal
|
||||
string. The documents are saved with a filename assembled from this handle and the file extension
|
||||
``.nwd``.
|
||||
|
||||
If you wish to find the file system location of a document in the project, you can either look it
|
||||
up in the project XML file, select :guilabel:`Show File Details` from the :guilabel:`Document` menu
|
||||
when having the document open in the editor, or look in the ``ToC.txt`` file in the root of the
|
||||
project folder. The ``ToC.txt`` file has a list of all documents in the project, referenced by
|
||||
their label, and where they are saved.
|
||||
|
||||
The reason for this cryptic file naming is to avoid issues with file naming conventions and
|
||||
restrictions on different operating systems, and also to have a file name that does not depend on
|
||||
what you name the document within the project, or changes it to. This is particularly useful when
|
||||
using a versioning system.
|
||||
|
||||
Each document file contains a plain text version of the text from the editor. The file can in
|
||||
principle be edited in any text editor, and is suitable for diffing and version control if so
|
||||
desired. Just make sure the file remains in utf-8 encoding, otherwise unicode characters may
|
||||
become mangled when the file is opened in novelWriter again.
|
||||
|
||||
Editing these files is generally not recommended. The reason for this is that the index will not be
|
||||
automatically updated when doing so, which means novelWriter doesn't know you've altered the file.
|
||||
If you *do* edit a file in this manner, you should rebuild the index when you next open the project
|
||||
in novelWriter.
|
||||
|
||||
The first lines of the file may contain some meta data starting with the characters ``%%~``. These
|
||||
lines are mainly there to restore some information if the file is lost from the main project file,
|
||||
and the information may be helpful if you do open the file in an external editor as it contains the
|
||||
document label and the document class and layout. The lines can be deleted without any consequences
|
||||
to the rest of the content of the file, and will be added back the next time the document is saved
|
||||
in novelWriter.
|
||||
|
||||
|
||||
The File Saving Process
|
||||
-----------------------
|
||||
|
||||
When saving the project file, or any of the documents, the data is first saved to a temporary file.
|
||||
If successful, the old data file is then removed, and the temporary file replaces it. This ensures
|
||||
that the previously saved data is only replaced when the new data has been successfully saved to
|
||||
the storage medium.
|
||||
|
||||
For the project XML file, a ``.bak`` file is in addition kept, which will always contain the
|
||||
previous version of the file, although when auto-save is enabled, they may have the same content.
|
||||
If the opening of a project file fails, novelWriter will automatically try to open the ``.bak``
|
||||
file instead.
|
||||
|
||||
|
||||
Project Meta Data
|
||||
=================
|
||||
|
||||
The project folder contains a subfolder named ``meta``, containing a number of files. The meta
|
||||
folder contains semi-important files. That is, they can be lost with only minor impact to the
|
||||
project. All files in this folder are JSON or JSON Lines files, although some other files may
|
||||
remain from earlier versions of novelWriter as they haven't all been JSON files in the past.
|
||||
|
||||
If you use version control software on your project, you can exclude this folder, although you may
|
||||
want to track the session log file and the custom words list.
|
||||
|
||||
|
||||
The Project Index
|
||||
-----------------
|
||||
|
||||
Between writing sessions, the project index is saved in a JSON file in ``meta/index.json``.
|
||||
This file is not critical. If it is lost, it can be completely rebuilt from within novelWriter from
|
||||
the :guilabel:`Tools` menu.
|
||||
|
||||
The index is maintained and updated whenever a document or note is saved in the editor. It contains
|
||||
all references and tags in documents and notes, as well as the location of all headers in the
|
||||
project, and the word counts within each header section.
|
||||
|
||||
The integrity of the index is checked when the file is loaded. It is possible to corrupt the index
|
||||
if the file is manually edited and manipulated, so the check is important to avoid sudden crashes
|
||||
of novelWriter. If the file contains errors, novelWriter will automatically build it anew. If the
|
||||
check somehow fails and novelWriter keeps crashing, you can delete the file manually and rebuild
|
||||
the index. If this too fails, you have likely encountered a bug.
|
||||
|
||||
|
||||
Build Definitions
|
||||
-----------------
|
||||
|
||||
The build definitions from the :guilabel:`Manuscript Build` tool are kept in the
|
||||
``meta/builds.json`` file. If this file is lost, all custom build definitions are lost too.
|
||||
|
||||
|
||||
Cached GUI Options
|
||||
------------------
|
||||
|
||||
A file named ``meta/options.json`` contains the latest state of various GUI buttons, switches,
|
||||
dialog window sizes, column sizes, etc, from the GUI. These are the GUI settings that are specific
|
||||
to the project. Global GUI settings are stored in the main config file.
|
||||
|
||||
The file is not critical, but if it is lost, all such GUI options will revert back to their default
|
||||
settings.
|
||||
|
||||
|
||||
Custom Word List
|
||||
----------------
|
||||
|
||||
A file named ``meta/userdict.json`` contains all the custom words you've added to the project for
|
||||
spell checking purposes. The content of the file can be edited from the :guilabel:`Tools` menu. If
|
||||
you lose this file, all your custom spell check words will be lost too.
|
||||
|
||||
|
||||
Session Stats
|
||||
-------------
|
||||
|
||||
The writing progress is saved in the ``meta/sessions.jsonl`` file. This file records the length
|
||||
and word counts of each writing session on the given project. The file is used by the
|
||||
:guilabel:`Writing Statistics` tool. If this file is lost, the history it contains is also lost,
|
||||
but it has otherwise no impact on the project.
|
||||
|
||||
Each session is recorded as a JSON object on a single line of the file. Each session record is
|
||||
appended tot he file.
|
||||
145
docs/source/tech_technical.rst
Normal file
@@ -0,0 +1,145 @@
|
||||
.. _a_tech:
|
||||
|
||||
*********************
|
||||
Technical Information
|
||||
*********************
|
||||
|
||||
This section contains details of how novelWriter stores and handles the project data.
|
||||
|
||||
|
||||
How Project Data is Stored
|
||||
==========================
|
||||
|
||||
All novelWriter files are written with utf-8 encoding. Since Python automatically converts Unix
|
||||
line endings to Windows line endings on Windows systems, novelWriter does not make any adaptations
|
||||
to the formatting on Windows systems. This is handled entirely by the Python standard library.
|
||||
Python also handles this fairly well when working on the same files on both Windows and Unix-based
|
||||
operating systems.
|
||||
|
||||
|
||||
Main Project File
|
||||
-----------------
|
||||
|
||||
The project itself requires a dedicated folder for storing its files where novelWriter will create
|
||||
its own "file system" where the folder and file hierarchy is described in a project XML file. This
|
||||
is the main project file in the project's root folder with the name ``nwProject.nwx``. This file
|
||||
also contains all the meta data required for the project, and a number of related project settings.
|
||||
|
||||
If this file is lost or corrupted, the structure of the project is lost, although not the text
|
||||
itself. It is important to keep this file backed up, either through the built-in backup tool, or
|
||||
your own backup solution.
|
||||
|
||||
.. tip::
|
||||
The novelWriter project folder is structured so that it can easily be added to a version control
|
||||
system like git. If so, you may want to add a `.gitignore` file to exclude files with the
|
||||
extensions `.json` as JSON files are used to cache the index and various run-time settings and
|
||||
are generally large files that change often. You'd also want to exclude the ``cache`` folder.
|
||||
|
||||
The project XML file is indent-formatted, suitable for diff tools and version control since most of
|
||||
the file will stay static, although a timesetamp is set in the meta section on line 2 each time the
|
||||
file is saved, and various meta data entries are incremented on each save.
|
||||
|
||||
|
||||
Project Documents
|
||||
-----------------
|
||||
|
||||
All the project documents are saved in a folder in the main project folder named ``content``. Each
|
||||
document has a file handle taken from the first 13 characters of a SHA256 hash of the system time
|
||||
when the document was first created. The documents are saved with a filename assembled from this
|
||||
hash and the file extension ``.nwd``.
|
||||
|
||||
If you wish to find the file system location of a document in the project, you can either look it
|
||||
up in the project XML file, select :guilabel:`Show File Details` from the :guilabel:`Document` menu
|
||||
when having the document open, or look in the ``ToC.txt`` file in the root of the project folder.
|
||||
The ``ToC.txt`` file has a list of all documents in the project, referenced by their label, and
|
||||
where they are saved.
|
||||
|
||||
The reason for this cryptic file naming is to avoid issues with file naming conventions and
|
||||
restrictions on different operating systems, and also to have a file name that does not depend on
|
||||
what the user names the document within the project, or changes it to.
|
||||
|
||||
Each document file contains a plain text version of the text from the editor. The file can in
|
||||
principle be edited in any text editor, and is suitable for diffing and version control if so
|
||||
desired. Just make sure the file remains in utf-8 encoding, otherwise unicode chatracters may
|
||||
become mangled when the file is opened in novelWriter again.
|
||||
|
||||
The first lines of the file may contain some meta data starting with the characters ``%%~``. These
|
||||
lines are mainly there to restore some information if it is lost from the project file, and the
|
||||
information may be helpful if you do open the file in an external editor as it contains the
|
||||
document label and the document class and layout. The lines can be deleted without any consequences
|
||||
to the rest of the content of the file, and will be added back the next time the document is saved
|
||||
in novelWriter.
|
||||
|
||||
|
||||
The File Saving Process
|
||||
-----------------------
|
||||
|
||||
When saving the project file, or any of the documents, the data is first saved to a temporary file.
|
||||
If successful, the old data file is removed, and the temporary file becomes the new file. This
|
||||
ensures that the previously saved data is only replaced when the new data has been successfully
|
||||
saved to the storage medium.
|
||||
|
||||
For the project XML file, a ``.bak`` file is in addition kept, which will always contain the
|
||||
previous version of the file, although when auto-save is enabled, they may have the same content.
|
||||
If the opening of a project file fails, novelWriter will automatically try to open the ``.bak``
|
||||
file instead.
|
||||
|
||||
|
||||
Project Meta Data
|
||||
=================
|
||||
|
||||
The project folder contains a subfolder named ``meta``, containing a number of files. The meta
|
||||
folder contains semi-important files. That is, they can be lost with only minor impact to the
|
||||
project.
|
||||
|
||||
If you use version control software on your project, you can exclude this folder, although you may
|
||||
want to track the session log file. The JSON files within this folder can safely be ignored as they
|
||||
will be automatically regenerated if lost.
|
||||
|
||||
|
||||
The Project Index
|
||||
-----------------
|
||||
|
||||
Between writing sessions, the project index is saved in a JSON file in ``meta/tagsIndex.json``.
|
||||
This file is not critical. If it is lost, it can be rebuilt from within novelWriter from the
|
||||
:guilabel:`Tools` menu.
|
||||
|
||||
The index is maintained and updated whenever a document or note is saved in the editor. It contains
|
||||
all references and tags in documents and notes, as well as the location of all headers in the
|
||||
project, and the word counts within each header section.
|
||||
|
||||
The integrity of the index is checked when the file is loaded. It is possible to corrupt the index
|
||||
if the file is manually edited and manipulated, so the check is important to avoid sudden crashes
|
||||
of novelWriter. if the file contains errors, novelWriter will automatically build it anew. If the
|
||||
check somehow fails and novelWriter keeps crashing, you can delete the file manually and rebuild
|
||||
the index. If this too fails, you have likely encountered a bug.
|
||||
|
||||
|
||||
Cached GUI Options
|
||||
------------------
|
||||
|
||||
A file named ``meta/guiOptions.json`` contains the latest state of various GUI buttons, switches,
|
||||
dialog window sizes, column sizes, etc, from the GUI. These are the GUI settings that are specific
|
||||
to the project. Global GUI settings are stored in the main config file.
|
||||
|
||||
The file is not critical, but if it is lost, all such GUI options will revert back to their default
|
||||
settings.
|
||||
|
||||
|
||||
Session Stats
|
||||
-------------
|
||||
|
||||
The writing progress is saved in the ``meta/sessionStats.log`` file. This file records the length
|
||||
and word counts of each writing session on the given project. The file is used by the
|
||||
:guilabel:`Writing Statistics` tool. If this file is lost, the history it contains is also lost,
|
||||
but it has otherwise no impact on the project.
|
||||
|
||||
|
||||
Project Cache
|
||||
=============
|
||||
|
||||
The project ``cache`` folder contains non-critical files. If these files are lost, there is no
|
||||
impact on the functionality of novelWriter or the history of the project. It contains temporary
|
||||
files, like the preview document in the :guilabel:`Build Novel Project` tool.
|
||||
|
||||
It should be excluded from version control tools if such are used.
|
||||
@@ -1,84 +0,0 @@
|
||||
.. _a_pytest:
|
||||
|
||||
*************
|
||||
Running Tests
|
||||
*************
|
||||
|
||||
The novelWriter source code is well covered by tests. The test framework used for the development
|
||||
is ``pytest`` with the use of an extension for Qt.
|
||||
|
||||
|
||||
Dependencies
|
||||
============
|
||||
|
||||
The dependencies for running the tests can be installed with:
|
||||
|
||||
.. code-block:: bash
|
||||
|
||||
pip install -r tests/requirements.txt
|
||||
|
||||
This will install a couple of extra packages for coverage and test management. The minimum
|
||||
requirement is ``pytest`` and ``pytest-qt``.
|
||||
|
||||
|
||||
Simple Test Run
|
||||
===============
|
||||
|
||||
To run the tests, you simply need to execute the following from the root of the source folder:
|
||||
|
||||
.. code-block:: bash
|
||||
|
||||
pytest
|
||||
|
||||
Since several of the tests involve opening up the novelWriter GUI, you may want to disable the GUI
|
||||
for the duration of the test run. Moving your mouse while the tests are running may otherwise
|
||||
interfere with the execution of some tests.
|
||||
|
||||
You can disable the renderring of the GUI by setting the flag ``QT_QPA_PLATFORM=offscreen``:
|
||||
|
||||
.. code-block:: bash
|
||||
|
||||
export QT_QPA_PLATFORM=offscreen pytest
|
||||
|
||||
|
||||
Advanced Options
|
||||
================
|
||||
|
||||
Adding the flag ``-v`` to the ``pytest`` command will increase verbosity of the test execution.
|
||||
|
||||
You can also add coverage report generation. For instance to HTML:
|
||||
|
||||
.. code-block:: bash
|
||||
|
||||
export QT_QPA_PLATFORM=offscreen pytest -v --cov=novelwriter --cov-report=html
|
||||
|
||||
Other useful report formats are ``xml``, and ``term`` for terminal output.
|
||||
|
||||
You can also run tests per subpackage of novelWriter with the ``-m`` command. The available
|
||||
subpackage groups are ``base``, ``core``, and ``gui``. Consider for instance:
|
||||
|
||||
.. code-block:: bash
|
||||
|
||||
export QT_QPA_PLATFORM=offscreen pytest -v --cov=novelwriter --cov-report=html -m core
|
||||
|
||||
This will only run the tests of the "core" package, that is, all the classes that deal with the
|
||||
project data of a novelWriter project. The "gui" tests, likewise, will run the tests for the GUI
|
||||
components, and the "base" tests cover the bits in-between.
|
||||
|
||||
You can also filter the tests with the ``-k`` switch. The following will do the same as
|
||||
``-m core``:
|
||||
|
||||
.. code-block:: bash
|
||||
|
||||
export QT_QPA_PLATFORM=offscreen pytest -v --cov=novelwriter --cov-report=html -k testCore
|
||||
|
||||
All tests are named in such a way that you can filter them by adding more bits of the test names.
|
||||
They all start with the word "test". Then comes the group: "Core", "Base", "Dlg", "Tool", or "Gui".
|
||||
Finally comes the name of the class or module, which generally corresponds to a single source code
|
||||
file. For instance, running the following will run all tests for the document editor:
|
||||
|
||||
.. code-block:: bash
|
||||
|
||||
export QT_QPA_PLATFORM=offscreen pytest -v --cov=novelwriter --cov-report=html -k testGuiEditor
|
||||
|
||||
To run a single test, simply add the full test name to the ``-k`` switch.
|
||||
@@ -1,237 +0,0 @@
|
||||
.. _a_breakdown:
|
||||
|
||||
************
|
||||
How it Works
|
||||
************
|
||||
|
||||
.. _Fusion: https://doc.qt.io/qt-6/gallery.html
|
||||
.. _Pandoc: https://pandoc.org/
|
||||
.. _Open Document: https://en.wikipedia.org/wiki/OpenDocument
|
||||
|
||||
The main features of novelWriter are listed in the :ref:`a_intro` chapter. In this chapter, we go
|
||||
into some more details on how they are implemented. This is intended as an overview. Later on in
|
||||
this documentation, these features will be covered in more detail.
|
||||
|
||||
|
||||
.. _a_breakdown_design:
|
||||
|
||||
GUI Layout and Design
|
||||
=====================
|
||||
|
||||
The user interface of novelWriter is intended to be as minimalistic as practically possible, while
|
||||
at the same time provide useful features needed for writing a novel.
|
||||
|
||||
The main window does not have an editor toolbar like many other applications do. This reduces
|
||||
clutter, and since the documents are formatted with style tags, it is more or less redundant.
|
||||
|
||||
Most formatting features supported are available through convenient keyboard shortcuts. They are
|
||||
also available in the main menu, so you don't have to look up formatting codes every time you need
|
||||
them. For reference, a list of all shortcuts can be found in the :ref:`a_kb` chapter.
|
||||
|
||||
.. note::
|
||||
novelWriter is not intended to be a full office type word processor. It doesn't support images,
|
||||
links, tables, and other complex structures and objects often needed for such documents.
|
||||
Formatting is limited to headers, emphasis, text alignment, and a few other simple features.
|
||||
|
||||
On the left side of the main window, you will find a sidebar. This bar has buttons for the standard
|
||||
views you can switch between, a quick link to the :guilabel:`Build Manuscript` tool, and a set of
|
||||
project-related tools and quick access to settings at the bottom.
|
||||
|
||||
.. versionadded:: 2.2
|
||||
A number of new formatting options were added in 2.2 to allow for some special formatting cases.
|
||||
At the same time, a small formatting toolbar was added in the editor. It is hidden by default,
|
||||
but can be opened by pressing the three dots icon in the top right corner.
|
||||
|
||||
|
||||
Project Tree and Editor View
|
||||
----------------------------
|
||||
|
||||
.. figure:: images/fig_project_tree_view.png
|
||||
|
||||
A screenshot of the Project Tree and Editor View.
|
||||
|
||||
When in :guilabel:`Project Tree View` mode, the main work area of the main window is split in two,
|
||||
or optionally three, panels. The left-most panel contains the project tree and all the documents in
|
||||
your project. The second panel is the document editor.
|
||||
|
||||
An optional third panel on the right contains a document viewer which can view any document in your
|
||||
project independently of what is open in the document editor. This panel is not intended as a
|
||||
preview window, although you can use it for this purpose if you wish as it will apply the
|
||||
formatting tags you have specified. The main purpose of the viewer is for viewing your notes next
|
||||
to your editor while you're writing.
|
||||
|
||||
The editor also has a :guilabel:`Focus Mode` you can toggle either from the menu, from the icon in
|
||||
the editor's header, or by pressing :kbd:`F8`. When :guilabel:`Focus Mode` is enabled, all the user
|
||||
interface elements other than the document editor itself are hidden away.
|
||||
|
||||
|
||||
Novel Tree and Editor View
|
||||
--------------------------
|
||||
|
||||
.. figure:: images/fig_novel_tree_view.png
|
||||
|
||||
A screenshot of the Novel Tree View.
|
||||
|
||||
When in :guilabel:`Novel Tree View` mode, the project tree is replaced by an overview of your novel
|
||||
structure for a specific Novel :term:`root folder`. Instead of showing individual documents, the
|
||||
tree now shows all headings of your novel text. This includes multiple headings within the same
|
||||
document.
|
||||
|
||||
Each heading is indented according to the heading level. You can open and edit your novel documents
|
||||
from this view as well. All headings contained in the currently open document should be highlighted
|
||||
in the view to indicate which ones belong together in the same document.
|
||||
|
||||
If you have multiple Novel root folders, the header of the novel view becomes a dropdown box. You
|
||||
can then switch between them by clicking the :guilabel:`Outline of ...` text. You can also click
|
||||
the novel icon button next to it.
|
||||
|
||||
Generally, the novel view should update when you make changes to the novel structure, including
|
||||
edits of the current document in the editor. The information is only updated when the automatic
|
||||
save of the document is triggered, or you manually press :kbd:`Ctrl+S` to save changes. (You can
|
||||
adjust the auto-save interval in :guilabel:`Preferences`.) You can also regenerate the whole novel
|
||||
view by pressing the refresh button at the top of the side panel.
|
||||
|
||||
It is possible to show an optional third column in the novel view, The settings are available from
|
||||
the menu button in the toolbar.
|
||||
|
||||
If you click the arrow icon to the right of each item, a tooltip will pop out showing you all the
|
||||
meta data collected for that heading.
|
||||
|
||||
|
||||
Novel Outline View
|
||||
------------------
|
||||
|
||||
.. figure:: images/fig_outline_view.png
|
||||
|
||||
A screenshot of the Novel Outline View.
|
||||
|
||||
When in :guilabel:`Novel Outline View` mode, the tree, editor and viewer will be replaced by a
|
||||
large table that shows the entire novel structure with all the tags and references listed. Pretty
|
||||
much all collected meta data is available here in different columns.
|
||||
|
||||
You can select which novel root folder to display from the dropdown box, and you can select which
|
||||
columns to show or hide from the menu button. You can also rearrange the columns by drag and drop.
|
||||
The app will remember your column order and size between sessions, and for each individual project.
|
||||
|
||||
|
||||
Colour Themes
|
||||
-------------
|
||||
|
||||
By default, novelWriter will use the colour theme provided by the Qt library, which is determined
|
||||
by the Fusion_ style setting. You can also choose between a standard dark and light theme that have
|
||||
neutral colours from :guilabel:`Preferences`. Other colour themes are also available. More themes
|
||||
can be contributed to novelWriter on GitHub.
|
||||
|
||||
Switching the GUI colour theme does not affect the colours of the editor and viewer. They have
|
||||
separate colour themes called :guilabel:`Editor Themes`. They are separated because there are a lot
|
||||
more options to choose from for the editor and viewer.
|
||||
|
||||
.. note::
|
||||
If you switch to dark mode on the GUI, you should also switch editor theme to match, otherwise
|
||||
icons may be hard to see in the editor and viewer.
|
||||
|
||||
|
||||
.. _a_breakdown_project:
|
||||
|
||||
Project Layout
|
||||
==============
|
||||
|
||||
This is a brief introduction to how you structure your writing projects. All of this will be
|
||||
covered in more detail later.
|
||||
|
||||
The main point of novelWriter is that you are free to organise your project documents as you wish
|
||||
into sub-folders or sub-documents, and split the text between these documents in whatever way suits
|
||||
you. All that matters to novelWriter is the linear order the documents appear at in the project
|
||||
tree (top to bottom). The chapters, scenes and sections of the novel are determined by the headings
|
||||
within those documents.
|
||||
|
||||
.. figure:: images/fig_header_levels.png
|
||||
|
||||
An illustration of how header levels correspond to the novel structure.
|
||||
|
||||
The four heading levels (**H1** to **H4**) are treated as follows:
|
||||
|
||||
* **H1** is used for the novel title, and for partitions.
|
||||
* **H2** is used for chapter tiles.
|
||||
* **H3** is used for scene titles -- optionally replaced by separators.
|
||||
* **H4** is for section titles within scenes, if such granularity is needed.
|
||||
|
||||
The project tree will select an icon for the document based on the first heading in it.
|
||||
|
||||
This header level structure is only taken into account for :term:`novel documents`. For
|
||||
:term:`project notes`, the header levels have no structural meaning, and you are free to use them
|
||||
however you want. See :ref:`a_struct` and :ref:`a_references` for more details.
|
||||
|
||||
.. versionadded:: 2.0
|
||||
You can add documents as child items of other documents. This is often more useful than adding
|
||||
folders, since you anyway may want to have the chapter heading in a separate document from your
|
||||
individual scene documents so that you can rearrange scene documents freely without affecting
|
||||
chapter placement.
|
||||
|
||||
|
||||
.. _a_breakdown_export:
|
||||
|
||||
Building the Manuscript
|
||||
=======================
|
||||
|
||||
The project can at any time be assembled into a range of different formats through the
|
||||
:guilabel:`Build Manuscript` tool. Natively, novelWriter supports `Open Document`_, HTML5, and
|
||||
various flavours of Markdown.
|
||||
|
||||
The HTML5 format is suitable for conversion by a number of other tools like Pandoc_, or for
|
||||
importing into word processors if the Open Document format isn't suitable. The Open Document format
|
||||
is supported by most Office type applications. In addition, printing is also possible. Print to PDF
|
||||
is available from the print dialog.
|
||||
|
||||
In addition, you can export the content of the project to a JSON file. This is useful if you want
|
||||
to write your own custom processing script in for instance Python, as the entire novel can be read
|
||||
into a Python dictionary with a couple of lines of code. The JSON file can be populated with either
|
||||
HTML formatted text, or with the raw text as typed into the novel documents.
|
||||
|
||||
See :ref:`a_manuscript` for more details.
|
||||
|
||||
.. versionadded:: 2.1
|
||||
You can now define multiple build definitions in the :guilabel:`Build Manuscript` tool. This
|
||||
allows you to define specific settings for various types of draft documents, outline documents,
|
||||
and manuscript formats. See :ref:`a_manuscript` for more details.
|
||||
|
||||
|
||||
.. _a_breakdown_storage:
|
||||
|
||||
Project Storage
|
||||
===============
|
||||
|
||||
The files of a novelWriter project are stored in a dedicated project folder. The project structure
|
||||
is kept in a file at the root of this folder called ``nwProject.nwx``. All the document files and
|
||||
associated meta data is stored in other folders below the project folder. For more technical
|
||||
details about what all the files mean and how they're organised, see the :ref:`a_storage` section.
|
||||
|
||||
This way of storing data was chosen for several reasons.
|
||||
|
||||
Firstly, all the text you add to your project is saved directly to your project folder in separate
|
||||
files. Only the project structure and the text you are currently editing is stored in memory at any
|
||||
given time, which means there is a smaller risk of losing data if the application or your computer
|
||||
crashes.
|
||||
|
||||
Secondly, having multiple small files means it is very easy to synchronise them between computers
|
||||
with standard file synchronisation tools.
|
||||
|
||||
Thirdly, if you use version control software to track the changes to your project, the file formats
|
||||
used for the files are well suited. Also the JSON documents have line breaks and indents, which
|
||||
makes it easier to track them with version control software.
|
||||
|
||||
.. note::
|
||||
Since novelWriter has to keep track of a bunch of files and folders when a project is open, it
|
||||
may not run well on some virtual file systems. A file or folder must be accessible with exactly
|
||||
the path it was saved or created with. An example where this is not the case is the way Google
|
||||
Drive is mapped on Linux Gnome desktops using gvfs/gio.
|
||||
|
||||
.. caution::
|
||||
You should not add additional files to the project folder yourself. Nor should you, as a rule,
|
||||
manually edit files within it. If you really must manually edit the text files, e.g. with some
|
||||
automated task you want to perform, you need to rebuild the :term:`Project Index` when you open
|
||||
the project again.
|
||||
|
||||
Editing text files in the ``content`` folder is less risky as these are just plain text. Editing
|
||||
the main project XML file, however, may make the project file unreadable and you may crash
|
||||
novelWriter and lose project structure information and project settings.
|
||||
157
docs/source/usage_export.rst
Normal file
@@ -0,0 +1,157 @@
|
||||
.. _a_export:
|
||||
|
||||
******************
|
||||
Exporting Projects
|
||||
******************
|
||||
|
||||
The novelWriter project can be exported in various formats using the build tool available from
|
||||
:guilabel:`Build Novel Project` in the :guilabel:`Tools` menu, or by pressing :kbd:`F5`.
|
||||
|
||||
|
||||
.. _a_export_headers:
|
||||
|
||||
Header Formatting
|
||||
=================
|
||||
|
||||
The titles for the five types of titles (the chapter headings come in a numbered and unnumbered
|
||||
version) of story structure can be formatted collectively in the build tool. This is done through
|
||||
a series of keyword–replace steps. They are all on the format ``%keyword%``.
|
||||
|
||||
``%title%``
|
||||
This keyword will always be replaced with the title text you put after the ``#`` characters in
|
||||
your document.
|
||||
|
||||
``%ch%``
|
||||
This will be replaced by a chapter number. The number is incremented by one each time the build
|
||||
tool sees a new heading of level two in a document with layout :guilabel:`Chapter`. If the
|
||||
document has layout :guilabel:`Unnumbered`, the counter is *not* incremented. The latter is
|
||||
useful for for instance Prologue and Epilogue chapters. Adding an asterisk (``*``) in front of
|
||||
the title text of a level two heading will also disable the chapter counter for that heading.
|
||||
|
||||
``%chw%``
|
||||
Behaves like ``%ch%``, but the number is represented as a number word.
|
||||
|
||||
``%chi%``
|
||||
Begaves like ``%ch%``, but the number is represented as a lower case Roman number.
|
||||
|
||||
``%chI%``
|
||||
Behaves like ``%ch%``, but the number is represented as an upper case Roman number.
|
||||
|
||||
``%sc%``
|
||||
This is the number counter equivalent for scenes. These are incremented each time a heading of
|
||||
level three is encountered, but reset to 1 each time a chapter is encountered. They can thus be
|
||||
used for counting scenes within a chapter.
|
||||
|
||||
``%sca%``
|
||||
Behaves like ``%sc%``, but the number is *not* reset to 1 for each chapter. Instead it runs from
|
||||
1 from the beginning of the novel to produce an absolute scene count.
|
||||
|
||||
``\\``
|
||||
This inserts a line break within the title.
|
||||
|
||||
.. note::
|
||||
Header formatting only applies to novel documents. Headings in notes will be left as-is on
|
||||
export. However, heading levels 1 through 4 are converted to the correct heading level in the
|
||||
respective output formats.
|
||||
|
||||
**Example**
|
||||
|
||||
* The format ``%title%`` just reproduces the title you set in the document.
|
||||
* The format ``Chapter %ch%: %title%`` produces something like "Chapter 1: My Chapter Title".
|
||||
* The format ``Scene %ch%.%sc%`` produces something like "Scene 1.2" for scene 2 in chapter 1.
|
||||
|
||||
|
||||
.. _a_export_scenes:
|
||||
|
||||
Scene Separators
|
||||
================
|
||||
|
||||
If you don't want any titles for your scenes (or for your sections if you have them), you can leave
|
||||
the formatting boxes empty. If so, an empty paragraph will be inserted between the scenes or
|
||||
sections instead.
|
||||
|
||||
Alternatively, if you want a separator between them, like the common ``* * *``, you can enter the
|
||||
desired separator text in the formatting box. In fact, if the format is a piece of static text, it
|
||||
will always be treated as a separator.
|
||||
|
||||
|
||||
.. _a_export_files:
|
||||
|
||||
File Selection
|
||||
==============
|
||||
|
||||
Which documents and notes are selected for export can be controlled from the options on the left
|
||||
side of the dialog window. The switch for :guilabel:`Include novel files` will select any document
|
||||
that isn't classified as a note. The switch for :guilabel:`Include note files` will select any
|
||||
document that *is* a note. This allows for exporting just the novel, just your notes, or both, as
|
||||
you see fit.
|
||||
|
||||
In addition, you can select to export the synopsis comments, regular comments, keywords, and even
|
||||
exclude the body text itself.
|
||||
|
||||
.. tip::
|
||||
If you for instance want to export a document with an outline of the novel, you can enable
|
||||
keywords and synopsis export and disable body text, thus getting a document with each heading
|
||||
followed by the tags and references and the synopsis.
|
||||
|
||||
If you need to exclude specific documents from your exports, like draft documents or documents you
|
||||
want to take out of your manuscript, but don't want to delete, you can un-check the
|
||||
:guilabel:`Include when building project` option for each document in the project tree. An included
|
||||
document has a checkmark after the status icon in the :guilabel:`Flags` column. The
|
||||
:guilabel:`Build Novel Project` tool has a switch to ignore this flag if you need to collectively
|
||||
override these settings.
|
||||
|
||||
|
||||
.. _a_export_print:
|
||||
|
||||
Printing
|
||||
========
|
||||
|
||||
The print button allows you to print the content in the preview window. You can either print to one
|
||||
of your system's printers, or print directly to file. You can also print to file from the regular
|
||||
print dialog. The direct to file option is just a shortcut.
|
||||
|
||||
|
||||
.. _a_export_formats:
|
||||
|
||||
Export Formats
|
||||
==============
|
||||
|
||||
Currently, six formats are supported for exporting.
|
||||
|
||||
Open Document Format
|
||||
The Build tool can produce either an ``.odt`` file, or an ``.fodt`` file. The latter is just a
|
||||
flat version of the document format as a single XML file.
|
||||
|
||||
novelWriter HTML
|
||||
The HTML export format writes a single ``.htm`` file with minimal style formatting. The exported
|
||||
HTML document is suitable for further processing by document conversion tools like Pandoc, for
|
||||
importing in word processors, or for printing from browser.
|
||||
|
||||
novelWriter Markdown
|
||||
This is simply a concatenation of the project documents selected by the filters. The documents
|
||||
are stacked together in the order they appear in the project tree, with comments, tags, etc.
|
||||
included if they are selected. This is a useful format for exporting the project for later
|
||||
import back into novelWriter.
|
||||
|
||||
Standard/GitHub Markdown
|
||||
The Markdown export format comes in both Standard and GitHub flavour. The *only* difference in
|
||||
terms of novelWriter functionality is the support of strikethrough text, which is not supported
|
||||
by the Standard flavour, but *is* supported by the GitHub flavour.
|
||||
|
||||
|
||||
.. _a_export_options:
|
||||
|
||||
Additional Export Options
|
||||
=========================
|
||||
|
||||
In addition to the above document formats, the novelWriter HTML and Markdown formats can also be
|
||||
wrapped in a JSON file. These files will have a meta data entry and a body entry. For HTML, also
|
||||
the accompanying css styles are exported.
|
||||
|
||||
The text body is saved in a two-level list. The outer list contains one entry per exported
|
||||
document, in the order they appear in the project tree. Each document is then split up into a list
|
||||
as well, with one entry per paragraph it contains.
|
||||
|
||||
These files are mainly intended for scripted post-processing for those who want that option. A JSON
|
||||
file can be imported directly into a Python dict object or a PHP array, to mentions a few options.
|
||||
@@ -1,326 +0,0 @@
|
||||
.. _a_fmt:
|
||||
|
||||
********************
|
||||
Formatting Your Text
|
||||
********************
|
||||
|
||||
The novelWriter text editor is a plain text editor that uses formatting codes for setting meta data
|
||||
values and allowing for some text formatting. The syntax is based on Markdown, but novelWriter is
|
||||
*not* a Markdown editor. It supports basic formatting like emphasis (italic), strong importance
|
||||
(bold) and strike through text, as well as four levels of headings. Form some further complex
|
||||
formatting needs, a set of shortcodes can be used.
|
||||
|
||||
In addition to formatting codes, novelWriter allows for comments, a synopsis tag, and a set of
|
||||
keyword and value sets used for :term:`tags<tag>` and :term:`references<reference>`. There are also
|
||||
some codes that apply to whole paragraphs. See :ref:`a_fmt_text` for more details.
|
||||
|
||||
|
||||
.. _a_fmt_hlight:
|
||||
|
||||
Syntax Highlighting
|
||||
===================
|
||||
|
||||
The editor has a syntax highlighter feature that is meant to help you know when you've used the
|
||||
formatting tags or other features correctly. It will change the colour and font size of your
|
||||
headings, change the text colour of emphasised text, and it can also show you where you have
|
||||
dialogue in your text.
|
||||
|
||||
.. figure:: images/fig_references.png
|
||||
|
||||
An example of the colour highlighting of references. "Bob" is not defined, and "@blabla" is not
|
||||
a valid reference type.
|
||||
|
||||
When you use the commands to set tags and references, these also change colour. Correct commands
|
||||
have a distinct colour, and the references themselves will get a colour if they are valid. Invalid
|
||||
references will get a squiggly error line underneath. The same applies to duplicate tags.
|
||||
|
||||
There are a number of syntax highlighter colour themes available, both for light and dark GUIs. You
|
||||
can select them from :guilabel:`Preferences`.
|
||||
|
||||
|
||||
.. _a_fmt_head:
|
||||
|
||||
Headings
|
||||
========
|
||||
|
||||
.. figure:: images/fig_header_levels.png
|
||||
|
||||
An illustration of how header levels correspond to the novel structure.
|
||||
|
||||
Four levels of headings are allowed. For :term:`project notes`, they are free to be used as you see
|
||||
fit. That is, novelWriter doesn't assign the different headings any particular meaning. However,
|
||||
for :term:`novel documents` they indicate the structural level of the novel and must be used
|
||||
correctly to produce the intended result. See :ref:`a_struct_heads` for more details.
|
||||
|
||||
``# Title Text``
|
||||
Heading level one. For novel documents, the header level indicates the start of a new partition.
|
||||
|
||||
``## Title Text``
|
||||
Heading level two. For novel documents, the header level indicates the start of a new chapter.
|
||||
Chapter numbers can be inserted automatically when building the manuscript.
|
||||
|
||||
``### Title Text``
|
||||
Heading level three. For novel documents, the header level indicates the start of a new scene.
|
||||
Scene numbers or scene separators can be inserted automatically when building the manuscript,
|
||||
so you can use the title field as a working title for your scenes if you wish.
|
||||
|
||||
``#### Title Text``
|
||||
Heading level four. For novel documents, the header level indicates the start of a new section.
|
||||
Section titles can be replaced by separators or ignored completely when building the manuscript.
|
||||
|
||||
For headers level one and two, adding a ``!`` modifies the behaviour of the heading:
|
||||
|
||||
``#! Title Text``
|
||||
This tells the build tool that the level one heading is intended to be used for the novel's
|
||||
main title, like for instance on the front page. When building the manuscript, this will use a
|
||||
different styling and will exclude the title from, for instance, a Table of Contents in Libre
|
||||
Office.
|
||||
|
||||
``##! Title Text``
|
||||
This tells the build tool to not assign a chapter number to this chapter title if automatic
|
||||
chapter numbers are being used. Such titles are useful for a prologue for instance. See
|
||||
:ref:`a_struct_heads_unnum` for more details.
|
||||
|
||||
.. note::
|
||||
The space after the ``#`` or ``!`` character is mandatory. The syntax highlighter will change
|
||||
colour and font size when the heading is correctly formatted.
|
||||
|
||||
|
||||
.. _a_fmt_text:
|
||||
|
||||
Text Paragraphs
|
||||
===============
|
||||
|
||||
A text paragraph is indicated by a blank line. That is, you need two line breaks to separate two
|
||||
fragments of text into two paragraphs. Single line breaks are treated as line breaks within a
|
||||
paragraph.
|
||||
|
||||
In addition, the editor supports a few additional types of white spaces:
|
||||
|
||||
* A non-breaking space can be inserted with :kbd:`Ctrl+K`, :kbd:`Space`.
|
||||
* Thin spaces are also supported, and can be inserted with :kbd:`Ctrl+K`, :kbd:`Shift+Space`.
|
||||
* Non-breaking thin space can be inserted with :kbd:`Ctrl+K`, :kbd:`Ctrl+Space`.
|
||||
|
||||
These are all insert features, and the :guilabel:`Insert` menu has more. They are also listed
|
||||
in :ref:`a_kb_ins`.
|
||||
|
||||
Non-breaking spaces are highlighted by the syntax highlighter with an alternate coloured
|
||||
background, depending on the selected theme.
|
||||
|
||||
.. tip::
|
||||
Non-breaking spaces are for instance the correct type of space to separate a number from its
|
||||
unit. Generally, non-breaking spaces are used to prevent line wrapping algorithms from adding
|
||||
line breaks where they shouldn't.
|
||||
|
||||
|
||||
.. _a_fmt_emph:
|
||||
|
||||
Text Emphasis
|
||||
=============
|
||||
|
||||
A minimal set of text emphasis styles are supported for text paragraphs.
|
||||
|
||||
``_text_``
|
||||
The text is rendered as emphasised text (italicised).
|
||||
|
||||
``**text**``
|
||||
The text is rendered as strongly important text (bold).
|
||||
|
||||
``~~text~~``
|
||||
Strike through text.
|
||||
|
||||
In Markdown guides it is often recommended to differentiate between strong importance and emphasis
|
||||
by using ``**`` for strong and ``_`` for emphasis, although Markdown generally also supports ``__``
|
||||
for strong and ``*`` for emphasis. However, since the differentiation makes the highlighting and
|
||||
conversion significantly simpler and faster, in novelWriter this is a rule, not just a
|
||||
recommendation.
|
||||
|
||||
In addition, the following rules apply:
|
||||
|
||||
1. The emphasis and strike through formatting tags do not allow spaces between the words and the
|
||||
tag itself. That is, ``**text**`` is valid, ``**text **`` is not.
|
||||
2. More generally, the delimiters must be on the outer edge of words. That is, ``some **text in
|
||||
bold** here`` is valid, ``some** text in bold** here`` is not.
|
||||
3. If using both ``**`` and ``_`` to wrap the same text, the underscore must be the *inner*
|
||||
wrapper. This is due to the underscore also being a valid word character, so if they are on the
|
||||
outside, they violate rule 2.
|
||||
4. Text emphasis does not span past line breaks. If you need to add emphasis to multiple lines or
|
||||
paragraphs, you must apply it to each of them in turn.
|
||||
5. Text emphasis can only be used in plain paragraphs. Comments, titles, and meta data tags don't
|
||||
allow for formatting, and any formatting markup will be rendered as-is.
|
||||
|
||||
.. tip::
|
||||
novelWriter supports standard escape syntax for the emphasis markup characters in case the
|
||||
editor misunderstands your intended usage of them. That is, ``\*``, ``\_`` and ``\~`` will
|
||||
generate a plain ``*``, ``_`` and ``~``, respectively, without interpreting them as part of the
|
||||
markup.
|
||||
|
||||
|
||||
.. _a_fmt_shortcodes:
|
||||
|
||||
Extended Formatting with Shortcodes
|
||||
===================================
|
||||
|
||||
For additional formatting options, you can use shortcodes. Shortcodes is a form of in-line codes
|
||||
that can be used to change the format of the text that follows and opening code, and last until
|
||||
that formatting region is ended with a closing code.
|
||||
|
||||
These shortcodes are intended for special formatting cases, or more complex cases that cannot be
|
||||
solved with simple Markdown-like formatting codes. Available shortcodes are listed below.
|
||||
|
||||
.. csv-table:: Shortcodes Formats
|
||||
:header: "Syntax", "Description"
|
||||
:widths: 40, 60
|
||||
:class: "tight-table"
|
||||
|
||||
"``[b]text[/b]``", "Text is rendered as bold text."
|
||||
"``[i]text[/i]``", "Text is rendered as italicised text."
|
||||
"``[s]text[/s]``", "Text is rendered as strike through text."
|
||||
"``[u]text[/u]``", "Text is rendered as underlined text."
|
||||
"``[sup]text[/sup]``", "Text is rendered as superscript text."
|
||||
"``[sub]text[/sub]``", "Text is rendered as subscript text."
|
||||
|
||||
Unlike Markdown style codes, these can be used anywhere within a paragraph. Even in the middle of a
|
||||
word if you need to. You can also freely combine them to form more complex formatting.
|
||||
|
||||
The shortcodes are available from the :guilabel:`Format` menu and in the editor toolbar, which can
|
||||
be activated by clicking the three dots in the editor header.
|
||||
|
||||
.. versionadded:: 2.2
|
||||
|
||||
|
||||
.. _a_fmt_comm:
|
||||
|
||||
Comments and Synopsis
|
||||
=====================
|
||||
|
||||
In addition to these standard Markdown features, novelWriter also allows for comments in documents.
|
||||
The text of a comment is ignored by the word counter. The text can also be filtered out when
|
||||
building the manuscript or viewing the document.
|
||||
|
||||
If the first word of a comment is ``Synopsis:`` (with the colon included), the comment is treated
|
||||
in a special manner and will show up in the :ref:`a_ui_outline` in a dedicated column. The word
|
||||
``synopsis`` is not case sensitive. If it is correctly formatted, the syntax highlighter will
|
||||
indicate this by altering the colour of the word.
|
||||
|
||||
``% text ...``
|
||||
This is a comment. The text is not rendered by default (this can be overridden), seen in the
|
||||
document viewer, or counted towards word counts.
|
||||
|
||||
``%Synopsis: text ...``
|
||||
This is a synopsis comment. It is generally treated in the same way as a regular comment, except
|
||||
that it is also captured by the indexing algorithm and displayed in the :ref:`a_ui_outline`. It
|
||||
can also be filtered separately when building the project to for instance generate an outline
|
||||
document of the whole project.
|
||||
|
||||
``%Short: text ...``
|
||||
This is a short description comment. It is identical to the synopsis comment, but is intended to
|
||||
be used for project notes. The text shows up in the Reference panel below the document viewer in
|
||||
the last column labelled :guilabel:`Short Description`.
|
||||
|
||||
.. note::
|
||||
Only one comment can be flagged as a synopsis or short comment for each heading. If multiple
|
||||
comments are flagged as synopsis or short comments, the last one will be used and the rest
|
||||
ignored.
|
||||
|
||||
|
||||
.. _a_fmt_tags:
|
||||
|
||||
Tags and References
|
||||
===================
|
||||
|
||||
The document editor supports a set of keywords used for setting tags, and making references between
|
||||
documents.
|
||||
|
||||
Tags use the command ``@tag:`` to define a tag. The tag can be set once per section defined by a
|
||||
heading. Setting it multiple times under the same heading will just override the previous setting.
|
||||
|
||||
``@tag: value``
|
||||
A tag command followed by the tag value, like for instance the name of a character.
|
||||
|
||||
References can be set anywhere within a section, and are collected according to their category.
|
||||
References are in the form:
|
||||
|
||||
``@keyword: value``
|
||||
A reference keyword followed by a value, or a comma separated list of values.
|
||||
|
||||
Tags and references are covered in detail in the :ref:`a_references` chapter. The keywords can be
|
||||
inserted at the cursor position in the editor via the :guilabel:`Insert` menu. If you start typing
|
||||
an ``@`` on a new line, and auto-complete menu will also pop up suggesting keywords.
|
||||
|
||||
|
||||
.. _a_fmt_align:
|
||||
|
||||
Paragraph Alignment and Indentation
|
||||
===================================
|
||||
|
||||
All documents have the text by default aligned to the left or justified, depending on your
|
||||
settings in :guilabel:`Preferences`.
|
||||
|
||||
You can override the default text alignment on individual paragraphs by specifying alignment tags.
|
||||
These tags are double angle brackets. Either ``>>`` or ``<<``. You put them either before or after
|
||||
the paragraph, and they will "push" the text towards the edge the brackets point towards. This
|
||||
should be fairly intuitive.
|
||||
|
||||
Indentation uses a similar syntax. But here you use a single ``>`` or ``<`` to push the text away
|
||||
from the edge.
|
||||
|
||||
Examples:
|
||||
|
||||
.. csv-table:: Text Alignment and Indentation
|
||||
:header: "Syntax", "Description"
|
||||
:widths: 40, 60
|
||||
:class: "tight-table"
|
||||
|
||||
"``>> Right aligned text``", "The text paragraph is right-aligned."
|
||||
"``Left aligned text <<``", "The text paragraph is left-aligned."
|
||||
"``>> Centred text <<``", "The text paragraph is centred."
|
||||
"``> Left indented text``", "The text has an increased left margin."
|
||||
"``Right indented text <``", "The text has an increased right margin."
|
||||
"``> Left/right indented text <``", "The text has both margins increased."
|
||||
|
||||
.. note::
|
||||
The text editor will not show the alignment and indentation live. But the viewer will show them
|
||||
when you open the document there. It will of course also be reflected in the document generated
|
||||
from the build tool as long as the format supports paragraph alignment.
|
||||
|
||||
|
||||
.. _a_fmt_break:
|
||||
|
||||
Vertical Space and Page Breaks
|
||||
==============================
|
||||
|
||||
Adding more than one line break between paragraphs will *not* increase the space between those
|
||||
paragraphs when building the project. To add additional space between paragraphs, add the text
|
||||
``[VSPACE]`` on a line of its own, and the build tool will insert a blank paragraph in its place.
|
||||
|
||||
If you need multiple blank paragraphs just add a colon and a number to the above code. For
|
||||
instance, writing ``[VSPACE:3]`` will insert three blank paragraphs.
|
||||
|
||||
Normally, the build tool will insert a page break before all headers of level one and for all
|
||||
headers of level two for novel documents, i.e. chapters, but not for project notes.
|
||||
|
||||
If you need to add a page break somewhere else, put the text ``[NEW PAGE]`` on a line by itself
|
||||
before the text you wish to start on a new page.
|
||||
|
||||
If you want page breaks for scenes and sections, you must add them manually.
|
||||
|
||||
.. note::
|
||||
The page break code is applied to the text that follows it. It adds a "page break before" mark
|
||||
to the text when exporting to HTML or Open Document. This means that a ``[NEW PAGE]`` which has
|
||||
no text following it, it will not result in a page break.
|
||||
|
||||
**Example:**
|
||||
|
||||
.. code-block:: markdown
|
||||
|
||||
This is a text paragraph.
|
||||
|
||||
[VSPACE:2]
|
||||
|
||||
This is another text paragraph, but there will be two empty paragraphs
|
||||
in-between them.
|
||||
|
||||
[NEWPAGE]
|
||||
|
||||
This text will always start on a new page if the build format has pages.
|
||||
437
docs/source/usage_interface.rst
Normal file
@@ -0,0 +1,437 @@
|
||||
.. _a_ui:
|
||||
|
||||
**************
|
||||
User Interface
|
||||
**************
|
||||
|
||||
The user interface is kept as simple as possible to avoid distractions when writing. This page
|
||||
lists all the main GUI elements, and explains what they do.
|
||||
|
||||
|
||||
.. _a_ui_tree:
|
||||
|
||||
The Project Tree
|
||||
================
|
||||
|
||||
The main window contains a project tree in the left-most panel. It shows the entire structure of
|
||||
the project. It has four columns:
|
||||
|
||||
:guilabel:`Label`
|
||||
The first column shows the item icon and its label. The labels can be edited from the
|
||||
:guilabel:`Project` menu, or by pressing :kbd:`F2` or :kbd:`Ctrl`:kbd:`E`. The label is not the
|
||||
same as the title you set inside the document, but it will appear in the header above the
|
||||
document text itself.
|
||||
|
||||
:guilabel:`Words`
|
||||
The second column shows the word count of the document, or the sum of words of the child items
|
||||
if it is a folder. If the counts seem incorrect, they can be updated by rebuilding the project
|
||||
index from the :guilabel:`Tools` menu, or by pressing :kbd:`F9`.
|
||||
|
||||
:guilabel:`Inc`
|
||||
The third column indicates whether the document is included in the final project build or not.
|
||||
You may want to filter out documents that you no longer want to keep in the final manuscript,
|
||||
but want to keep in the project for reference.
|
||||
|
||||
:guilabel:`Flags`
|
||||
The fourth column shows various meta data flags for the item. The first is an icon indicating
|
||||
the importance or status of the document. These are colour coded status levels that you control
|
||||
and define yourself. They can be changed in :guilabel:`Project Settings` from the
|
||||
:guilabel:`Project` menu. The first character after the icon indicates the class of the item,
|
||||
that is ``N`` for **Novel**, ``C`` for **Character**, etc (see :ref:`a_struct_tags`). The
|
||||
characters after the dot indicate the document layout type (see :ref:`a_proj_roots`).
|
||||
|
||||
Right-clicking an item in the project tree will open a context menu under the cursor, displaying
|
||||
a selection of actions that can be performed on the selected item.
|
||||
|
||||
Below the project tree you will find a small details panel showing the full information of the
|
||||
currently selected item. This panel also includes the latest paragraph and character counts in
|
||||
addition to the word count.
|
||||
|
||||
|
||||
.. _a_ui_tree_novel:
|
||||
|
||||
The Novel Tree
|
||||
--------------
|
||||
|
||||
An alternative way to view the project structure is the novel tree. You can switch to this view by
|
||||
selecting the :guilabel:`Novel` tab under the project tree. This view is a simplified version of
|
||||
the view in the :guilabel:`Outline`. It is convenient when you want to browse the structure of the
|
||||
story itself rather than the document files.
|
||||
|
||||
.. note::
|
||||
You cannot reorganise the entries in the novel tree as that would imply restructuring the
|
||||
content of the document files.
|
||||
|
||||
|
||||
.. _a_ui_tree_status:
|
||||
|
||||
Document Importance and Status
|
||||
------------------------------
|
||||
|
||||
Each document or folder in your project can have either a "Status" or "Importance" flag set. These
|
||||
are flags that you control and define in their respective tabs in :guilabel:`Project Settings`. The
|
||||
"Status" flag is intended to tag a Novel document as for instance a draft or as completed, and the
|
||||
"Importance" flag is intended to tag character notes, or other notes, as for instance a main, major
|
||||
or minor character.
|
||||
|
||||
Whether a document uses a "Status" or "Importance" flag depends on which root folder it lives in.
|
||||
If it's in the :guilabel:`Novel` folder, it uses the "Status" flag, otherwise it uses an
|
||||
"Importance" flag. Some folders, like :guilabel:`Trash` and :guilabel:`Outtakes` allow both.
|
||||
|
||||
|
||||
.. _a_ui_tree_dnd:
|
||||
|
||||
Project Tree Drag & Drop
|
||||
------------------------
|
||||
|
||||
The project tree allows drag & drop to a certain extent. This feature is primarily intended for
|
||||
rearranging the order of your documents within each root folder, and has only limited support for
|
||||
moving documents elsewhere in the project tree. In general, bulk actions are not allowed. This is
|
||||
deliberate to avoid accidentally messing up your project. If you make a mistake, the last move
|
||||
action can be undone by pressing :kbd:`Ctrl`:kbd:`Shift`:kbd:`Z`.
|
||||
|
||||
Documents and their folders can be rearranged freely within their root folders. Novel documents
|
||||
cannot be moved out of the :guilabel:`Novel` folder, except to :guilabel:`Trash` and the
|
||||
:guilabel:`Outtakes` folders. Notes can be moved freely between all root folders, but keep in mind
|
||||
that if you move a note into a :guilabel:`Novel`, its "Importance" setting will be reset to the
|
||||
default "Status" setting. See :ref:`a_ui_tree_status`.
|
||||
|
||||
Folders cannot be moved at all outside their root tree. Neither can a folder containing documents
|
||||
be deleted. You must first delete the containing documents.
|
||||
|
||||
Root folders in the project tree cannot be dragged and dropped at all. If you want to reorder them,
|
||||
you can move them up or down with respect to eachother from the :guilabel:`Project` menu, the
|
||||
right-click context menu, or by pressing :kbd:`Ctrl`:kbd:`Shift` and the :kbd:`Up` or :kbd:`Down`
|
||||
key.
|
||||
|
||||
|
||||
.. _a_ui_edit:
|
||||
|
||||
Editing and Viewing Documents
|
||||
=============================
|
||||
|
||||
To edit a document, double-click it in the project tree, or press the :kbd:`Return` key while
|
||||
having it selected. This will open the document in the document editor. The editor uses a
|
||||
simplified markdown format. The format is described in the :ref:`a_ui_md` section below. The editor
|
||||
has a maximise button (toggles the :guilabel:`Focus Mode`) and a close button in the top-right
|
||||
corner.
|
||||
|
||||
Any document in the project tree can also be viewed in parallel in a right hand side document
|
||||
viewer. To view a document, press :kbd:`Ctrl`:kbd:`R`, or select :guilabel:`View Document` in the
|
||||
menu. If you have a middle mouse button, middle-clicking on the document will also open it in the
|
||||
viewer. The document viewed does not have to be the same document currently being edited. However,
|
||||
If you *are* viewing the same document, pressing :kbd:`Ctrl`:kbd:`R` again will update the document
|
||||
with your latest changes. You can also press the reload button in the top-right corner of the view
|
||||
panel next to the close button to achieve the same thing.
|
||||
|
||||
Both the document editor and viewer will show the label of the document in the header at the top of
|
||||
the edit or view panel. Optionally, the full project path to the document can be shown. This can be
|
||||
set in :guilabel:`Preferences` from the :guilabel:`Tools` menu. Clicking on the document title bar
|
||||
will select and reveal its location in the project tree, making it easier to locate in a large
|
||||
project.
|
||||
|
||||
Any tag reference in the editor can be opened in the viewer by moving the cursor to the label and
|
||||
pressing :kbd:`Ctrl`:kbd:`Return`. You can also control-click them with your mouse. In the viewer,
|
||||
the references become clickable links. Clicking them will replace the content of the viewer with
|
||||
the content of the document the reference points to. The document viewer keeps a history of viewed
|
||||
documents, which you can navigate with the arrow buttons in the top-left corner of the viewer. If
|
||||
your mouse has back and forward navigation buttons, these can be used as well. They work just like
|
||||
the backward and forward features in a browser.
|
||||
|
||||
At the bottom of the view panel there is a :guilabel:`References` panel. (If it is hidden, click
|
||||
the icon to reveal it.) This panel will show links to all documents referring back to the one
|
||||
you're currently viewing, if any has been defined. The :guilabel:`Sticky` button will freeze the
|
||||
content of the panel to the current document, even if you navigate to another document. This is
|
||||
convenient if you want to quickly look through all documents in the list in the
|
||||
:guilabel:`References` panel without losing the list in the process.
|
||||
|
||||
.. note::
|
||||
The :guilabel:`References` panel relies on an up-to-date index of the project. The index is
|
||||
maintained automatically. However, if anything is missing, or seems wrong, the index can always
|
||||
be rebuilt by selecting :guilabel:`Rebuild Index` from the :guilabel:`Tools` menu, or by
|
||||
pressing :kbd:`F9`.
|
||||
|
||||
|
||||
.. _a_ui_edit_search:
|
||||
|
||||
Search & Replace
|
||||
----------------
|
||||
|
||||
The document editor has a search and replace bar that can be activated with :kbd:`Ctrl`:kbd:`F` for
|
||||
search mode or :kbd:`Ctrl`:kbd:`H` for search/replace mode.
|
||||
|
||||
Pressing :kbd:`Return` while in the search box will search for the next occurrence of the word, and
|
||||
:kbd:`Shift`:kbd:`Return` for the previous. Pressing :kbd:`Return` in the replace box, will replace
|
||||
the highlighted text and move to the next word.
|
||||
|
||||
There are a number of settings for the search bar available as toggle switches above the search
|
||||
box. They allows you to search for, in order:,: matched case only, whole word results only, search
|
||||
using regular expressions, loop search when reaching the end of the document, and move to the next
|
||||
document when reaching the end. There is also a switch that will try to match the case of the word
|
||||
when the replacement is made. That is, it will try to keep the word upper, lower, or capitalised to
|
||||
match the word being replaced.
|
||||
|
||||
The regular expression search is somewhat dependant on which version of Qt your system has. If you
|
||||
have Qt 5.13 or higher, there is better support for unicode symbols in the search.
|
||||
|
||||
|
||||
.. _a_ui_edit_auto:
|
||||
|
||||
Auto-Replace as You Type
|
||||
========================
|
||||
|
||||
A few auto-replace features are supported by the editor. You can control every aspect of the
|
||||
auto-replace feature from :guilabel:`Preferences`. You can also disable this feature entirely if
|
||||
you wish.
|
||||
|
||||
.. tip::
|
||||
If you don't like auto-replacement, all symbols inserted by this feature are also available in
|
||||
the :guilabel:`Insert` menu, and via convenient :ref:`a_kb_ins`. You may also be using a
|
||||
`Compose Key`_ setup, which means you may not need the auto-replace feature.
|
||||
|
||||
.. _Compose Key: https://en.wikipedia.org/wiki/Compose_key
|
||||
|
||||
The editor is able to replace two and three hyphens with short and long dashes, triple points with
|
||||
ellipsis, and replace straight single and double quotes with user-defined quote symbols. It will
|
||||
also try to determine whether to use the opening or closing symbol, although this feature isn't
|
||||
always accurate. Especially distinguishing between closing single quote and apostrophe can be
|
||||
tricky for languages that use the same symbol for these.
|
||||
|
||||
.. tip::
|
||||
If the auto-replace feature changes a symbol when you did not want it to change, pressing
|
||||
:kbd:`Ctrl`:kbd:`Z` immediately after the auto-replacement will undo it without undoing the
|
||||
character you typed.
|
||||
|
||||
|
||||
.. _a_ui_md:
|
||||
|
||||
The Markdown-Like Format
|
||||
========================
|
||||
|
||||
The editor itself is a plaintext editor that uses formatting codes for setting meta data values and
|
||||
allowing for some text formatting. The syntax is based on Markdown, but novelWriter is *not* a
|
||||
Markdown editor. It supports basic formatting like emphasis (italic), strong importance (bold)
|
||||
and strikethrough text, as well as four levels of headings.
|
||||
|
||||
In addition to formatting codes, novelWriter allows for comments, a synopsis tag, and a set of
|
||||
keyword and value sets used for tags and references.
|
||||
|
||||
|
||||
.. _a_ui_md_head:
|
||||
|
||||
Headings
|
||||
--------
|
||||
|
||||
Four levels of headings are allowed. For documents of layout ``Note``, they are free to be used as
|
||||
you see fit, but for all other layouts used for the novel text itself, they indicate the structural
|
||||
level of the novel. See :ref:`a_struct_heads` for more details.
|
||||
|
||||
``# Title``
|
||||
Heading level one. If the document is a novel file, the header level indicates the start of a
|
||||
new partition. This heading level can also be used for the title page's novel title.
|
||||
|
||||
``## Title``
|
||||
Heading level two. If the document is a novel file, the header level indicates the start of a
|
||||
new chapter. Chapter numbers can be inserted automatically when exporting the manuscript.
|
||||
|
||||
``### Title``
|
||||
Heading level three. If the document is a novel file, the header level indicates the start of a
|
||||
new scene. Scene numbers or scene separators can be inserted automatically when exporting the
|
||||
manuscript, so you can use the title field as a working title for your scenes if you wish.
|
||||
|
||||
``#### Title``
|
||||
Heading level four. If the document is a novel file, the header level indicates the start of a
|
||||
new section. Section titles can be replaced by separators or removed when exporting the
|
||||
manuscript, so you can use the title field as a working title for your sections if you wish.
|
||||
|
||||
.. note::
|
||||
The space after the ``#`` characters is mandatory. The syntax highlighter will change colour and
|
||||
font size when the heading is correctly formatted.
|
||||
|
||||
.. tip::
|
||||
If you do use the automatic numbering feature for exports, you can tell the export tool to skip
|
||||
assigning a number to a specific chapter by adding a ``*`` as the first character of the title
|
||||
itself. See :ref:`a_struct_heads_unnum` for more details.
|
||||
|
||||
|
||||
.. _a_ui_md_text:
|
||||
|
||||
Text Paragraphs
|
||||
---------------
|
||||
|
||||
A text paragraph is indicated by a blank line. That is, you need two line breaks to separate two
|
||||
fragments of text into two paragraphs. Single line breaks are treated as line breaks within a
|
||||
paragraph.
|
||||
|
||||
In addition, the editor supports a few additional types of whitespaces.
|
||||
|
||||
* A non-breaking space can be inserted with :kbd:`Ctrl`:kbd:`K`, :kbd:`Space`.
|
||||
* Thin spaces are also supported, and can be inserted with :kbd:`Ctrl`:kbd:`K`,
|
||||
:kbd:`Shift`:kbd:`Space`.
|
||||
* Non-breaking thin space can be inserted with :kbd:`Ctrl`:kbd:`K`, :kbd:`Ctrl`:kbd:`Space`.
|
||||
|
||||
These are all insert features, and the :guilabel:`Insert` menu has more. They are also listed
|
||||
in :ref:`a_kb_ins`.
|
||||
|
||||
Non-breaking spaces are highlighted by the syntax highlighter with an alternate coloured
|
||||
background, depending on the selected theme.
|
||||
|
||||
.. tip::
|
||||
Non-breaking spaces are the correct type of space to separate a number from its unit. Generally,
|
||||
it prevents the line wrapping algorithms from adding line breaks where it shouldn't.
|
||||
|
||||
|
||||
.. _a_ui_md_align:
|
||||
|
||||
Paragraphs Alignment and Indentation
|
||||
------------------------------------
|
||||
|
||||
Aside from Title Page and Partition which by default have its text centred, all document layouts
|
||||
have the text by default aligned to the left ot justified, depending on your Preferences.
|
||||
|
||||
You can override the default text alignment on individual paragraphs by specifying alignment tags.
|
||||
These tags are double angle brackets. Either ``>>`` or ``<<``. You put them either before or after
|
||||
the paragraph, and they will "push" the text towards the edge the brackets point towards. This
|
||||
should be fairly intuitive.
|
||||
|
||||
Indentation uses a similar syntax. But here you use a single ``>`` or ``<`` to push the text away
|
||||
from the edge.
|
||||
|
||||
Examples:
|
||||
|
||||
.. csv-table:: Text Alignment and Indentation
|
||||
:header: "Syntax", "Description"
|
||||
:widths: 40, 60
|
||||
:class: "tight-table"
|
||||
|
||||
"``>> Right aligned text``", "The text paragraph is right-aligned."
|
||||
"``Left aligned text <<``", "The text paragraph is left-aligned."
|
||||
"``>> Centred text <<``", "The text paragraph is centred."
|
||||
"``> Indented text``", "The text has an increased left margin."
|
||||
"``Indented text <``", "The text has an increased right margin."
|
||||
"``> Indented text <``", "The text has an both margins increased."
|
||||
|
||||
.. note::
|
||||
The text editor will not show the alignment and indentation live. But the viewer will show them
|
||||
when you open the document in the viewer. It will of course also be reflected in the document
|
||||
generated from the build tool.
|
||||
|
||||
|
||||
.. _a_ui_md_emph:
|
||||
|
||||
Text Emphasis
|
||||
-------------
|
||||
|
||||
A minimal set of text emphasis styles are supported.
|
||||
|
||||
``_text_``
|
||||
The text is rendered as emphasised text (italicised).
|
||||
|
||||
``**text**``
|
||||
The text is rendered as strongly important text (bold).
|
||||
|
||||
``~~text~~``
|
||||
Strikethrough text.
|
||||
|
||||
In markdown guides it is often recommended to differentiate between strong importance and emphasis
|
||||
by using ``**`` for strong and ``_`` for emphasis, although markdown generally also supports ``__``
|
||||
for strong and ``*`` for emphasis. However, since the differentiation makes the highlighting and
|
||||
conversion significantly simpler and faster, in novelWriter this is a rule, not just a
|
||||
recommendation.
|
||||
|
||||
In addition, the following rules apply:
|
||||
|
||||
1. The emphasis and strikethrough formatting tags do not allow spaces between the words and the tag
|
||||
itself. That is, ``**text**`` is valid, ``**text **`` is not.
|
||||
2. More generally, the delimiters must be on the outer edge of words. That is, ``some **text in
|
||||
bold** here`` is valid, ``some** text in bold** here`` is not.
|
||||
3. If using both ``**`` and ``_`` to wrap the same text, the underscore must be the inner wrapper.
|
||||
This is due to the underscore also being a valid word character, so if they are on the outside,
|
||||
they violate rule 2.
|
||||
4. Text emphasis does not span past line breaks. If you need to add emphasis to multiple lines or
|
||||
paragraphs, you must apply it to each of them in turn.
|
||||
|
||||
|
||||
.. _a_ui_md_comm:
|
||||
|
||||
Comments and Synopsis
|
||||
---------------------
|
||||
|
||||
In addition to these standard markdown features, novelWriter also allows for comments in documents.
|
||||
The text of a comment is ignored by the word counter. The text can also be filtered out when
|
||||
exporting or viewing the document.
|
||||
|
||||
If the first word of a comment is ``Synopsis:`` (with the colon included), the comment is treated
|
||||
specially and will show up in the :ref:`a_ui_outline` in a dedicated column. The word ``synopsis``
|
||||
is not case sensitive. If it is correctly formatted, the syntax highlighter will indicate this by
|
||||
altering the colour of the word.
|
||||
|
||||
``% text...``
|
||||
This is a comment. The text is not exported by default (this can be overridden), seen in the
|
||||
document viewer, or counted towards word counts.
|
||||
|
||||
``% Synopsis: text...``
|
||||
This is a synopsis comment. It is generally treated in the same way as a regular comment, except
|
||||
that it is also captured by the indexing algorithm and displayed in the :ref:`a_ui_outline`. It
|
||||
can also be filtered separately when exporting the project to for instance generate an outline
|
||||
document of the whole project.
|
||||
|
||||
.. note::
|
||||
Only one comment can be flagged as a synopsis comment for each heading. If multiple comments are
|
||||
flagged as synopsis comments, the last one will be used and the rest ignored.
|
||||
|
||||
|
||||
.. _a_ui_md_tags:
|
||||
|
||||
Tags and References
|
||||
-------------------
|
||||
|
||||
The document editor supports a minimal set of keywords used for setting tags, and making references
|
||||
between documents. The tags and references can be set once per section defined by a heading. Using
|
||||
them multiple times under the same heading will just override the previous setting.
|
||||
|
||||
``@keyword: value``
|
||||
A keyword argument followed by a value, or a comma separated list of values.
|
||||
|
||||
The available tag and reference keywords are listed in the :ref:`a_struct_tags` section. They can
|
||||
also be inserted at the cursor position in the editor via the :guilabel:`Insert` menu.
|
||||
|
||||
|
||||
.. _a_ui_outline:
|
||||
|
||||
Project Outline View
|
||||
====================
|
||||
|
||||
The project's Outline view is available as the second tab on the right hand side of the main window
|
||||
labelled :guilabel:`Outline`. The outline provides an overview of the novel structure, displaying a
|
||||
tree hierarchy of the elements of the novel, that is, the level 1 to 4 headings representing
|
||||
partitions, chapters, scenes and sections.
|
||||
|
||||
The document containing the heading can also be displayed as a separate column, as well as the line
|
||||
number where it occurs. Double-clicking an entry will open the corresponding document in the
|
||||
editor.
|
||||
|
||||
.. note::
|
||||
Since the internal structure of the novel does not depend directly on the folder and document
|
||||
structure of the project tree, these will not necessarily look the same, depending on how you
|
||||
choose to organise your documents. See the :ref:`a_struct` page for more details.
|
||||
|
||||
Various meta data and information extracted from tags can be displayed in columns in the outline.
|
||||
A default set of such columns is visible, but you can turn on or off more columns by right clicking
|
||||
the header and selecting the columns you want to show. The order of the columns can also be
|
||||
rearranged by dragging them to a different position.
|
||||
|
||||
.. note::
|
||||
The :guilabel:`Title` column cannot be disabled or moved.
|
||||
|
||||
The information viewed in the outline is based on the project's main index. While novelWriter does
|
||||
its best to keep the index up to date when contents change, you can always rebuild it manually by
|
||||
pressing :kbd:`F9` if something isn't right.
|
||||
|
||||
The outline view itself can be regenerated by pressing :kbd:`F10`. You can also enable automatic
|
||||
updating in the :guilabel:`Tools` menu, which will trigger an update whenever the index is updated
|
||||
and the :guilabel:`Outline` tab is active. You may want to disable this feature if your project is
|
||||
very large,
|
||||
|
||||
The :guilabel:`Synopsis` column of the outline view takes its information from a specially
|
||||
formatted comment. See :ref:`a_ui_md_comm`.
|
||||
50
docs/source/usage_notes.rst
Normal file
@@ -0,0 +1,50 @@
|
||||
.. _a_notes:
|
||||
|
||||
*************
|
||||
Project Notes
|
||||
*************
|
||||
|
||||
novelWriter doesn't have a database and complicated forms for filling in details about plot
|
||||
elements, characters, and all sorts of additional information that isn't a part of the novel text
|
||||
itself. Instead, all such information is saved in notes that are written and maintained just like
|
||||
all other text in your project.
|
||||
|
||||
The relation between all these additional elements is extracted from the documents and notes by the
|
||||
project indexer, based on the tags and references you set within them.
|
||||
|
||||
Using notes is not required, but making at least minimal notes for each plot element, and adding a
|
||||
tag to them, makes it possible to use the :guilabel:`Outline` feature to see how each element
|
||||
intersects with each section of the novel itself, and adds clickable cross-references between
|
||||
documents in the editor and viewer.
|
||||
|
||||
|
||||
.. _a_notes_tags:
|
||||
|
||||
Tags in Notes
|
||||
=============
|
||||
|
||||
Each new heading in a note can have a tag associated with it. The format of a tag is
|
||||
``@tag: tagname``, where tagname is a unique identifier. Tags can then be referenced in the novel
|
||||
documents, or cross-referenced in other notes, and will show up in the outline view and in the
|
||||
back-reference panel when a document is being viewed. See :ref:`a_struct_tags` for how to reference
|
||||
notes.
|
||||
|
||||
The syntax highlighter will alert the user that the keyword is correctly used and that the tag is
|
||||
allowed, that is, the tag is unique. Duplicate tags should be detected as long as the index is up
|
||||
to date. An invalid tag should have a green wiggly line under it, and will not receive the syntax
|
||||
colour that valid tags do.
|
||||
|
||||
The tag is the only part of these notes that the application uses. The rest of the document content
|
||||
is there for the writer to use in whatever way they wish. Of course, the content of the documents
|
||||
can be exported if you want to compile a single document of all your notes, or include them in an
|
||||
outline.
|
||||
|
||||
A note can also reference other notes in the same way novel documents do. When the note is opened
|
||||
in the view panel, the references become clickable links, making it easier to follow connections in
|
||||
the plot. Notes don't show up in the outline view though, so referencing between notes is only
|
||||
meaningful if you want to be able to click-navigate between them.
|
||||
|
||||
.. tip::
|
||||
If you cross-reference between notes and export your project as an HTML document using the
|
||||
:guilabel:`Build Novel Project` tool, the cross-references become clickable links in the
|
||||
exported HTML document.
|
||||
@@ -1,231 +0,0 @@
|
||||
.. _a_ui_project:
|
||||
|
||||
*************
|
||||
Project Views
|
||||
*************
|
||||
|
||||
This chapter covers in more detail the different project views available in novelWriter.
|
||||
|
||||
.. figure:: images/fig_project_tree_detailed.png
|
||||
|
||||
The Project Tree as it appears when loading a sample project.
|
||||
|
||||
|
||||
.. _a_ui_tree:
|
||||
|
||||
The Project Tree
|
||||
================
|
||||
|
||||
The main window contains a project tree in the left-most panel. It shows the entire structure of
|
||||
the project, and has four columns.
|
||||
|
||||
**Column 1**
|
||||
The first column shows the icon and label of each folder, document, or note in your project. The
|
||||
label is not the same as the title you set inside the document. However, the document's label
|
||||
will appear in the header above the document text itself so you know where in the project an
|
||||
open document belongs. The icon is selected based on the type of item, and for novel documents,
|
||||
the level of the first header in the document text.
|
||||
|
||||
**Column 2**
|
||||
The second column shows the word count of the document, or the sum of words of the child items
|
||||
for folders and documents with sub-documents. If the counts seem incorrect, they can be updated
|
||||
by rebuilding the :term:`project index` from the :guilabel:`Tools` menu, or by pressing
|
||||
:kbd:`F9`.
|
||||
|
||||
**Column 3**
|
||||
The third column indicates whether the document is considered active or inactive in the project.
|
||||
You can use this flag to indicate that a document is still in the project, but should not be
|
||||
considered an active part of it. When you run the :guilabel:`Build Manuscript` tool, you can
|
||||
include or exclude documents based on this flag. You can change this value from the
|
||||
:term:`context menu`.
|
||||
|
||||
**Column 4**
|
||||
The fourth column shows the user-defined status or importance labels you've assigned to each
|
||||
project item. See :ref:`a_ui_tree_status` for more details on how to uses these labels. You can
|
||||
change these labels from the :term:`context menu`.
|
||||
|
||||
Right-clicking an item in the project tree will open a context menu under the cursor, displaying
|
||||
a selection of actions that can be performed on the selected item.
|
||||
|
||||
At the top of the tree, you will find a set of buttons.
|
||||
|
||||
* The first button is a quick links button that will show you a dropdown menu of all the
|
||||
:term:`root folders<root folder>` in your project. Selecting one will move to that position in
|
||||
the tree. You can also activate this menu by pressing :kbd:`Ctrl+L`.
|
||||
* The next two buttons can be used to move items up and down in the project tree. This is the only
|
||||
way to move root folders.
|
||||
* The next button opens a dropdown menu for adding new items to the tree. This includes root
|
||||
folders. You can also activate this dropdown menu by pressing :kbd:`Ctrl+N`.
|
||||
* The last button is a menu of further actions you can apply to the project tree.
|
||||
|
||||
Below the project tree you will find a small details panel showing the full information of the
|
||||
currently selected item. This panel also includes the latest paragraph and character counts in
|
||||
addition to the word count.
|
||||
|
||||
.. tip::
|
||||
If you want to set the label of a document to be the same as a header within it, you can
|
||||
right-click a header in the document when it is open in the editor and select
|
||||
:guilabel:`Set as Document Name` from the context menu.
|
||||
|
||||
|
||||
.. _a_ui_tree_split_merge:
|
||||
|
||||
Splitting and Merging Documents
|
||||
-------------------------------
|
||||
|
||||
Under the :guilabel:`Transform` submenu in the context menu of an item in the project tree, you
|
||||
will find several options on how to change a document or folder. This includes changing between
|
||||
document and note, but also splitting them into multiple documents, or merging child items into a
|
||||
single document.
|
||||
|
||||
|
||||
Splitting Documents
|
||||
^^^^^^^^^^^^^^^^^^^
|
||||
|
||||
.. figure:: images/fig_project_split_tool.png
|
||||
|
||||
The :guilabel:`Split Document` dialog.
|
||||
|
||||
The :guilabel:`Split Document by Header` option will open a dialog that allows you to split the
|
||||
selected document into multiple new documents based on the headings it contains. You can select at
|
||||
which heading level the split is to be performed from the dropdown box. The list box will preview
|
||||
which headings will be split into new documents.
|
||||
|
||||
You are given the option to create a folder for these new documents, and whether or not to create a
|
||||
hierarchy of documents. That is, put sections under scenes, and scenes under chapters.
|
||||
|
||||
The source document *is not* deleted in the process, but you have the option to let the tool move
|
||||
the source document to the :guilabel:`Trash` folder.
|
||||
|
||||
|
||||
Merging Documents
|
||||
^^^^^^^^^^^^^^^^^
|
||||
|
||||
.. figure:: images/fig_project_merge_tool.png
|
||||
|
||||
The :guilabel:`Merge Documents` dialog.
|
||||
|
||||
You have two options for merging documents that are child elements of another document. You can
|
||||
either :guilabel:`Merge Child Items into Self` and :guilabel:`Merge Child Items into New`. The
|
||||
first option will pull all content of child items and merge them into the parent document, while
|
||||
the second option will create a new document in the process.
|
||||
|
||||
When merging documents in a folder, you only have the latter process is possible, so only the
|
||||
choice :guilabel:`Merge Documents in Folder` is available.
|
||||
|
||||
In either case, the :guilabel:`Merge Documents` dialog will let you exclude documents you don't
|
||||
want to include, and it also lets you reorder them if you wish.
|
||||
|
||||
|
||||
.. _a_ui_tree_status:
|
||||
|
||||
Document Importance and Status
|
||||
------------------------------
|
||||
|
||||
Each document or folder in your project can have either a "Status" or "Importance" flag set. These
|
||||
are flags that you control and define yourself. novelWriter doesn't do anything with them at all.
|
||||
To modify the labels, go to their respective tabs in :guilabel:`Project Settings`.
|
||||
|
||||
The "Status" flag is intended to tag a :term:`novel document<novel documents>` as for instance a
|
||||
draft or as completed, and the "Importance" flag is intended to tag character notes, or other
|
||||
:term:`project notes`, as for instance a main, major, or minor character or story element.
|
||||
|
||||
Whether a document uses a "Status" or "Importance" flag depends on which :term:`root folder` it
|
||||
lives in. If it's in a :guilabel:`Novel` folder, it uses the "Status" flag, otherwise it uses an
|
||||
"Importance" flag. Some folders, like :guilabel:`Trash` and :guilabel:`Archive` allow both.
|
||||
|
||||
|
||||
.. _a_ui_tree_dnd:
|
||||
|
||||
Project Tree Drag & Drop
|
||||
------------------------
|
||||
|
||||
The project tree allows drag & drop to a certain extent to allow you to reorder your documents and
|
||||
folders. Moving a document in the project tree will affect the text's position when you assemble
|
||||
your manuscript in the :guilabel:`Manuscript Build` tool.
|
||||
|
||||
.. versionadded:: 2.2
|
||||
You can now select multiple items in the project tree by holding down the :kbd:`Ctrl` or
|
||||
:kbd:`Shift` key while selecting items.
|
||||
|
||||
You can drag and drop documents and regular folders, but not root folders. If you select multiple
|
||||
items, they can only be dragged and dropped if they are siblings. That is, they have the same
|
||||
parent item in the project. This is due to the way drag and drop is implemented in the user
|
||||
interface framework novelWriter is built upon.
|
||||
|
||||
Documents and their folders can be rearranged freely within their root folders. If you move a Novel
|
||||
document out of a Novel folder, it will be converted to a project note. Notes can be moved freely
|
||||
between all root folders, but keep in mind that if you move a note into a :guilabel:`Novel` root
|
||||
folder, its "Importance" setting will be switched with a "Status" setting. See
|
||||
:ref:`a_ui_tree_status`. The old value will not be overwritten though, and should be restored if
|
||||
you move it back at some point.
|
||||
|
||||
Root folders in the project tree cannot be dragged and dropped at all. If you want to reorder them,
|
||||
you can move them up or down with respect to each other from the arrow buttons at the top of the
|
||||
project tree, or by pressing :kbd:`Ctrl+Shift+Up` or :kbd:`Ctrl+Shift+Down` when they are selected.
|
||||
|
||||
|
||||
.. _a_ui_tree_novel:
|
||||
|
||||
The Novel Tree
|
||||
==============
|
||||
|
||||
.. figure:: images/fig_novel_tree_view.png
|
||||
|
||||
A screenshot of the Novel Tree View.
|
||||
|
||||
An alternative way to view the project structure is the novel tree. You can switch to this view by
|
||||
selecting the :guilabel:`Novel Tree View` button in the sidebar. This view is a simplified version
|
||||
of the view in the :guilabel:`Outline View`. It is convenient when you want to browse the structure
|
||||
of the story itself rather than the document files.
|
||||
|
||||
.. note::
|
||||
You cannot reorganise the entries in the novel tree, or add any new documents, as that would
|
||||
imply restructuring the content of the document files themselves. Any such editing must be done
|
||||
in the project tree. However, you can add new headings to existing documents, or change
|
||||
references, which will be updated in this view when the document is saved.
|
||||
|
||||
|
||||
.. _a_ui_outline:
|
||||
|
||||
Project Outline View
|
||||
====================
|
||||
|
||||
.. figure:: images/fig_outline_view.png
|
||||
|
||||
A screenshot of the Novel Outline View.
|
||||
|
||||
The project's :guilabel:`Outline View` is available as another view option from the sidebar. The
|
||||
outline provides an overview of the novel structure, displaying a tree hierarchy of the elements of
|
||||
the novel, that is, the level 1 to 4 headings representing partitions, chapters, scenes and
|
||||
sections.
|
||||
|
||||
The document containing the heading can also be displayed as a separate column, as well as the line
|
||||
number where the heading is defined. Double-clicking an entry will open the corresponding document
|
||||
in the editor and switch to :guilabel:`Project Tree View` mode.
|
||||
|
||||
You can select which novel folder to display from the dropdown menu. You can optionally also choose
|
||||
to show a combination of all novel folders.
|
||||
|
||||
.. note::
|
||||
Since the internal structure of the novel does not depend directly on the folder and document
|
||||
structure of the project tree, this view will not necessarily look the same, depending on how
|
||||
you choose to organise your documents. See the :ref:`a_struct` page for more details.
|
||||
|
||||
Various meta data and information extracted from :term:`tags<tag>` can be displayed in columns in
|
||||
the outline. A default set of such columns is visible, but you can turn on or off more columns from
|
||||
the menu button in the toolbar. The order of the columns can also be rearranged by dragging them to
|
||||
a different position. You column settings are saved between sessions on a per-project basis.
|
||||
|
||||
.. note::
|
||||
The :guilabel:`Title` column cannot be disabled or moved.
|
||||
|
||||
The information viewed in the outline is based on the :term:`project index`. While novelWriter does
|
||||
its best to keep the index up to date when contents change, you can always rebuild it manually by
|
||||
pressing :kbd:`F9` if something isn't right.
|
||||
|
||||
The outline view itself can be regenerated by pressing the refresh button. By default, the content
|
||||
is refreshed each time you switch to this view.
|
||||
|
||||
The :guilabel:`Synopsis` column of the outline view takes its information from a specially
|
||||
formatted comment. See :ref:`a_fmt_comm`.
|
||||
@@ -1,133 +0,0 @@
|
||||
.. _a_prjfmt:
|
||||
|
||||
**********************
|
||||
Project Format Changes
|
||||
**********************
|
||||
|
||||
.. _File Format Spec 1.5: _static/fileformatspec15.pdf
|
||||
.. _documentation: https://docs.novelwriter.io/
|
||||
|
||||
Most of the changes to the file formats over the history of novelWriter have no impact on the
|
||||
user side of things. The project files are generally updated automatically. However, some of the
|
||||
changes require minor actions from the user.
|
||||
|
||||
The key changes in the formats are listed in this chapter, as well as the user actions required,
|
||||
where applicable.
|
||||
|
||||
.. only:: not html
|
||||
|
||||
A full project file format specification is available in the online documentation_.
|
||||
|
||||
.. caution::
|
||||
When you update a project from one format version to the next, the project can no longer be
|
||||
opened by a version of novelWriter prior to the version where the new file format was
|
||||
introduced. You will get a notification about any updates to your project file format and will
|
||||
have the option to decline the upgrade.
|
||||
|
||||
.. only:: html
|
||||
|
||||
**For Developers**
|
||||
|
||||
A full description of the current file format is available in the
|
||||
:download:`File Format Spec 1.5 <fileformatspec15.pdf>`
|
||||
document, available as a PDF. This document is intended for contributors to novelWriter, those
|
||||
building project conversion tools, either to or from tne novelWriter format, and for those who
|
||||
wish to make their own templating system.
|
||||
|
||||
|
||||
.. _a_prjfmt_1_5:
|
||||
|
||||
Format 1.5 Changes
|
||||
==================
|
||||
|
||||
This project format was introduced in novelWriter version 2.0 RC 2.
|
||||
|
||||
This is a modification of the 1.4 format. It makes the XML more consistent in that meta data have
|
||||
been moved to their respective section nodes as attributes, and key/value settings now have a
|
||||
consistent format. Logical flags are saved as yes/no instead of Python True/False, and the main
|
||||
heading of the document is now saved to the item rather than in the index. The conversion is done
|
||||
automatically the first time a project is loaded. No user action is required.
|
||||
|
||||
|
||||
.. _a_prjfmt_1_4:
|
||||
|
||||
Format 1.4 Changes
|
||||
==================
|
||||
|
||||
This project format was introduced in novelWriter version 2.0 RC 1. Since this was a release
|
||||
candidate, it is unlikely that your project uses it, but it may be the case if you've installed a
|
||||
pre-release.
|
||||
|
||||
This format changes the way project items (folders, documents and notes) are stored. It is a more
|
||||
compact format that is simpler and faster to parse, and easier to extend. The conversion is done
|
||||
automatically the first time a project is loaded. No user action is required.
|
||||
|
||||
|
||||
.. _a_prjfmt_1_3:
|
||||
|
||||
Format 1.3 Changes
|
||||
==================
|
||||
|
||||
This project format was introduced in novelWriter version 1.5.
|
||||
|
||||
With this format, the number of document layouts was reduced from eight to two. The conversion of
|
||||
document layouts is performed automatically when the project is opened.
|
||||
|
||||
Due to the reduction of layouts, some features that were previously controlled by these layouts
|
||||
will be lost. These features are instead now controlled by syntax codes, so to recover these
|
||||
features, some minor modification must be made to select documents by the user.
|
||||
|
||||
The manual changes the user must make should be very few as they apply to document layouts that
|
||||
should be used only a few places in any given project. These are as follows:
|
||||
|
||||
**Title Pages**
|
||||
|
||||
* The formatting of the level one title on the title page must be changed from ``# Title Text`` to
|
||||
``#! Title Text`` in order to retain the previous functionality. See :ref:`a_fmt_head`.
|
||||
* Any text that was previously centred on the page must be manually centred using the text
|
||||
alignment feature. See :ref:`a_fmt_align`.
|
||||
|
||||
**Unnumbered Chapters**
|
||||
|
||||
* Since the specific layout for unnumbered chapters has been dropped, such chapters must all use
|
||||
the ``##! Chapter Name`` formatting code instead of ``## Chapter Name``. This also includes
|
||||
chapters marked by an asterisk: ``## *Chapter Name``, as this feature has also been dropped.
|
||||
See :ref:`a_fmt_head`.
|
||||
|
||||
**Plain Pages**
|
||||
|
||||
* The layout named "Plain Page" has also been removed. The only feature of this layout was that it
|
||||
ensured that the content always started on a fresh page. In the new format, fresh pages can be
|
||||
set anywhere in the text with the ``[NEW PAGE]`` code. See :ref:`a_fmt_break`.
|
||||
|
||||
|
||||
.. _a_prjfmt_1_2:
|
||||
|
||||
Format 1.2 Changes
|
||||
==================
|
||||
|
||||
This project format was introduced in novelWriter version 0.10.
|
||||
|
||||
With this format, the way auto-replace entries were stored in the main project XML file changed.
|
||||
|
||||
|
||||
.. _a_prjfmt_1_1:
|
||||
|
||||
Format 1.1 Changes
|
||||
==================
|
||||
|
||||
This project format was introduced in novelWriter version 0.7.
|
||||
|
||||
With this format, the ``content`` folder was introduced in the project storage. Previously, all
|
||||
novelWriter documents were saved in a series of folders numbered from ``data_0`` to ``data_f``.
|
||||
|
||||
It also reduces the number of meta data and cache files. These files are automatically deleted if
|
||||
an old project is opened. This was also when the Table of Contents file was introduced.
|
||||
|
||||
|
||||
.. _a_prjfmt_1_0:
|
||||
|
||||
Format 1.0 Changes
|
||||
==================
|
||||
|
||||
This is the original file format and project structure. It was in use up to version 0.6.3.
|
||||
335
docs/source/usage_projects.rst
Normal file
@@ -0,0 +1,335 @@
|
||||
.. _a_proj:
|
||||
|
||||
**************
|
||||
Novel Projects
|
||||
**************
|
||||
|
||||
A new project can be created from the :guilabel:`Project` menu by selecting
|
||||
:guilabel:`New Project`. This will open the :guilabel:`New Project Wizard` that will assist you in
|
||||
creating a barebone project suited to your needs. A novelWriter project requires a dedicated folder
|
||||
for storing its files on the local file system. See :ref:`a_tech` for further details on how files
|
||||
are organised.
|
||||
|
||||
A list of recently opened projects is maintained, and displayed in the :guilabel:`Open Project`
|
||||
dialog. A project can be removed from this list by selecting it and pressing the :kbd:`Del` key or
|
||||
by clicking the :guilabel:`Remove` button.
|
||||
|
||||
Project-specific settings are available in :guilabel:`Project Settings` in the :guilabel:`Project`
|
||||
menu. See further details below in the :ref:`a_proj_settings` section. Details about the project,
|
||||
including word counts, and a table of contents with word and page counts, is available through the
|
||||
:guilabel:`Project Details` dialog.
|
||||
|
||||
|
||||
.. _a_proj_roots:
|
||||
|
||||
Project Roots
|
||||
=============
|
||||
|
||||
Projects are structured into a set of top level folders called *root folders*. They are visible in
|
||||
the project tree at the left side of the main window.
|
||||
|
||||
The core novel documents go into a root folder of type :guilabel:`Novel`. Other supporting
|
||||
documents go into the other root folders. These other root folder types are intended for your notes
|
||||
on the various elements of your story. Using them is of course entirely optional.
|
||||
|
||||
A new project may not have all of the root folders present, but you can add the ones you want from
|
||||
:guilabel:`Create Root Folder` in the :guilabel:`Project` menu.
|
||||
|
||||
The root folders are intended for the following use, but aside from the :guilabel:`Novel` folder,
|
||||
no restrictions are enforced by the application. You can use them however you want.
|
||||
|
||||
:guilabel:`Novel`
|
||||
This is the root folder of all text that goes into the final novel. This class of documents have
|
||||
other rules and features than other documents in the project. See :ref:`a_struct` for more
|
||||
details.
|
||||
|
||||
:guilabel:`Plot`
|
||||
This is the root folder where main plots can be outlined. It is optional, but adding at least
|
||||
dummy notes can be useful in order to tag plot elements for the Outline view. Tags in this
|
||||
folder can be references using the ``@plot`` keyword.
|
||||
|
||||
:guilabel:`Characters`
|
||||
Character notes go in this root folder. These are especially important if one wants to use the
|
||||
Outline view to see which character appears where, and which part of the story is told from a
|
||||
specific character's point-of-view or focusing on a particular character's storyline. Tags in
|
||||
this folder can be referenced using the ``@pov`` keyword for point-of-view characters,
|
||||
``@focus`` for a focus character, or the ``@char`` keyword for any other characters.
|
||||
|
||||
:guilabel:`Locations`
|
||||
The locations folder is for various scene locations that you want to track. Tags in this folder
|
||||
can be references using the ``@location`` keyword.
|
||||
|
||||
:guilabel:`Timeline`
|
||||
If the story has multiple plot timelines or jumps in time within the same plot, this class of
|
||||
notes can be used to track this. Tags in this folder can be references using the ``@time``
|
||||
keyword.
|
||||
|
||||
:guilabel:`Objects`
|
||||
Important objects in the story, for instance important objects that change hands often, can be
|
||||
tracked here. Tags in this folder can be references using the ``@object`` keyword.
|
||||
|
||||
:guilabel:`Entities`
|
||||
Does your plot have many powerful organisations or companies? Or other entities that are part of
|
||||
the plot? They can be organised here. Tags in this folder can be references using the
|
||||
``@entity`` keyword.
|
||||
|
||||
:guilabel:`Custom`
|
||||
The custom root folder can be used for tracking anything else not covered by the above options.
|
||||
Tags in this folder can be references using the ``@custom`` keyword.
|
||||
|
||||
The root folders correspond to the categories of tags that can be used to reference them. For more
|
||||
information about the tags listed, see :ref:`a_struct_tags`.
|
||||
|
||||
.. tip::
|
||||
You can rename root folders to whatever you want. The first character in the :guilabel:`Flags`
|
||||
column in the project tree will still indicate what type they are, and so will the icon if you
|
||||
are using one of the optional icon sets.
|
||||
|
||||
|
||||
.. _a_proj_roots_del:
|
||||
|
||||
Deleted Documents
|
||||
-----------------
|
||||
|
||||
Deleted documents will be moved into a special :guilabel:`Trash` root folder. Documents in the
|
||||
trash folder can then be deleted permanently, either individually, or by emptying the trash from
|
||||
the menu. Documents in the trash folder are removed from the project index and cannot be
|
||||
referenced.
|
||||
|
||||
Folders and root folders can only be deleted when they are empty. Recursive deletion is not
|
||||
supported. A document or a folder can be deleted from the :guilabel:`Project` menu, or by pressing
|
||||
:kbd:`Ctrl`:kbd:`Shift`:kbd:`Del`.
|
||||
|
||||
|
||||
.. _a_proj_roots_out:
|
||||
|
||||
Archived Documents (Outtakes)
|
||||
-----------------------------
|
||||
|
||||
If you don't want to delete a document, or put it in the :guilabel:`Trash` folder where it may be
|
||||
deleted, but still want it out of your main project tree, you can create an :guilabel:`Outtakes`
|
||||
root folder from the :guilabel:`Project` menu. You are not allowed to move entire folders to this
|
||||
root folder, only documents. If you need folders in it to organise your documents, you can of
|
||||
course create new ones there.
|
||||
|
||||
You can drag any document to this folder and preserve its settings. The document will always be
|
||||
excluded from the :guilabel:`Build Novel Project` builds. It is also removed from the project
|
||||
index, so the tags and references defined in it will not show up anywhere else.
|
||||
|
||||
|
||||
.. _a_proj_roots_orph:
|
||||
|
||||
Recovered Documents
|
||||
-------------------
|
||||
|
||||
If novelWriter crashes or otherwise exits without saving the project state, or if you're using a
|
||||
file synchronisation tool that runs out of sync, there may be files in the project folder that
|
||||
aren't tracked in the core project file. These files, when discovered, are recovered and added back
|
||||
into the project if possible.
|
||||
|
||||
The discovered files are scanned for meta information that gives clues as to where the document may
|
||||
previously have been located in the project. The project loading routines will try to put them back
|
||||
as close as possible to this location, if it still exists. Generally, it will be appended to the
|
||||
end of the folder where it previously was located. If that folder doesn't exist, it will try to add
|
||||
it to the correct root folder. If it cannot figure out which root folder is correct, the document
|
||||
will be added to the :guilabel:`Novel` root folder. Only if the :guilabel:`Novel` folder is
|
||||
missing will it give up.
|
||||
|
||||
If the title of the document can be recovered, the word "Recovered:" will be added as a prefix. If
|
||||
the title cannot be determined, the document will be named "Recovered File N" where N is a
|
||||
sequential number.
|
||||
|
||||
|
||||
.. _a_proj_roots_lock:
|
||||
|
||||
Project Lockfile
|
||||
----------------
|
||||
|
||||
To prevent lost documents caused by file conflicts when novelWriter projects are synced with file
|
||||
synchronisation tools, a project lockfile is written to the project folder. If you try to open a
|
||||
project which has such a file present, you will be presented with a warning, and some information
|
||||
about where else novelWriter thinks the project is also open. You will be give the option to ignore
|
||||
this warning, and continue opening the project at your own risk.
|
||||
|
||||
.. note::
|
||||
If, for some reason, novelWriter crashes, the lock file may remain even if there are no other
|
||||
instances keeping the project open. In such a case it is safe to ignore the lock file warning
|
||||
when re-opening the project.
|
||||
|
||||
.. warning::
|
||||
If you choose to ignore the warning and continue opening the project, and multiple instances of
|
||||
the project are in fact open, you are likely to cause inconsistencies and create diverging
|
||||
project files, potentially resulting in loss of data and orphaned files. You are not likely to
|
||||
lose any actual text unless both instances have the same document open in the editor, and
|
||||
novelWriter will try to resolve inconsistencies the next time you open the project.
|
||||
|
||||
|
||||
.. _a_proj_roots_dirs:
|
||||
|
||||
Using Folders in the Project Tree
|
||||
---------------------------------
|
||||
|
||||
Folders, aside from root folders, have no structural significance to the project. When novelWriter
|
||||
is processing the documents in the novel, like for instance during export, these folders are
|
||||
ignored. Only the order of the documents themselves matter.
|
||||
|
||||
The folders are there purely as a way for the user to organise the documents in meaningful sections
|
||||
and to be able to collapse and hide them in the project tree when you're not working on those
|
||||
documents.
|
||||
|
||||
.. tip::
|
||||
You can use folders to sort your scene documents into chapters. You will still need to add a
|
||||
chapter document as the first item of your chapter folder, and the scene documents as the
|
||||
following items. Another way to use folders is to make a folder for each act.
|
||||
|
||||
|
||||
.. _a_proj_files:
|
||||
|
||||
Project Documents
|
||||
=================
|
||||
|
||||
New documents can be created from the :guilabel:`Document` menu, or by pressing :kbd:`Ctrl`:kbd:`N`
|
||||
while in the project tree. This will create a new, empty document, and open the :guilabel:`Item
|
||||
Settings` dialog where the document label and various other settings can be changed. This dialog
|
||||
can also be opened again later from either the :guilabel:`Project` menu, selecting :guilabel:`Edit
|
||||
Project Item`, or by pressing :kbd:`Ctrl`:kbd:`E` or :kbd:`F2` with the item selected.
|
||||
|
||||
The layout of the document is also defined here. For Novel documents, the full list of layout
|
||||
options are available. For non-Novel documents, only :guilabel:`Note` is available. See
|
||||
:ref:`a_struct_layout` for more details.
|
||||
|
||||
You can also select whether the document is by default included when building the project. This
|
||||
setting can be overridden in the :guilabel:`Build Novel Project` tool if you wish to include them
|
||||
anyway. This is covered in the :ref:`a_export_files` section. You can also toggle the included
|
||||
state of a document from the right-click context menu.
|
||||
|
||||
|
||||
.. _a_proj_files_counts:
|
||||
|
||||
Word Counts
|
||||
-----------
|
||||
|
||||
A character, word and paragraph count is maintained for each document, as well as for each section
|
||||
of a document following a header. The word count, and change of words in the current session, is
|
||||
displayed in the footer of any document open in the editor, and all stats are shown in the details
|
||||
panel below the project tree for any document selected in the project or novel tree.
|
||||
|
||||
The word counts are not updated in real time, but run in the background every five seconds for as
|
||||
long as the document is being actively edited.
|
||||
|
||||
A total project word count is displayed in the status bar. The total count depends on the sum of
|
||||
the values in the project tree, which again depend on an up to date index. If the counts seem
|
||||
wrong, a full project word recount can be initiated by rebuilding the project's index. Either form
|
||||
the :guilabel:`Tools` menu, or by pressing :kbd:`F9`.
|
||||
|
||||
|
||||
.. _a_proj_settings:
|
||||
|
||||
Project Settings
|
||||
================
|
||||
|
||||
The :guilabel:`Project Settings` can be accessed from the :guilabel:`Project` menu, or by pressing
|
||||
:kbd:`Ctrl`:kbd:`Shift`:kbd:`,`. This will open a dialog box, with a set of tabs.
|
||||
|
||||
|
||||
Settings Tab
|
||||
------------
|
||||
|
||||
The :guilabel:`Settings` tab holds the project title and author settings.
|
||||
|
||||
The :guilabel:`Working Title` can be set to a different title than the :guilabel:`Book Title`. The
|
||||
difference between them is simply that the :guilabel:`Working Title` is used for the GUI (main
|
||||
window title) and for generating the backup files. The intention is that the :guilabel:`Working
|
||||
Title` should remain unchanged throughout the project, otherwise the name of exported files and
|
||||
backup files may change too.
|
||||
|
||||
The :guilabel:`Book Title` and :guilabel:`Book Authors` settings are currently not used for
|
||||
anything, so setting then is just for the benefit of the author. Future features may be using them,
|
||||
and they are exported on some export formats in the :guilabel:`Build Novel Project` tool.
|
||||
|
||||
If your project is in a different language than your main spell checking is set to, you can
|
||||
override the default spell checking language here. You can also override the automatic backup
|
||||
setting.
|
||||
|
||||
|
||||
Status and Importance Tabs
|
||||
--------------------------
|
||||
|
||||
Each document or folder of type :guilabel:`Novel` can be given a status level, signified by a
|
||||
coloured icon, and each document or folder of the remaining types can be given an importance level.
|
||||
These are colour coded icons and labels that can be applied to each document or folder.
|
||||
|
||||
These are purely there for the user's convenience, and you are not required to use them for any
|
||||
other features to work. No other part of novelWriter accesses this information. The intention is to
|
||||
use these to indicate at what stage of completion each novel document is, or how important the
|
||||
content of a note is to the plot. You don't have to use them this way, that's just what they were
|
||||
intended for, but you can make them whatever you want.
|
||||
|
||||
See also :ref:`a_ui_tree_status`.
|
||||
|
||||
.. note::
|
||||
The status or importance level currently in use by one or more documents cannot be deleted, but
|
||||
they can be edited.
|
||||
|
||||
|
||||
Auto-Replace Tab
|
||||
----------------
|
||||
|
||||
A set of automatically replaced keywords can be added in this tab. The keywords in the left column
|
||||
will be replaced by the text in the right column when documents are opened in the viewer. They will
|
||||
also be applied to exports.
|
||||
|
||||
The auto-replace feature will replace text in angle brackets that are in this list. The syntax
|
||||
highlighter will add an alternate colour to text marching the syntax, but it doesn't check if the
|
||||
text is in this list.
|
||||
|
||||
.. note::
|
||||
A keyword cannot contain spaces. The angle brackets are added by default, and when used in the
|
||||
text are a part of the keyword to be replaced. This is to ensure that parts of the text aren't
|
||||
unintentionally replaced by the content of the list.
|
||||
|
||||
|
||||
.. _a_proj_backup:
|
||||
|
||||
Backup
|
||||
======
|
||||
|
||||
An automatic backup system is built into novelWriter. In order to use it, a backup path to where
|
||||
the backup files are to be stored must be provided in :guilabel:`Preferences`.
|
||||
|
||||
Backups can be run automatically when a project is closed, which also implies it is run when the
|
||||
application itself is closed. Backups are date stamped zip files of the entire project folder, and
|
||||
are stored in a subfolder of the backup path. The subfolder will have the same name as the project
|
||||
:guilabel:`Working Title` set in :ref:`a_proj_settings`.
|
||||
|
||||
The backup feature, when configured, can also be run manually from the :guilabel:`Tools` menu.
|
||||
It is also possible to disable automated backup for a given project in :guilabel:`Project
|
||||
Settings`.
|
||||
|
||||
.. note::
|
||||
For the backup to be able to run, the :guilabel:`Working Title` must be set in
|
||||
:guilabel:`Project Settings`. This value is used to generate the folder name for the zip files.
|
||||
Without it, the backup will not run at all, but it will produce a warning message.
|
||||
|
||||
|
||||
.. _a_proj_stats:
|
||||
|
||||
Writing Statistics
|
||||
==================
|
||||
|
||||
When you work on a project, a log file records when you opened it, when you closed it, and the
|
||||
total word counts of your novel documents and notes at the end of the session. You can view this
|
||||
file in the ``meta`` folder in the directory where you saved your project. The file is named
|
||||
``sessionStats.log``.
|
||||
|
||||
A tool to view the content of this file is available in the :guilabel:`Tools` menu under
|
||||
:guilabel:`Writing Statistics`. You can also launch it by pressing :kbd:`F6`.
|
||||
|
||||
The tool will show a list of all your sessions, and a set of filters to apply to it. You can also
|
||||
export the filtered data to a JSON file or to a CSV file that can be opened by a spreadsheet
|
||||
application like for instance Libre Office Calc.
|
||||
|
||||
As of version 1.2, the log file also stores how much of the session time was spent idle. The
|
||||
definition of idle here is that the novelWriter main window loses focus, and the user hasn't made
|
||||
any changes to the currently open document in five minutes. The number of minutes can be altered in
|
||||
:guilabel:`Preferences`.
|
||||
@@ -4,195 +4,144 @@
|
||||
Keyboard Shortcuts
|
||||
******************
|
||||
|
||||
Most features in novelWriter are available as keyboard shortcuts. This is a reference list of those
|
||||
shortcuts. Most of them are also listed in the application's user interface.
|
||||
|
||||
.. note::
|
||||
On MacOS, replace :kbd:`Ctrl` with :kbd:`Cmd`.
|
||||
Most features in novelWriter are available as keyboard shortcuts.
|
||||
|
||||
|
||||
.. _a_kb_main:
|
||||
|
||||
Main Window Shortcuts
|
||||
=====================
|
||||
Main Shortcuts
|
||||
==============
|
||||
|
||||
.. csv-table::
|
||||
The main shorcuts are as follows:
|
||||
|
||||
.. csv-table:: Keyboard Shortcuts
|
||||
:header: "Shortcut", "Description"
|
||||
:widths: 30, 70
|
||||
:class: "tight-table"
|
||||
|
||||
":kbd:`F1`", "Open the online user manual"
|
||||
":kbd:`F5`", "Open the :guilabel:`Build Manuscript` tool"
|
||||
":kbd:`F6`", "Open the :guilabel:`Writing Statistics` tool"
|
||||
":kbd:`F8`", "Toggle :guilabel:`Focus Mode`"
|
||||
":kbd:`F9`", "Re-build the project index"
|
||||
":kbd:`F11`", "Toggle full screen mode"
|
||||
":kbd:`Ctrl+,`", "Open the :guilabel:`Preferences` dialog"
|
||||
":kbd:`Ctrl+E`", "Switch focus to the document editor"
|
||||
":kbd:`Ctrl+T`", "Switch focus to the project/novel tree"
|
||||
":kbd:`Ctrl+Q`", "Exit novelWriter"
|
||||
":kbd:`Ctrl+Shift+,`", "Open the :guilabel:`Project Settings` dialog"
|
||||
":kbd:`Ctrl+Shift+O`", "Open a project"
|
||||
":kbd:`Ctrl+Shift+S`", "Save the current project"
|
||||
":kbd:`Ctrl+Shift+T`", "Switch focus to the outline view"
|
||||
":kbd:`Ctrl+Shift+W`", "Close the current project"
|
||||
":kbd:`Shift+F1`", "Open the local user manual (PDF) if it is available"
|
||||
":kbd:`Shift+F6`", "Open the :guilabel:`Project Details` dialog"
|
||||
":kbd:`Alt`:kbd:`1`", "Switch focus to the project tree. On Windows, use :kbd:`Ctrl`:kbd:`Alt`:kbd:`1`."
|
||||
":kbd:`Alt`:kbd:`2`", "Switch focus to document editor. On Windows, use :kbd:`Ctrl`:kbd:`Alt`:kbd:`2`."
|
||||
":kbd:`Alt`:kbd:`3`", "Switch focus to document viewer. On Windows, use :kbd:`Ctrl`:kbd:`Alt`:kbd:`3`."
|
||||
":kbd:`Alt`:kbd:`4`", "Switch focus to outline view. On Windows, use :kbd:`Ctrl`:kbd:`Alt`:kbd:`4`."
|
||||
":kbd:`Alt`:kbd:`Left`", "Move backward in the view history of the document viewer."
|
||||
":kbd:`Alt`:kbd:`Right`", "Move forward in the view history of the document viewer."
|
||||
":kbd:`Ctrl`:kbd:`.`", "Open menu to correct word under cursor."
|
||||
":kbd:`Ctrl`:kbd:`,`", "Open the :guilabel:`Preferences` dialog."
|
||||
":kbd:`Ctrl`:kbd:`/`", "Toggle block format as comment."
|
||||
":kbd:`Ctrl`:kbd:`0`", "Remove block formatting for block under cursor."
|
||||
":kbd:`Ctrl`:kbd:`1`", "Change block format to header level 1."
|
||||
":kbd:`Ctrl`:kbd:`2`", "Change block format to header level 2."
|
||||
":kbd:`Ctrl`:kbd:`3`", "Change block format to header level 3."
|
||||
":kbd:`Ctrl`:kbd:`4`", "Change block format to header level 4."
|
||||
":kbd:`Ctrl`:kbd:`5`", "Change block alignment to left-aligned."
|
||||
":kbd:`Ctrl`:kbd:`6`", "Change block alignment to centred."
|
||||
":kbd:`Ctrl`:kbd:`7`", "Change block alignment to right-aligned."
|
||||
":kbd:`Ctrl`:kbd:`8`", "Add a left margin to the block."
|
||||
":kbd:`Ctrl`:kbd:`9`", "Add a right margin to the block."
|
||||
":kbd:`Ctrl`:kbd:`A`", "Select all text in the document."
|
||||
":kbd:`Ctrl`:kbd:`B`", "Format selected text, or word under cursor, with strong emphasis (bold)."
|
||||
":kbd:`Ctrl`:kbd:`C`", "Copy selected text to clipboard."
|
||||
":kbd:`Ctrl`:kbd:`D`", "Strikethrough selected text, or word under cursor."
|
||||
":kbd:`Ctrl`:kbd:`E`", "If in the project tree, edit a document or folder settings. (Same as :kbd:`F2`.)"
|
||||
":kbd:`Ctrl`:kbd:`F`", "Open the search bar and search for the selected word, if any is selected."
|
||||
":kbd:`Ctrl`:kbd:`G`", "Find next occurrence of search word in current document. (Same as :kbd:`F3`.)"
|
||||
":kbd:`Ctrl`:kbd:`H`", "Open the search and replace bar and search for the selected word, if any is selected. (On Mac, this is :kbd:`Cmd`:kbd:`=`.)"
|
||||
":kbd:`Ctrl`:kbd:`I`", "Format selected text, or word under cursor, with emphasis (italic)."
|
||||
":kbd:`Ctrl`:kbd:`K`", "Activate the insert commands. The commands are listed in :ref:`a_kb_ins`."
|
||||
":kbd:`Ctrl`:kbd:`N`", "Create new document."
|
||||
":kbd:`Ctrl`:kbd:`O`", "Open selected document."
|
||||
":kbd:`Ctrl`:kbd:`Q`", "Exit novelWriter."
|
||||
":kbd:`Ctrl`:kbd:`R`", "If in the project tree, open a document for viewing. If the editor has focus, open current document for viewing."
|
||||
":kbd:`Ctrl`:kbd:`S`", "Save the current document in the document editor."
|
||||
":kbd:`Ctrl`:kbd:`V`", "Paste text from clipboard to cursor position."
|
||||
":kbd:`Ctrl`:kbd:`W`", "Close the current document in the document editor."
|
||||
":kbd:`Ctrl`:kbd:`X`", "Cut selected text to clipboard."
|
||||
":kbd:`Ctrl`:kbd:`Y`", "Redo latest undo."
|
||||
":kbd:`Ctrl`:kbd:`Z`", "Undo latest changes."
|
||||
":kbd:`Ctrl`:kbd:`F7`", "Toggle spell checking."
|
||||
":kbd:`Ctrl`:kbd:`F10`", "Toggle automatic updating of project outline."
|
||||
":kbd:`Ctrl`:kbd:`Up`", "Move item one step up in the project tree."
|
||||
":kbd:`Ctrl`:kbd:`Down`", "Move item one step down in the project tree."
|
||||
":kbd:`Ctrl`:kbd:`Del`", "Delete next word in editor."
|
||||
":kbd:`Ctrl`:kbd:`Backspace`", "Delete previous word in editor."
|
||||
":kbd:`Ctrl`:kbd:`'`", "Wrap selected text, or word under cursor, in single quotes."
|
||||
":kbd:`Ctrl`:kbd:`""`", "Wrap selected text, or word under cursor, in double quotes."
|
||||
":kbd:`Ctrl`:kbd:`Retrun`", "Open the tag or reference under the cursor in the Viewer."
|
||||
":kbd:`Ctrl`:kbd:`Shift`:kbd:`,`", "Open the :guilabel:`Project Settings` dialog."
|
||||
":kbd:`Ctrl`:kbd:`Shift`:kbd:`/`", "Remove block formatting for block under cursor."
|
||||
":kbd:`Ctrl`:kbd:`Shift`:kbd:`1`", "Replace occurrence of search word in current document, and search for next occurrence."
|
||||
":kbd:`Ctrl`:kbd:`Shift`:kbd:`A`", "Select all text in current paragraph."
|
||||
":kbd:`Ctrl`:kbd:`Shift`:kbd:`G`", "Find previous occurrence of search word in current document. (Same as :kbd:`Shift`:kbd:`F3`.)"
|
||||
":kbd:`Ctrl`:kbd:`Shift`:kbd:`I`", "Import text to the current document from a text file."
|
||||
":kbd:`Ctrl`:kbd:`Shift`:kbd:`N`", "Create new folder."
|
||||
":kbd:`Ctrl`:kbd:`Shift`:kbd:`O`", "Open a project."
|
||||
":kbd:`Ctrl`:kbd:`Shift`:kbd:`R`", "Close the document viewer."
|
||||
":kbd:`Ctrl`:kbd:`Shift`:kbd:`S`", "Save the current project."
|
||||
":kbd:`Ctrl`:kbd:`Shift`:kbd:`W`", "Close the current project."
|
||||
":kbd:`Ctrl`:kbd:`Shift`:kbd:`Z`", "Undo move of project tree item."
|
||||
":kbd:`Ctrl`:kbd:`Shift`:kbd:`Del`", "If in the project tree, move a document to trash, or delete a folder."
|
||||
":kbd:`F1`", "Open the documentation. This will either open the Qt Assistant, if available, or send you to the documentation website."
|
||||
":kbd:`F2`", "If in the project tree, edit a document or folder settings. (Same as :kbd:`Ctrl`:kbd:`E`)"
|
||||
":kbd:`F3`", "Find next occurrence of search word in current document. (Same as :kbd:`Ctrl`:kbd:`G`)"
|
||||
":kbd:`F5`", "Open the :guilabel:`Build Novel Project` dialog."
|
||||
":kbd:`F6`", "Open the :guilabel:`Writing Statistics` dialog."
|
||||
":kbd:`F7`", "Re-run spell checker."
|
||||
":kbd:`F8`", "Activate :guilabel:`Focus Mode`, hiding the project tree and document viewer."
|
||||
":kbd:`F9`", "Re-build the project index."
|
||||
":kbd:`F10`", "Re-build the project outline."
|
||||
":kbd:`F11`", "Activate full screen mode."
|
||||
":kbd:`Shift`:kbd:`F1`", "Open the online documentation in the system default browser."
|
||||
":kbd:`Shift`:kbd:`F3`", "Find previous occurrence of search word in current document. (Same as :kbd:`Ctrl`:kbd:`Shift`:kbd:`G`.)"
|
||||
":kbd:`Shift`:kbd:`F6`", "Open the :guilabel:`Project Details` dialog."
|
||||
":kbd:`Return`", "If in the project tree, open a document for editing."
|
||||
|
||||
|
||||
.. _a_kb_tree:
|
||||
|
||||
Project Tree Shortcuts
|
||||
======================
|
||||
|
||||
.. csv-table::
|
||||
:header: "Shortcut", "Description"
|
||||
|
||||
":kbd:`F2`", "Edit the label of the selected item"
|
||||
":kbd:`Return`", "Open the selected document in the editor"
|
||||
":kbd:`Alt+Up`", "Jump or go to the previous item at same level in the tree"
|
||||
":kbd:`Alt+Down`", "Jump or go to the next item at same level in the tree"
|
||||
":kbd:`Alt+Left`", "Jump to the parent item in the tree"
|
||||
":kbd:`Alt+Right`", "Jump to the first child item in the project tree"
|
||||
":kbd:`Ctrl+.`", "Open the context menu on the selected item"
|
||||
":kbd:`Ctrl+L`", "Open the :guilabel:`Quick Links` menu"
|
||||
":kbd:`Ctrl+N`", "Open the :guilabel:`Create New Item` menu"
|
||||
":kbd:`Ctrl+O`", "Open selected document"
|
||||
":kbd:`Ctrl+R`", "Open the selected document in the viewer"
|
||||
":kbd:`Ctrl+Up`", "Move selected item one step up in the tree"
|
||||
":kbd:`Ctrl+Down`", "Move selected item one step down in the tree"
|
||||
":kbd:`Ctrl+Shift+Del`", "Move the selected item to Trash"
|
||||
":kbd:`Ctrl+Shift+Z`", "Undo the last move of a project item, if possible"
|
||||
|
||||
|
||||
.. _a_kb_editor:
|
||||
|
||||
Document Editor Shortcuts
|
||||
=========================
|
||||
|
||||
|
||||
Text Search Shortcuts
|
||||
---------------------
|
||||
|
||||
.. csv-table::
|
||||
:header: "Shortcut", "Description"
|
||||
|
||||
":kbd:`F3`", "Find the next occurrence of the search word"
|
||||
":kbd:`Ctrl+F`", "Open the search bar and search for the selected word, if any is selected"
|
||||
":kbd:`Ctrl+G`", "Find the next occurrence of the search word"
|
||||
":kbd:`Ctrl+H`", "Open the search tool and populate with the selected word (Mac :kbd:`Cmd+=`)"
|
||||
":kbd:`Ctrl+Shift+1`", "Replace selected occurrence of the search word, and move to the next"
|
||||
":kbd:`Ctrl+Shift+G`", "Find the previous occurrence of the search word"
|
||||
":kbd:`Shift+F3`", "Find the previous occurrence of the search word"
|
||||
|
||||
|
||||
Text Formatting Shortcuts
|
||||
-------------------------
|
||||
|
||||
.. csv-table::
|
||||
:header: "Shortcut", "Description"
|
||||
|
||||
":kbd:`Ctrl+'`", "Wrap selected text, or word under cursor, in single quotes"
|
||||
":kbd:`Ctrl+""`", "Wrap selected text, or word under cursor, in double quotes"
|
||||
":kbd:`Ctrl+/`", "Toggle block format as comment"
|
||||
":kbd:`Ctrl+0`", "Remove block formatting for block under cursor"
|
||||
":kbd:`Ctrl+1`", "Change block format to header level 1"
|
||||
":kbd:`Ctrl+2`", "Change block format to header level 2"
|
||||
":kbd:`Ctrl+3`", "Change block format to header level 3"
|
||||
":kbd:`Ctrl+4`", "Change block format to header level 4"
|
||||
":kbd:`Ctrl+5`", "Change block alignment to left-aligned"
|
||||
":kbd:`Ctrl+6`", "Change block alignment to centred"
|
||||
":kbd:`Ctrl+7`", "Change block alignment to right-aligned"
|
||||
":kbd:`Ctrl+8`", "Add a left margin to the block"
|
||||
":kbd:`Ctrl+9`", "Add a right margin to the block"
|
||||
":kbd:`Ctrl+B`", "Format selected text, or word under cursor, with strong emphasis (bold)"
|
||||
":kbd:`Ctrl+D`", "Strike through selected text, or word under cursor"
|
||||
":kbd:`Ctrl+I`", "Format selected text, or word under cursor, with emphasis (italic)"
|
||||
":kbd:`Ctrl+Shift+/`", "Remove block formatting for block under cursor"
|
||||
|
||||
|
||||
Other Editor Shortcuts
|
||||
----------------------
|
||||
|
||||
.. csv-table::
|
||||
:header: "Shortcut", "Description"
|
||||
|
||||
":kbd:`F7`", "Re-run the spell checker"
|
||||
":kbd:`Ctrl+.`", "Open the context menu at the current cursor location"
|
||||
":kbd:`Ctrl+A`", "Select all text in the document"
|
||||
":kbd:`Ctrl+C`", "Copy selected text to clipboard"
|
||||
":kbd:`Ctrl+K`", "Activate the insert commands (see list in :ref:`a_kb_ins`)"
|
||||
":kbd:`Ctrl+R`", "Open or reload the current document in the viewer"
|
||||
":kbd:`Ctrl+S`", "Save the current document"
|
||||
":kbd:`Ctrl+V`", "Paste text from clipboard to cursor position"
|
||||
":kbd:`Ctrl+W`", "Close the current document"
|
||||
":kbd:`Ctrl+X`", "Cut selected text to clipboard"
|
||||
":kbd:`Ctrl+Y`", "Redo latest undo"
|
||||
":kbd:`Ctrl+Z`", "Undo latest changes"
|
||||
":kbd:`Ctrl+Backspace`", "Delete the word before the cursor"
|
||||
":kbd:`Ctrl+Del`", "Delete the word after the cursor"
|
||||
":kbd:`Ctrl+F7`", "Toggle spell checking"
|
||||
":kbd:`Ctrl+Return`", "Open the tag or reference under the cursor in the viewer"
|
||||
":kbd:`Ctrl+Shift+A`", "Select all text in the current paragraph"
|
||||
":kbd:`Ctrl+Shift+I`", "Import text to the current document from a text file"
|
||||
.. note::
|
||||
On macOS, replace :kbd:`Ctrl` with :kbd:`Cmd`.
|
||||
|
||||
|
||||
.. _a_kb_ins:
|
||||
|
||||
Insert Shortcuts
|
||||
----------------
|
||||
================
|
||||
|
||||
A set of insert features are also available through shortcuts, but they require a double
|
||||
combination of key sequences. The insert feature is activated with :kbd:`Ctrl+K`, followed by
|
||||
combination of key sequences. The insert feature is activated with :kbd:`Ctrl`:kbd:`K`, followed by
|
||||
a key or key combination for the inserted content.
|
||||
|
||||
.. csv-table::
|
||||
.. csv-table:: Keyboard Shortcuts
|
||||
:header: "Shortcut", "Description"
|
||||
:widths: 40, 60
|
||||
:class: "tight-table"
|
||||
|
||||
":kbd:`Ctrl+K`, :kbd:`Space`", "Insert a non-breaking space"
|
||||
":kbd:`Ctrl+K`, :kbd:`_`", "Insert a long dash (em dash)"
|
||||
":kbd:`Ctrl+K`, :kbd:`.`", "Insert an ellipsis"
|
||||
":kbd:`Ctrl+K`, :kbd:`'`", "Insert a modifier apostrophe"
|
||||
":kbd:`Ctrl+K`, :kbd:`*`", "Insert a list bullet"
|
||||
":kbd:`Ctrl+K`, :kbd:`%`", "Insert a per mille symbol"
|
||||
":kbd:`Ctrl+K`, :kbd:`~`", "Insert a figure dash (same width as a number)"
|
||||
":kbd:`Ctrl+K`, :kbd:`−`", "Insert a short dash (en dash)"
|
||||
":kbd:`Ctrl+K`, :kbd:`1`", "Insert a left single quote"
|
||||
":kbd:`Ctrl+K`, :kbd:`2`", "Insert a right single quote"
|
||||
":kbd:`Ctrl+K`, :kbd:`3`", "Insert a left double quote"
|
||||
":kbd:`Ctrl+K`, :kbd:`4`", "Insert a right double quote"
|
||||
":kbd:`Ctrl+K`, :kbd:`C`", "Insert a ``@char`` keyword"
|
||||
":kbd:`Ctrl+K`, :kbd:`E`", "Insert an ``@entity`` keyword"
|
||||
":kbd:`Ctrl+K`, :kbd:`F`", "Insert a ``@focus`` keyword"
|
||||
":kbd:`Ctrl+K`, :kbd:`G`", "Insert a ``@tag`` keyword"
|
||||
":kbd:`Ctrl+K`, :kbd:`H`", "Insert a short description comment"
|
||||
":kbd:`Ctrl+K`, :kbd:`L`", "Insert a ``@location`` keyword"
|
||||
":kbd:`Ctrl+K`, :kbd:`O`", "Insert an ``@object`` keyword"
|
||||
":kbd:`Ctrl+K`, :kbd:`P`", "Insert a ``@plot`` keyword"
|
||||
":kbd:`Ctrl+K`, :kbd:`S`", "Insert a synopsis comment"
|
||||
":kbd:`Ctrl+K`, :kbd:`T`", "Insert a ``@time`` keyword"
|
||||
":kbd:`Ctrl+K`, :kbd:`V`", "Insert a ``@pov`` keyword"
|
||||
":kbd:`Ctrl+K`, :kbd:`X`", "Insert a ``@custom`` keyword"
|
||||
":kbd:`Ctrl+K`, :kbd:`Ctrl+Space`", "Insert a thin non-breaking space"
|
||||
":kbd:`Ctrl+K`, :kbd:`Ctrl+_`", "Insert a horizontal bar (quotation dash)"
|
||||
":kbd:`Ctrl+K`, :kbd:`Ctrl+'`", "Insert a prime"
|
||||
":kbd:`Ctrl+K`, :kbd:`Ctrl+""`", "Insert a double prime"
|
||||
":kbd:`Ctrl+K`, :kbd:`Ctrl+*`", "Insert a flower mark (alternative bullet)"
|
||||
":kbd:`Ctrl+K`, :kbd:`Ctrl+−`", "Insert a hyphen bullet (alternative bullet)"
|
||||
":kbd:`Ctrl+K`, :kbd:`Ctrl+D`", "Insert a division sign"
|
||||
":kbd:`Ctrl+K`, :kbd:`Ctrl+O`", "Insert a degree symbol"
|
||||
":kbd:`Ctrl+K`, :kbd:`Ctrl+X`", "Insert a times sign"
|
||||
":kbd:`Ctrl+K`, :kbd:`Shift+Space`", "Insert a thin space"
|
||||
|
||||
|
||||
.. _a_kb_viewer:
|
||||
|
||||
Document Viewer Shortcuts
|
||||
=========================
|
||||
|
||||
.. csv-table::
|
||||
:header: "Shortcut", "Description"
|
||||
|
||||
":kbd:`Alt+Left`", "Move backward in the view history"
|
||||
":kbd:`Alt+Right`", "Move forward in the view history"
|
||||
":kbd:`Ctrl+C`", "Copy selected text to clipboard"
|
||||
":kbd:`Ctrl+Shift+A`", "Select all text in the current paragraph"
|
||||
":kbd:`Ctrl+Shift+R`", "Close the document viewer"
|
||||
":kbd:`Ctrl`:kbd:`K`, :kbd:`−`", "Insert a short dash (en dash)."
|
||||
":kbd:`Ctrl`:kbd:`K`, :kbd:`_`", "Insert a long dash (em dash)."
|
||||
":kbd:`Ctrl`:kbd:`K`, :kbd:`Ctrl`:kbd:`_`", "Insert a horizontal bar (quotation dash)."
|
||||
":kbd:`Ctrl`:kbd:`K`, :kbd:`~`", "Insert a figure dash (same width as a number)."
|
||||
":kbd:`Ctrl`:kbd:`K`, :kbd:`1`", "Insert a left single quote."
|
||||
":kbd:`Ctrl`:kbd:`K`, :kbd:`2`", "Insert a right single quote."
|
||||
":kbd:`Ctrl`:kbd:`K`, :kbd:`3`", "Insert a left double quote."
|
||||
":kbd:`Ctrl`:kbd:`K`, :kbd:`4`", "Insert a right double quote."
|
||||
":kbd:`Ctrl`:kbd:`K`, :kbd:`'`", "Insert a modifier apostrophe."
|
||||
":kbd:`Ctrl`:kbd:`K`, :kbd:`.`", "Insert an ellipsis."
|
||||
":kbd:`Ctrl`:kbd:`K`, :kbd:`Ctrl`:kbd:`'`", "Insert a prime."
|
||||
":kbd:`Ctrl`:kbd:`K`, :kbd:`Ctrl`:kbd:`""`", "Insert a double prime."
|
||||
":kbd:`Ctrl`:kbd:`K`, :kbd:`Space`", "Insert a non-breaking space."
|
||||
":kbd:`Ctrl`:kbd:`K`, :kbd:`Shift`:kbd:`Space`", "Insert a thin space."
|
||||
":kbd:`Ctrl`:kbd:`K`, :kbd:`Ctrl`:kbd:`Space`", "Insert a thin non-breaking space."
|
||||
":kbd:`Ctrl`:kbd:`K`, :kbd:`*`", "Insert a list bullet."
|
||||
":kbd:`Ctrl`:kbd:`K`, :kbd:`Ctrl`:kbd:`−`", "Insert a hyphen bullet (alternative bullet)."
|
||||
":kbd:`Ctrl`:kbd:`K`, :kbd:`Ctrl`:kbd:`*`", "Insert a flower mark (alternative bullet)."
|
||||
":kbd:`Ctrl`:kbd:`K`, :kbd:`%`", "Insert a per mille symbol."
|
||||
":kbd:`Ctrl`:kbd:`K`, :kbd:`Ctrl`:kbd:`O`", "Insert a degree symbol."
|
||||
":kbd:`Ctrl`:kbd:`K`, :kbd:`Ctrl`:kbd:`X`", "Insert a times sign."
|
||||
":kbd:`Ctrl`:kbd:`K`, :kbd:`Ctrl`:kbd:`D`", "Insert a division sign."
|
||||
":kbd:`Ctrl`:kbd:`K`, :kbd:`G`", "Insert a ``@tag`` keyword."
|
||||
":kbd:`Ctrl`:kbd:`K`, :kbd:`V`", "Insert a ``@pov`` keyword."
|
||||
":kbd:`Ctrl`:kbd:`K`, :kbd:`F`", "Insert a ``@focus`` keyword."
|
||||
":kbd:`Ctrl`:kbd:`K`, :kbd:`C`", "Insert a ``@char`` keyword."
|
||||
":kbd:`Ctrl`:kbd:`K`, :kbd:`P`", "Insert a ``@plot`` keyword."
|
||||
":kbd:`Ctrl`:kbd:`K`, :kbd:`T`", "Insert a ``@time`` keyword."
|
||||
":kbd:`Ctrl`:kbd:`K`, :kbd:`L`", "Insert a ``@location`` keyword."
|
||||
":kbd:`Ctrl`:kbd:`K`, :kbd:`O`", "Insert an ``@object`` keyword."
|
||||
":kbd:`Ctrl`:kbd:`K`, :kbd:`E`", "Insert an ``@entity`` keyword."
|
||||
":kbd:`Ctrl`:kbd:`K`, :kbd:`X`", "Insert a ``@custom`` keyword."
|
||||
|
||||
250
docs/source/usage_structure.rst
Normal file
@@ -0,0 +1,250 @@
|
||||
.. _a_struct:
|
||||
|
||||
***************
|
||||
Novel Structure
|
||||
***************
|
||||
|
||||
This section covers the structure of a novel project.
|
||||
|
||||
It concerns documents under the :guilabel:`Novel` type root folder only. There are some
|
||||
restrictions and features that only apply to these types of documents.
|
||||
|
||||
|
||||
.. _a_struct_heads:
|
||||
|
||||
Importance of Headings
|
||||
======================
|
||||
|
||||
Subfolders under root folders have no impact on the structure of the novel itself. The structure is
|
||||
instead dictated by the heading level of the headers within the documents.
|
||||
|
||||
Four levels of headings are supported, signified by the number of hashes (``#``) preceding the
|
||||
title. See also the :ref:`a_ui_md` section for more details about the markdown syntax.
|
||||
|
||||
.. note::
|
||||
The header levels are not only important when generating the exported novel file, they are also
|
||||
used by the indexer when building the outline tree in the :guilabel:`Outline` tab as well as the
|
||||
:guilabel:`Novel` tab of the project tree. Each heading also starts a new region where new
|
||||
references and tags can be defined.
|
||||
|
||||
The different header levels are interpreted as specific section types of the novel in the following
|
||||
way:
|
||||
|
||||
``# Header1``
|
||||
Header level one signifies that the text refers to either the novel title or the name of a top
|
||||
level partition. The latter is useful when you want to split the manuscript up into books,
|
||||
parts, or acts.
|
||||
|
||||
``## Header2``
|
||||
Header level two signifies a chapter level partition. Each time you want to start a new chapter,
|
||||
you must add such a heading. If you choose to split your manuscript up into one document per
|
||||
scene, you need a single chapter document with just the heading. You can of course also add a
|
||||
synopsis and reference keywords to the chapter document. If you want to open the chapter with a
|
||||
quote or other introductory text that isn't part of a scene, this is also where you'd put that
|
||||
text.
|
||||
|
||||
``### Header3``
|
||||
Header level three signifies a scene level partition. You must provide a title text, but the
|
||||
title text can be replaced with a scene separator or just skipped entirely when you export your
|
||||
manuscript.
|
||||
|
||||
``#### Header4``
|
||||
Header level four signifies a sub-scene level partition, usually called a "section" in the
|
||||
documentation and the user interface. These can be useful if you want to change tag references
|
||||
mid-scene, like if you change the point-of-view character. You are free to use sections as you
|
||||
wish, and can filter them out of the final manuscript just like with scene titles.
|
||||
|
||||
.. tip::
|
||||
There are multiple options of how to process novel titles when exporting the manuscript. For
|
||||
instance, chapter numbers can be applied automatically, and so can scene numbers if you want
|
||||
them in a draft manuscript. See the :ref:`a_export` page for more details.
|
||||
|
||||
|
||||
.. _a_struct_heads_unnum:
|
||||
|
||||
Unnumbered Chapter Headings
|
||||
---------------------------
|
||||
|
||||
If you use layout types for your documents, the automatic numbering feature for your chapters is
|
||||
controlled by whether you use the :guilabel:`Chapter` or :guilabel:`Unnumbered` layout type for
|
||||
your document. However, if you have a different document layout where this isn't practical, you can
|
||||
also switch off chapter numbering for a chapter by making the first character of the chapter title
|
||||
an asterisk (``*``). Like so:
|
||||
|
||||
``## *Unnumbered Chapter Title``
|
||||
|
||||
The leading asterisk is only considered by the :guilabel:`Build Novel Project` tool, and will be
|
||||
removed before the title is inserted at the location of the ``%title%`` label. See the
|
||||
:ref:`a_export` page for more details.
|
||||
|
||||
.. note::
|
||||
If you need the first character of the title to be an actual asterisk, you must escape it:
|
||||
``\*``.
|
||||
|
||||
|
||||
.. _a_struct_tags:
|
||||
|
||||
Tag References
|
||||
==============
|
||||
|
||||
Each text partition, indicated by a heading of any level, can contain references to tags set in the
|
||||
supporting notes of the project. The references are gathered by the indexer and used to generate an
|
||||
outline view on the :guilabel:`Outline` tab of how the different parts of the novel are connected.
|
||||
This section covers how to set references to tags. See :ref:`a_notes_tags` for how to define tags
|
||||
the references can point to.
|
||||
|
||||
References and tags are also clickable in the document editor and viewer, making it easy to
|
||||
navigate between reference notes while writing. Clicked links are always opened in the view panel.
|
||||
|
||||
References are set as a keyword and a list of corresponding tags. The valid keywords are listed
|
||||
below. The format of a reference line is ``@keyword: value1, [value2] ... [valueN]``. All keywords
|
||||
allow multiple values.
|
||||
|
||||
``@pov``
|
||||
The point-of-view character for the current section. The target must be a note tag in the
|
||||
:guilabel:`Character` type root folder.
|
||||
|
||||
``@focus``
|
||||
The character that has the focus for the current section. This can be used in cases where the
|
||||
focus is not a point-of-view character. The target must be a note tag in the
|
||||
:guilabel:`Character` type root folder.
|
||||
|
||||
``@char``
|
||||
Other characters in the current section. The target must be a note tag in the
|
||||
:guilabel:`Character` type root folder. This should not include the point-of-view character.
|
||||
|
||||
``@plot``
|
||||
The plot or subplot advanced in the current section. The target must be a note tag in the
|
||||
:guilabel:`Plot` type root folder.
|
||||
|
||||
``@time``
|
||||
The timelines touched by the current section. The target must be a note tag in the
|
||||
:guilabel:`Timeline` type root folder.
|
||||
|
||||
``@location``
|
||||
The location the current section takes place in. The target must be a note tag in the
|
||||
:guilabel:`Locations` type root folder.
|
||||
|
||||
``@object``
|
||||
Objects present in the current section. The target must be a note tag in the :guilabel:`Object`
|
||||
type root folder.
|
||||
|
||||
``@entity``
|
||||
Entities present in the current section. The target must be a note tag in the
|
||||
:guilabel:`Entities` type root folder.
|
||||
|
||||
``@custom``
|
||||
Custom references in the current section. The target must be a note tag in a :guilabel:`Custom`
|
||||
type root folder.
|
||||
|
||||
The syntax highlighter will alert the user that the tags and references are used correctly, and
|
||||
that the tags referenced exist.
|
||||
|
||||
The highlighter may be mistaken if the index of defined tags is out of date. If so, press :kbd:`F9`
|
||||
to regenerate it, or select :guilabel:`Rebuild Index` from the :guilabel:`Tools` menu. In general,
|
||||
the index for a document is regenerated when it is saved, so this shouldn't normally be necessary.
|
||||
|
||||
|
||||
.. _a_struct_layout:
|
||||
|
||||
Novel Document Layout
|
||||
=====================
|
||||
|
||||
All documents in the project can have a layout format set. These layouts are important when the
|
||||
project is exported as they indicate how to treat the content in terms of text formatting,
|
||||
headings, and page breaks. The layout for each document is indicated as the last set of characters
|
||||
in the :guilabel:`Flags` column of the project tree.
|
||||
|
||||
Not all layout types are actually treated differently, they also help to indicate what each
|
||||
document is intended for in your project. The :guilabel:`Book` layout is a generic novel document
|
||||
layout that is formatted identically to :guilabel:`Chapter` and :guilabel:`Scene` layout documents,
|
||||
but may help to indicate what each document does in your project.
|
||||
|
||||
You can for instance lay out your project using :guilabel:`Book` documents for each act, and then
|
||||
later split those into chapter or scene documents by using the :guilabel:`Split Document` tool.
|
||||
Scenes can also be contained within :guilabel:`Chapter` type documents, but you lose the drag and
|
||||
drop feature that comes with having them in separate documents if you organise them this way.
|
||||
|
||||
Some layouts *do* have implications on how the project is exported. Documents with layout
|
||||
:guilabel:`Title Page` and :guilabel:`Partition` have all headings and text centred, while the
|
||||
:guilabel:`Unnumbered` layout disables the automatic chapter numbering feature for everything
|
||||
contained within it. The latter is convenient for Prologue and Epilogue type chapters.
|
||||
|
||||
The above layout formats are only usable in the Novel root folder. Documents that are not a part of
|
||||
the novel itself should have the :guilabel:`Note` layout. These documents are not getting any
|
||||
special formatting, and it is possible to collectively filter them out during export. Notes can be
|
||||
used anywhere in the project, also in the :guilabel:`Novel` root folder.
|
||||
|
||||
Below is an overview of all available layout formats.
|
||||
|
||||
:guilabel:`Title Page`
|
||||
The title page layout. The title should be formatted as a heading level one. All text is centred
|
||||
on export.
|
||||
|
||||
:guilabel:`Plain Page`
|
||||
A plain page layout useful for instance for front matter pages. Heading levels are ignored for
|
||||
this layout format, and so are formatting options like :guilabel:`Justify Text`. The page is
|
||||
exported with a page break before it.
|
||||
|
||||
:guilabel:`Book`
|
||||
This is the generic novel format that in principle can be used for all novel documents. Since
|
||||
the internal structure of the novel is controlled by the heading levels, this layout will
|
||||
produce the same result as a collection of :guilabel:`Partition`, :guilabel:`Chapter` and
|
||||
:guilabel:`Scene` layout documents. However, it does not provide the functionality of the
|
||||
:guilabel:`Unnumbered` layout format by default, but this can still be achieved by prefixing the
|
||||
chapter title with an asterisk (``*``). See :ref:`a_struct_heads_unnum` for more details.
|
||||
|
||||
:guilabel:`Partition`
|
||||
A partition can be used to split the novel into parts. Partition titles are indicated with a
|
||||
level one heading. You can also add text and meta data to the page. The :guilabel:`Partition`
|
||||
layout will in addition force a page break before the heading, and centre all content on the
|
||||
page.
|
||||
|
||||
:guilabel:`Chapter`
|
||||
Signifies the start of a new chapter. If the text itself is contained in scene documents, these
|
||||
documents should only contain the title, comments, synopsis, and tag references for characters,
|
||||
plot, etc. The heading for chapters should be level two. If you need an opening text, like a
|
||||
quote or other leading text before the first scene, this is also where you'd want to add this
|
||||
text.
|
||||
|
||||
:guilabel:`Unnumbered`
|
||||
Same as :guilabel:`Chapter`, but when exporting the project, and automatic chapter numbering is
|
||||
enabled, documents with this layout will not increment and apply a chapter number. It also has a
|
||||
separate title formatting setting. This makes the layout suitable for Prologue and Epilogue type
|
||||
chapters.
|
||||
|
||||
:guilabel:`Scene`
|
||||
Used for scenes. This document should have a header of level three. Further sections can have
|
||||
headers of level four, but there are no layout specifically for sections.
|
||||
|
||||
:guilabel:`Note`
|
||||
A generic document that is optionally ignored when the novel project is exported. Use this
|
||||
layout for descriptions of content in the supporting root folders. Notes can also be added to
|
||||
the :guilabel:`Novel` root folder if you need to insert notes there. Note headers receive no
|
||||
special formatting when building the project. They are always exported as-is.
|
||||
|
||||
.. note::
|
||||
The layout granularity is entirely optional. In principle, you can write the entire novel in a
|
||||
single document with layout :guilabel:`Book`. You can also have a single document per chapter if
|
||||
that suits you better. The :guilabel:`Outline` will show your structure of chapters and scenes
|
||||
regardless of how your documents are organised. So will the novel tree.
|
||||
|
||||
.. tip::
|
||||
You can always start writing with a coarse layout with one or a few documents, and then later
|
||||
use the split tool to automatically split the documents into separate chapter and scene
|
||||
documents. The split tool will try to select the correct layout for each of the new documents.
|
||||
|
||||
|
||||
.. _a_struct_layout_auto:
|
||||
|
||||
Novel Layout Automation
|
||||
-----------------------
|
||||
|
||||
When a document is saved from the document editor, novelWriter will check if the level of the first
|
||||
header of the document matches the selected document layout. If the header level is inconsistent
|
||||
with the layout, the layout will automatically be corrected if it can be unambiguously determined.
|
||||
|
||||
This means that for instance saving a document with header level three, when the layout is set to
|
||||
:guilabel:`Chapter`, the layout will automatically be changed to :guilabel:`Scene`. If, however,
|
||||
the layout was set to :guilabel:`Book`, no change will be made because the :guilabel:`Book` layout
|
||||
is not associated with a specific header level.
|
||||
@@ -4,11 +4,6 @@
|
||||
Typographical Notes
|
||||
*******************
|
||||
|
||||
.. _Prime: https://en.wikipedia.org/wiki/Prime_(symbol)
|
||||
.. _thin space: https://en.wikipedia.org/wiki/Thin_space
|
||||
.. _Quotation Mark: https://en.wikipedia.org/wiki/Quotation_mark
|
||||
.. _Modifier letter apostrophe: https://en.wikipedia.org/wiki/Modifier_letter_apostrophe
|
||||
|
||||
novelWriter has some support for typographical symbols that are not usually easily available in
|
||||
many text editors. This includes for instance the proper unicode quotation marks, dashes, ellipsis,
|
||||
thin spaces, etc. All these symbols are available from the :guilabel:`Insert` menu, and via
|
||||
@@ -22,7 +17,7 @@ This chapter provides some additional information on how novelWriter handles the
|
||||
Special Notes on Symbols
|
||||
========================
|
||||
|
||||
This section contains additional notes on the available special symbols.
|
||||
Some additional notes on the available symbols.
|
||||
|
||||
|
||||
Dashes and Ellipsis
|
||||
@@ -30,12 +25,12 @@ Dashes and Ellipsis
|
||||
|
||||
With the auto-replace feature enabled (see :ref:`a_ui_edit_auto`), multiple hyphens are converted
|
||||
automatically to short and long dashes, and three dots to ellipsis. The last auto-replace can
|
||||
always be reverted with the undo command :kbd:`Ctrl+Z`, reverting the text to what you typed before
|
||||
the automatic replacement occurred.
|
||||
always be reverted with the undo command :kbd:`Ctrl`:kbd:`Z`, reverting the text to what you typed
|
||||
before the automatic replacement occurred.
|
||||
|
||||
In addition, "Figure Dash" is available. The Figure Dash is a dash that has the same width as the
|
||||
numbers of the same font, for most fonts. It helps to align numbers nicely in columns when you need
|
||||
to use a dash in them.
|
||||
numbers of the same font, for most fonts. It helps to align numbers align nicely in columns when
|
||||
you need to use a dash in them.
|
||||
|
||||
|
||||
Single and Double Quotes
|
||||
@@ -49,22 +44,26 @@ Ordinarily, text wrapped in quotes are highlighted by the editor. This is meant
|
||||
for highlighting dialogue between characters. This feature can be disabled in
|
||||
:guilabel:`Preferences` if this feature isn't wanted.
|
||||
|
||||
The editor distinguishes between text wrapped in regular straight double quotes and the
|
||||
user-selected double quote symbols. This is to help the writer recognise which parts of the text
|
||||
are not using the chosen quote symbols. Two convenience functions in the :guilabel:`Format` menu
|
||||
can be used to re-format a selected section of text with the correct quote symbols.
|
||||
The editor distinguishes between text wrapped in regular straight quotes and with the user-selected
|
||||
double quote symbols. This is to help the writer recognise which parts of the text are not using
|
||||
the chosen quote symbols. Two convenience functions in the :guilabel:`Format` menu can be used to
|
||||
re-format a selected section of text with the correct quote symbols.
|
||||
|
||||
.. _Quotation Mark: https://en.wikipedia.org/wiki/Quotation_mark
|
||||
|
||||
|
||||
Single and Double Prime
|
||||
------------------------
|
||||
|
||||
Both single and double prime symbols are available in the :guilabel:`Insert` menu. These symbols
|
||||
are the correct symbols to use for unit symbols for feet, inches, minutes, and seconds. The usage
|
||||
of these is described in more detail on the Wikipedia Prime_ page. They look very similar to single
|
||||
and double straight quotes, and may be rendered similarly by the font, but they have different
|
||||
are the correct symbols to use for unit symbols for feet, inches, minutes and seconds. The usage of
|
||||
these is described in more detail on the Wikipedia Prime_ page. They look very similar to single
|
||||
and double straight quotes, and may be renderred similarly by the font, but they have different
|
||||
codes. Using these correctly will also prevent the auto-replace and dialogue highlighting features
|
||||
misunderstanding their meaning in the text.
|
||||
|
||||
.. _Prime: https://en.wikipedia.org/wiki/Prime_(symbol)
|
||||
|
||||
|
||||
Modifier Letter Apostrophe
|
||||
--------------------------
|
||||
@@ -74,14 +73,16 @@ even if it is intended as an apostrophe. This also includes the syntax highlight
|
||||
assume the first following apostrophe is the closing symbol of a single quoted region of text.
|
||||
|
||||
To get around this, an alternative apostrophe is available. It is a special Unicode character that
|
||||
is not categorised as punctuation, but as a modifier. It is usually rendered the same way as the
|
||||
is not categorised as punctuation, but as a modifier. It is usually renderred the same way as the
|
||||
right single quotation marks, depending on the font. There is a Wikipedia article for the
|
||||
`Modifier letter apostrophe`_ with more details.
|
||||
|
||||
.. note::
|
||||
On export with the :guilabel:`Build Manuscript` tool, these apostrophes will be replaced
|
||||
On export with the :guilabel:`Build Novel Project` tool, these apostrophes will be replaced
|
||||
automatically with the corresponding right hand single quote symbol as is generally recommended.
|
||||
Therefore it doesn't really matter if you only use them to correct syntax highlighting.
|
||||
Therefore it doesn't really matter if you only use them to correct highlighting.
|
||||
|
||||
.. _Modifier letter apostrophe: https://en.wikipedia.org/wiki/Modifier_letter_apostrophe
|
||||
|
||||
|
||||
Special Space Symbols
|
||||
@@ -99,3 +100,5 @@ spot them in the text. The colour will depend on the selected colour theme.
|
||||
|
||||
The thin and non-breaking spaces are converted to their corresponding HTML codes on export to HTML
|
||||
format.
|
||||
|
||||
.. _thin space: https://en.wikipedia.org/wiki/Thin_space
|
||||
|
||||
@@ -1,152 +0,0 @@
|
||||
.. _a_ui_writing:
|
||||
|
||||
*********************
|
||||
The Editor and Viewer
|
||||
*********************
|
||||
|
||||
.. _Compose Key: https://en.wikipedia.org/wiki/Compose_key
|
||||
|
||||
This chapter covers in more detail how the document editor and viewer panels work.
|
||||
|
||||
|
||||
.. _a_ui_edit:
|
||||
|
||||
Editing a Document
|
||||
==================
|
||||
|
||||
.. figure:: images/fig_editor.png
|
||||
|
||||
A screenshot of the Document Editor panel.
|
||||
|
||||
To edit a document, double-click it in the project tree, or press the :kbd:`Return` key while
|
||||
having it selected. This will open the document in the document editor. The editor uses a
|
||||
Markdown-like syntax for some features, and a novelWriter-specific syntax for others. The syntax
|
||||
format is described in the :ref:`a_fmt` chapter.
|
||||
|
||||
The editor has a maximise button (toggles the :guilabel:`Focus Mode`) and a close button in the
|
||||
top--right corner. On the top--left side you will find a tools button that opens a toolbar with a
|
||||
few buttons for applying text formatting, and a search button to open the search dialog.
|
||||
|
||||
Both the document editor and viewer will show the label of the currently open document in the
|
||||
header at the top of the edit or view panel. Optionally, the full project path to the document can
|
||||
be shown. This can be set in :guilabel:`Preferences`.
|
||||
|
||||
.. tip::
|
||||
Clicking on the document title bar will select the document in the project tree and thus reveal
|
||||
its location there, making it easier to find in a large project.
|
||||
|
||||
Any :term:`references<reference>` in the editor can be opened in the viewer by moving the cursor to
|
||||
the label and pressing :kbd:`Ctrl+Return`. You can also control-click them with your mouse.
|
||||
|
||||
|
||||
Editor Auto-Completer
|
||||
---------------------
|
||||
|
||||
If you type the character ``@`` on a new line, a context menu will appear showing the different
|
||||
available keywords. The list will shorten as you type. Once a keyword command has been selected or
|
||||
typed, the editor may suggest further content based on your project content. See
|
||||
:ref:`a_references_completer` for more details.
|
||||
|
||||
.. versionadded:: 2.2
|
||||
The auto-completer feature was added.
|
||||
|
||||
|
||||
.. _a_ui_view:
|
||||
|
||||
Viewing a Document
|
||||
==================
|
||||
|
||||
.. figure:: images/fig_viewer.png
|
||||
|
||||
A screenshot of the Document Viewer panel.
|
||||
|
||||
Any document in the project tree can also be viewed in parallel in a right hand side document
|
||||
viewer. To view a document, press :kbd:`Ctrl+R`, or select :guilabel:`View Document` in the menu or
|
||||
context menu. If you have a middle mouse button, middle-clicking on the document will also open it
|
||||
in the viewer.
|
||||
|
||||
The document viewed does not have to be the same document as the one currently being edited.
|
||||
However, If you *are* viewing the same document, pressing :kbd:`Ctrl+R` again will update the
|
||||
document with your latest changes. You can also press the reload button in the top--right corner of
|
||||
the viewer panel, next to the close button, to achieve the same thing.
|
||||
|
||||
In the viewer :term:`references<reference>` become clickable links. Clicking them will replace the
|
||||
content of the viewer with the content of the document the reference points to.
|
||||
|
||||
The document viewer keeps a history of viewed documents, which you can navigate with the arrow
|
||||
buttons in the top--left corner of the viewer. If your mouse has backward and forward navigation
|
||||
buttons, these can be used as well. They work just like the backward and forward features in a
|
||||
browser.
|
||||
|
||||
At the bottom of the view panel there is a :guilabel:`References` panel. (If it is hidden, click
|
||||
the button on the left side of the footer area to reveal it.) This panel contains a References tab
|
||||
with links to all documents referring back to the one you're currently viewing, if any has been
|
||||
defined. If you have created root folders and tags for various story elements like characters and
|
||||
plot points, these will appear as additional tabs in this panel.
|
||||
|
||||
.. note::
|
||||
The :guilabel:`References` panel relies on an up-to-date :term:`index<project index>` of the
|
||||
project. The index is maintained automatically. However, if anything is missing, or seems wrong,
|
||||
the index can always be rebuilt by selecting :guilabel:`Rebuild Index` from the
|
||||
:guilabel:`Tools` menu, or by pressing :kbd:`F9`.
|
||||
|
||||
.. versionadded:: 2.2
|
||||
The reference panel was redesigned and the additional tabs added.
|
||||
|
||||
|
||||
.. _a_ui_edit_search:
|
||||
|
||||
Search & Replace
|
||||
================
|
||||
|
||||
.. figure:: images/fig_editor_search.png
|
||||
|
||||
A screenshot of the Document Editor search box.
|
||||
|
||||
The document editor has a search and replace tool that can be activated with :kbd:`Ctrl+F` for
|
||||
search mode or :kbd:`Ctrl+H` for search and replace mode.
|
||||
|
||||
Pressing :kbd:`Return` while in the search box will search for the next occurrence of the word, and
|
||||
:kbd:`Shift+Return` for the previous. Pressing :kbd:`Return` in the replace box, will replace the
|
||||
highlighted text and move to the next result.
|
||||
|
||||
There are a number of settings for the search tool available as toggle switches above the search
|
||||
box. They allow you to search for, in order: matched case only, whole word results only, search
|
||||
using regular expressions, loop search when reaching the end of the document, and move to the next
|
||||
document when reaching the end. There is also a switch that will try to match the case of the word
|
||||
when the replacement is made. That is, it will try to keep the word upper, lower, or capitalised to
|
||||
match the word being replaced.
|
||||
|
||||
The regular expression search is somewhat dependant on which version of Qt your system has. If you
|
||||
have Qt 5.13 or higher, there is better support for Unicode symbols in the search.
|
||||
|
||||
.. seealso::
|
||||
For more information on the capabilities of the Regular Expression option, see the Qt
|
||||
documentation for the `QRegularExpression <https://doc.qt.io/qt-5/qregularexpression.html>`_
|
||||
class.
|
||||
|
||||
|
||||
.. _a_ui_edit_auto:
|
||||
|
||||
Auto-Replace as You Type
|
||||
========================
|
||||
|
||||
A few auto-replace features are supported by the editor. You can control every aspect of the
|
||||
auto-replace feature from :guilabel:`Preferences`. You can also disable this feature entirely if
|
||||
you wish.
|
||||
|
||||
.. tip::
|
||||
If you don't like auto-replacement, all symbols inserted by this feature are also available in
|
||||
the :guilabel:`Insert` menu, and via :ref:`a_kb_ins`. You may also be using a `Compose Key`_
|
||||
setup, which means you may not need the auto-replace feature at all.
|
||||
|
||||
The editor is able to replace two and three hyphens with short and long dashes, triple points with
|
||||
ellipsis, and replace straight single and double quotes with user-defined quote symbols. It will
|
||||
also try to determine whether to use the opening or closing symbol, although this feature isn't
|
||||
always accurate. Especially distinguishing between closing single quote and apostrophe can be
|
||||
tricky for languages that use the same symbol for these, like English does.
|
||||
|
||||
.. tip::
|
||||
If the auto-replace feature changes a symbol when you did not want it to change, pressing
|
||||
:kbd:`Ctrl+Z` once after the auto-replacement will undo it without undoing the character
|
||||
you typed before it.
|
||||
162
i18n/README.md
@@ -1,126 +1,63 @@
|
||||
# novelWriter Internationalisation (i18n)
|
||||
# novelWriter Internationalisation
|
||||
|
||||
The maintenance of translations has been moved to the Crowdin service. The translation strings can
|
||||
be edited there at the [novelWriter project page](https://crowdin.com/project/novelwriter).
|
||||
However, please read the Translation Guidelines section below.
|
||||
The `i18n` folder contains the translation files for the Qt5 GUI. There are two types of files
|
||||
involved: the `nw_XX.ts` and the `nw_XX.qm` files. The `nw_XX.ts` files are located in the `i18n`
|
||||
folder at the root of the repository, and the `nw_XX.qm` together with the `project_XX.json` files
|
||||
are located in `nw/assets/i18n`. The latter are JSON translation maps for the novelWriter projects,
|
||||
used by the Build Novel Project tool.
|
||||
|
||||
You can still use the manual approach listed below, and then upload the file through the website's
|
||||
interface. The translation strings for that language will then be updated and queued for approval.
|
||||
**Note**
|
||||
|
||||
To verify a language file translated through the Crowdin tool, download and extract it into the
|
||||
`i18n` folder in the novelWriter source and follow the instructions in
|
||||
[Generate an Updated Translation File](#generate-an-updated-translation-file) below.
|
||||
When making a new translation, or updating an existing one, only commit the `nw_XX.ts` you have
|
||||
made changes to. The `qtlupdate` command mentioned below will likely modify all `nw_XX.ts`
|
||||
slightly, but please _don't_ commit those changes to the pull request.
|
||||
|
||||
## Qt GUI Localisation
|
||||
|
||||
# Translation Guidelines
|
||||
The `.qm` files are the actual files used by the application to translate the GUI into another
|
||||
language other than the default British English. The files are not generated by default. They can
|
||||
be built with:
|
||||
```bash
|
||||
python3 setup.py qtlrelease
|
||||
```
|
||||
|
||||
When contributing translations, keep the following things in mind.
|
||||
To add a new translation file, first add a new entry in the `novelWriter.pro` file under the
|
||||
`TRANSLATIONS` variable. Please use the underscore syntax for file names as the importer expects
|
||||
this format.
|
||||
|
||||
* For descriptive labels and dialog boxes, make sure you do _not_ change the meaning of the text
|
||||
when you translate it from English. The user must receive the same instructions or information
|
||||
regardless of language. This is improtant, otherwise the documentation will be inconsistent with
|
||||
the user interface and it will become a lot more difficult to handle user issues and questions.
|
||||
* If you think a label or description is misleading or incomplete, please file an issue report. The
|
||||
correct way to handle such changes is to change the text in the code first, which will then be
|
||||
forwarded to _all_ translators such that the GUI is consistent across all languages.
|
||||
* For very short labels, like button labels. it may be fine to replace the word with a similar
|
||||
word, but only as long as the user understands what it is supposed to do. Some buttons and tabs
|
||||
have limited space. If necessary, it is OK to use abbreviations.
|
||||
After adding the entry in the `.pro` file, run:
|
||||
```bash
|
||||
python3 setup.py qtlupdate
|
||||
```
|
||||
|
||||
This will build a new `i18n/nw_XX.ts` file for the language you just added. The file can then be
|
||||
edited with the Qt 5 Linguist application provided by Qt. This is by far easier than manually
|
||||
editing the `.ts` file. Please select "English" and "United Kingdom" as the source langauge when
|
||||
prompted by Qt 5 Linguist.
|
||||
|
||||
# Direct Approach Using Qt Linguist
|
||||
When you're done editing, you can build the `nw/assets/i18n/nw_XX.qm` file and test it in
|
||||
novelWriter. The Preferences dialog should list the newly added language, and you can select it and
|
||||
test it.
|
||||
|
||||
Here you will find instructions for translating novelWriter to a new language directly using Qt
|
||||
Linguist, or updating the translations for an already existing supported language.
|
||||
Please do not submit the `.qm` files to the repository. Only the `.ts` file you just added in the
|
||||
`i18n` folder is needed.
|
||||
|
||||
There are two areas relevant to localisation:
|
||||
**Note**
|
||||
|
||||
* The Qt5 GUI translation files, which consists of `nw_XX.ts` files. This is the bulk of the
|
||||
translation work.
|
||||
* The `project_XX.json` files. See [Project Localisation](#project-localisation) below.
|
||||
|
||||
The `XX` in the file name corresponds to the language and country code for the translation. For
|
||||
instance `en_GB` for British English.
|
||||
|
||||
|
||||
## Qt5 GUI Localisation
|
||||
|
||||
You will need the translation tool Qt 5 Linguist on your system.
|
||||
These commands require that you have the tools Qt 5 Linguist and the PyQt5 tool `pylupdate5`
|
||||
installed on your system.
|
||||
|
||||
For Ubuntu/Debian, run:
|
||||
|
||||
```bash
|
||||
sudo apt install qttools5-dev-tools
|
||||
sudo apt install qttools5-dev-tools pyqt5-dev-tools
|
||||
```
|
||||
|
||||
See also [Qt Linguist Manual: Translators](https://doc.qt.io/qt-5/linguist-translators.html).
|
||||
|
||||
|
||||
### Workflow
|
||||
|
||||
Here's an overview of the localisation workflow:
|
||||
|
||||
1. First, create a new branch off of `main`, and there, generate a new `nw_XX.ts` translation file.
|
||||
1. Load the translation file in Qt Linguist. Translate and save your changes.
|
||||
1. Generate the `nw_XX.qm` file.
|
||||
1. Run the application and verify your changes. Iterate from step 2.
|
||||
1. Once finished, commit your changes and submit your pull request.
|
||||
|
||||
When you want to translate new changes, again create a new branch off of `main` and re-generate the
|
||||
translation file. Continue from step 2.
|
||||
|
||||
|
||||
### Generate an Updated Translation File
|
||||
|
||||
The `i18n` folder at the root of the repository contains the `nw_XX.ts` translation files.
|
||||
|
||||
Whether to add a new language to the translation framework, or to update the file against the
|
||||
current source code, you must first run the `qtlupdate` command:
|
||||
|
||||
```bash
|
||||
python3 pkgutils.py qtlupdate i18n/nw_XX.ts
|
||||
```
|
||||
|
||||
The file name must be in the correct format. All translation files must be located in the `i18n`
|
||||
folder, start with `nw_` and end with `.ts`. In between goes the language and country code. It must
|
||||
be a valid ISO language code, otherwise novelWriter will not accept the file.
|
||||
|
||||
For instance, the French translation uses the language code `fr_FR`, so its translation file will
|
||||
be `nw_fr_FR.ts`
|
||||
|
||||
Note: The `qtlupdate` command needs the `lupdate` tool provided by PyQt6, which uses the latest
|
||||
TS file format. The tool in PyQt5 generates an older file format. On Debian/Ubuntu it is provided
|
||||
by the package `pyqt6-dev-tools`.
|
||||
|
||||
|
||||
### Edit the Translation File in Qt Linguist
|
||||
|
||||
The `i18n/nw_XX.ts` file can be edited with the Qt Linguist application provided by Qt 5. This is
|
||||
by far easier than manually editing the `.ts` file.
|
||||
|
||||
Please select "English" and "United Kingdom" as the _source_ language if prompted by Qt Linguist.
|
||||
|
||||
|
||||
### Verify Your Translation
|
||||
|
||||
The application does not use `.ts` files directly. The `novelwriter/assets/i18n/nw_XX.qm` files are
|
||||
the actual files used to translate the GUI into another language other than the default British
|
||||
English. These files are not generated by default, but they can be built with:
|
||||
|
||||
```bash
|
||||
python3 pkgutils.py qtlrelease
|
||||
```
|
||||
|
||||
You can now test the translation in novelWriter. The Preferences dialog should list the newly added
|
||||
language, so go ahead and select it.
|
||||
|
||||
|
||||
### Missing QtBase Translations
|
||||
|
||||
The default Qt dialogs also have translations, for instance for standard buttons like "Yes", "No",
|
||||
"Ok", "Cancel", etc. Generally, these translation files are installed with the Qt libraries on your
|
||||
system, and novelWriter will collect those translations from there. However, these translations are
|
||||
missing for many languages.
|
||||
"Ok", "Cancel", etc. Generally, these translations files are installed with the Qt libraries on
|
||||
your system, and novelWriter will collect those translations from there. However, these
|
||||
translations are missing for many languages.
|
||||
|
||||
As a starting point, there is no need to translate any entries in the `.ts` files that are under
|
||||
elements starting with the letter "Q", like "QPlatformTheme", "QWizard", etc. If these turn up in
|
||||
@@ -131,17 +68,18 @@ These additional translation entries are generated from a file named `i18n/qtbas
|
||||
a file that novelWriter uses. It is there only to generate these additional entries for the `.ts`
|
||||
files.
|
||||
|
||||
|
||||
## Project Localisation
|
||||
|
||||
Projects can have a different language setting than the GUI itself. The files with format
|
||||
`project_XX.json` in `novelwriter/assets/i18n` are simple translation maps for text that goes into
|
||||
the exported documents generated by the Build Novel Project tool.
|
||||
`project_XX.json` in `nw/assets/i18n` are simple translation maps for text that goes into the
|
||||
exported documents generated by the Build Novel Project tool.
|
||||
|
||||
The files are loaded based on the language setting in the Build Novel Project tool. At the present
|
||||
time, no other parts of the application use these files. Since these are used as replacement
|
||||
lookups, they are maintained as plain JSON files. The main usage is to generate chapter headers as
|
||||
number words.
|
||||
The files are loaded based on the language setting in the build tool. At the present time, no other
|
||||
parts of the application use these files. Since these are used as replacement lookups, they are
|
||||
maintained as plain JSON files. The main usage is to generate chapter headers as number words.
|
||||
|
||||
Adding new translations for these files is easy. Just copy the `project_en_GB.json` file, rename it
|
||||
to the appropriate language coded filename, and open it in a text editor and edit the content.
|
||||
Adding new translations for these files is easy. Just copy the `project_en.json` file, rename it to
|
||||
the appropriate language coded filename, and edit it. Please use the underscore as separator if a
|
||||
language needs to be localised to a specific country under a language. The importer will for
|
||||
instance look for `en_US` first, then use `en` if it is not found. If there are no matching files,
|
||||
the project falls back to using English.
|
||||
|
||||
4835
i18n/nw_base.ts
4653
i18n/nw_de_DE.ts
6946
i18n/nw_en_US.ts
4835
i18n/nw_es_419.ts
5024
i18n/nw_fr.ts
Normal file
4835
i18n/nw_fr_FR.ts
4835
i18n/nw_it_IT.ts
4835
i18n/nw_ja_JP.ts
6946
i18n/nw_nb_NO.ts
4653
i18n/nw_nl_NL.ts
4943
i18n/nw_pt.ts
Normal file
4681
i18n/nw_pt_BR.ts
6822
i18n/nw_zh_CN.ts
@@ -26,6 +26,14 @@ QT_TRANSLATE_NOOP("QGnomeTheme", "&Cancel")
|
||||
QT_TRANSLATE_NOOP("QGnomeTheme", "&Close")
|
||||
QT_TRANSLATE_NOOP("QGnomeTheme", "Close without Saving")
|
||||
|
||||
# QGuiApplication
|
||||
# ===============
|
||||
|
||||
QT_TRANSLATE_NOOP("QGuiApplication", (
|
||||
"Translate this string to the string 'LTR' in left-to-right languages or to "
|
||||
"'RTL' in right-to-left languages (such as Hebrew and Arabic) to get proper widget layout."
|
||||
))
|
||||
|
||||
# QPlatformTheme
|
||||
# ==============
|
||||
|
||||
|
||||
39
novelWriter.pro
Normal file
@@ -0,0 +1,39 @@
|
||||
SOURCES += \
|
||||
i18n/qtbase.py \
|
||||
nw/core/project.py \
|
||||
nw/core/tokenizer.py \
|
||||
nw/dialogs/about.py \
|
||||
nw/dialogs/docmerge.py \
|
||||
nw/dialogs/docsplit.py \
|
||||
nw/dialogs/itemeditor.py \
|
||||
nw/dialogs/preferences.py \
|
||||
nw/dialogs/projload.py \
|
||||
nw/dialogs/projsettings.py \
|
||||
nw/dialogs/wordlist.py \
|
||||
nw/gui/custom.py \
|
||||
nw/gui/doceditor.py \
|
||||
nw/gui/docviewer.py \
|
||||
nw/gui/itemdetails.py \
|
||||
nw/gui/mainmenu.py \
|
||||
nw/gui/noveltree.py \
|
||||
nw/gui/outline.py \
|
||||
nw/gui/outlinedetails.py \
|
||||
nw/gui/projdetails.py \
|
||||
nw/gui/projtree.py \
|
||||
nw/gui/statusbar.py \
|
||||
nw/gui/theme.py \
|
||||
nw/tools/build.py \
|
||||
nw/tools/projwizard.py \
|
||||
nw/tools/writingstats.py \
|
||||
nw/common.py \
|
||||
nw/constants.py \
|
||||
nw/error.py \
|
||||
nw/guimain.py
|
||||
|
||||
TRANSLATIONS += \
|
||||
i18n/nw_en_US.ts \
|
||||
i18n/nw_fr.ts \
|
||||
i18n/nw_nb_NO.ts \
|
||||
i18n/nw_pt.ts \
|
||||
i18n/nw_zh_CN.ts
|
||||
|
||||
@@ -17,5 +17,5 @@ except Exception:
|
||||
os.curdir = os.path.abspath(os.path.dirname(__file__))
|
||||
|
||||
if __name__ == "__main__":
|
||||
import novelwriter
|
||||
novelwriter.main(sys.argv[1:])
|
||||
import nw
|
||||
nw.main(sys.argv[1:])
|
||||
|
||||
@@ -1,116 +0,0 @@
|
||||
{
|
||||
"Synopsis": "Synopsis",
|
||||
"Short Description": "Short Description",
|
||||
"Comment": "Comment",
|
||||
"Notes": "Notes",
|
||||
"Tag": "Tag",
|
||||
"Point of View": "Point of View",
|
||||
"Focus": "Focus",
|
||||
"Characters": "Characters",
|
||||
"Plot": "Plot",
|
||||
"Timeline": "Timeline",
|
||||
"Locations": "Locations",
|
||||
"Objects": "Objects",
|
||||
"Entities": "Entities",
|
||||
"Custom": "Custom",
|
||||
"0": "Zero",
|
||||
"1": "One",
|
||||
"2": "Two",
|
||||
"3": "Three",
|
||||
"4": "Four",
|
||||
"5": "Five",
|
||||
"6": "Six",
|
||||
"7": "Seven",
|
||||
"8": "Eight",
|
||||
"9": "Nine",
|
||||
"10": "Ten",
|
||||
"11": "Eleven",
|
||||
"12": "Twelve",
|
||||
"13": "Thirteen",
|
||||
"14": "Fourteen",
|
||||
"15": "Fifteen",
|
||||
"16": "Sixteen",
|
||||
"17": "Seventeen",
|
||||
"18": "Eighteen",
|
||||
"19": "Nineteen",
|
||||
"20": "Twenty",
|
||||
"21": "Twenty-One",
|
||||
"22": "Twenty-Two",
|
||||
"23": "Twenty-Three",
|
||||
"24": "Twenty-Four",
|
||||
"25": "Twenty-Five",
|
||||
"26": "Twenty-Six",
|
||||
"27": "Twenty-Seven",
|
||||
"28": "Twenty-Eight",
|
||||
"29": "Twenty-Nine",
|
||||
"30": "Thirty",
|
||||
"31": "Thirty-One",
|
||||
"32": "Thirty-Two",
|
||||
"33": "Thirty-Three",
|
||||
"34": "Thirty-Four",
|
||||
"35": "Thirty-Five",
|
||||
"36": "Thirty-Six",
|
||||
"37": "Thirty-Seven",
|
||||
"38": "Thirty-Eight",
|
||||
"39": "Thirty-Nine",
|
||||
"40": "Forty",
|
||||
"41": "Forty-One",
|
||||
"42": "Forty-Two",
|
||||
"43": "Forty-Three",
|
||||
"44": "Forty-Four",
|
||||
"45": "Forty-Five",
|
||||
"46": "Forty-Six",
|
||||
"47": "Forty-Seven",
|
||||
"48": "Forty-Eight",
|
||||
"49": "Forty-Nine",
|
||||
"50": "Fifty",
|
||||
"51": "Fifty-One",
|
||||
"52": "Fifty-Two",
|
||||
"53": "Fifty-Three",
|
||||
"54": "Fifty-Four",
|
||||
"55": "Fifty-Five",
|
||||
"56": "Fifty-Six",
|
||||
"57": "Fifty-Seven",
|
||||
"58": "Fifty-Eight",
|
||||
"59": "Fifty-Nine",
|
||||
"60": "Sixty",
|
||||
"61": "Sixty-One",
|
||||
"62": "Sixty-Two",
|
||||
"63": "Sixty-Three",
|
||||
"64": "Sixty-Four",
|
||||
"65": "Sixty-Five",
|
||||
"66": "Sixty-Six",
|
||||
"67": "Sixty-Seven",
|
||||
"68": "Sixty-Eight",
|
||||
"69": "Sixty-Nine",
|
||||
"70": "Seventy",
|
||||
"71": "Seventy-One",
|
||||
"72": "Seventy-Two",
|
||||
"73": "Seventy-Three",
|
||||
"74": "Seventy-Four",
|
||||
"75": "Seventy-Five",
|
||||
"76": "Seventy-Six",
|
||||
"77": "Seventy-Seven",
|
||||
"78": "Seventy-Eight",
|
||||
"79": "Seventy-Nine",
|
||||
"80": "Eighty",
|
||||
"81": "Eighty-One",
|
||||
"82": "Eighty-Two",
|
||||
"83": "Eighty-Three",
|
||||
"84": "Eighty-Four",
|
||||
"85": "Eighty-Five",
|
||||
"86": "Eighty-Six",
|
||||
"87": "Eighty-Seven",
|
||||
"88": "Eighty-Eight",
|
||||
"89": "Eighty-Nine",
|
||||
"90": "Ninety",
|
||||
"91": "Ninety-One",
|
||||
"92": "Ninety-Two",
|
||||
"93": "Ninety-Three",
|
||||
"94": "Ninety-Four",
|
||||
"95": "Ninety-Five",
|
||||
"96": "Ninety-Six",
|
||||
"97": "Ninety-Seven",
|
||||
"98": "Ninety-Eight",
|
||||
"99": "Ninety-Nine"
|
||||
}
|
||||
@@ -1,116 +0,0 @@
|
||||
{
|
||||
"Synopsis": "Sinopsis",
|
||||
"Short Description": "Breve Descripción",
|
||||
"Comment": "Comentario",
|
||||
"Notes": "Notas",
|
||||
"Tag": "Etiqueta",
|
||||
"Point of View": "Punto de Vista",
|
||||
"Focus": "Foco",
|
||||
"Characters": "Personajes",
|
||||
"Plot": "Argumento",
|
||||
"Timeline": "Línea de Tiempo",
|
||||
"Locations": "Lugares",
|
||||
"Objects": "Objetos",
|
||||
"Entities": "Entidades",
|
||||
"Custom": "Otros",
|
||||
"0": "Cero",
|
||||
"1": "Uno",
|
||||
"2": "Dos",
|
||||
"3": "Tres",
|
||||
"4": "Cuatro",
|
||||
"5": "Cinco",
|
||||
"6": "Seis",
|
||||
"7": "Siete",
|
||||
"8": "Ocho",
|
||||
"9": "Nueve",
|
||||
"10": "Diez",
|
||||
"11": "Once",
|
||||
"12": "Doce",
|
||||
"13": "Trece",
|
||||
"14": "Catorce",
|
||||
"15": "Quince",
|
||||
"16": "Dieciséis",
|
||||
"17": "Diecisiete",
|
||||
"18": "Dieciocho",
|
||||
"19": "Diecinueve",
|
||||
"20": "Veinte",
|
||||
"21": "Veintiuno",
|
||||
"22": "Veintidós",
|
||||
"23": "Veintitrés",
|
||||
"24": "Veinticuatro",
|
||||
"25": "Veinticinco",
|
||||
"26": "Veintiséis",
|
||||
"27": "Veintisiete",
|
||||
"28": "Veintiocho",
|
||||
"29": "Veintinueve",
|
||||
"30": "Treinta",
|
||||
"31": "Treinta y ",
|
||||
"32": "Treinta y ",
|
||||
"33": "Treinta y ",
|
||||
"34": "Treinta y ",
|
||||
"35": "Treinta y ",
|
||||
"36": "Treinta y ",
|
||||
"37": "Treinta y ",
|
||||
"38": "Treinta y ",
|
||||
"39": "Treinta y ",
|
||||
"40": "Cuarenta",
|
||||
"41": "Cuarenta y uno",
|
||||
"42": "Cuarenta y dos",
|
||||
"43": "Cuarenta y tres",
|
||||
"44": "Cuarenta y cuatro",
|
||||
"45": "Cuarenta y cinco",
|
||||
"46": "Cuarenta y seis",
|
||||
"47": "Cuarenta y siete",
|
||||
"48": "Cuarenta y ocho",
|
||||
"49": "Cuarenta y nueve",
|
||||
"50": "Cincuenta",
|
||||
"51": "Cincuenta y uno",
|
||||
"52": "Cincuenta y dos",
|
||||
"53": "Cincuenta y tres",
|
||||
"54": "Cincuenta y cuatro",
|
||||
"55": "Cincuenta y cinco",
|
||||
"56": "Cincuenta y seis",
|
||||
"57": "Cincuenta y siete",
|
||||
"58": "Cincuenta y ocho",
|
||||
"59": "Cincuenta y nueve",
|
||||
"60": "Sesenta",
|
||||
"61": "Sesenta y uno",
|
||||
"62": "Sesenta y dos",
|
||||
"63": "Sesenta y tres",
|
||||
"64": "Sesenta y cuatro",
|
||||
"65": "Sesenta y cinco",
|
||||
"66": "Sesenta y seis",
|
||||
"67": "Sesenta y siete",
|
||||
"68": "Sesenta y ocho",
|
||||
"69": "Sesenta y nueve",
|
||||
"70": "Setenta",
|
||||
"71": "Setenta y uno",
|
||||
"72": "Setenta y dos",
|
||||
"73": "Setenta y tres",
|
||||
"74": "Setenta y cuatro",
|
||||
"75": "Setenta y cinco",
|
||||
"76": "Setenta y seis",
|
||||
"77": "Setenta y siete",
|
||||
"78": "Setenta y ocho",
|
||||
"79": "Setenta y nueve",
|
||||
"80": "Ochenta",
|
||||
"81": "Ochenta y uno",
|
||||
"82": "Ochenta y dos",
|
||||
"83": "Ochenta y tres",
|
||||
"84": "Ochenta y cuatro",
|
||||
"85": "Ochenta y cinco",
|
||||
"86": "Ochenta y seis",
|
||||
"87": "Ochenta y siete",
|
||||
"88": "Ochenta y ocho",
|
||||
"89": "Ochenta y nueve",
|
||||
"90": "Noventa",
|
||||
"91": "Noventa y uno",
|
||||
"92": "Noventa y dos",
|
||||
"93": "Noventa y tres",
|
||||
"94": "Noventa y cuatro",
|
||||
"95": "Noventa y cinco",
|
||||
"96": "Noventa y seis",
|
||||
"97": "Noventa y siete",
|
||||
"98": "Noventa y ocho",
|
||||
"99": "Noventa y nueve"
|
||||
}
|
||||
@@ -1,116 +0,0 @@
|
||||
{
|
||||
"Synopsis": "Sinossi",
|
||||
"Short Description": "Breve descrizione",
|
||||
"Comment": "Commento",
|
||||
"Notes": "Note",
|
||||
"Tag": "Etichetta",
|
||||
"Point of View": "Punto di vista",
|
||||
"Focus": "Focus",
|
||||
"Characters": "Personaggi",
|
||||
"Plot": "Trama",
|
||||
"Timeline": "Sequenza temporale",
|
||||
"Locations": "Luoghi",
|
||||
"Objects": "Oggetti",
|
||||
"Entities": "Enti",
|
||||
"Custom": "Personalizzato",
|
||||
"0": "Zero",
|
||||
"1": "Uno",
|
||||
"2": "Due",
|
||||
"3": "Tre",
|
||||
"4": "Quattro",
|
||||
"5": "Cinque",
|
||||
"6": "Sei",
|
||||
"7": "Sette",
|
||||
"8": "Otto",
|
||||
"9": "Nove",
|
||||
"10": "Dieci",
|
||||
"11": "Undici",
|
||||
"12": "Dodici",
|
||||
"13": "Tredici",
|
||||
"14": "Quattordici",
|
||||
"15": "Quindici",
|
||||
"16": "Sedici",
|
||||
"17": "Diciassette",
|
||||
"18": "Diciotto",
|
||||
"19": "Diciannove",
|
||||
"20": "Venti",
|
||||
"21": "Ventuno",
|
||||
"22": "Ventidue",
|
||||
"23": "Ventitré",
|
||||
"24": "Ventiquattro",
|
||||
"25": "Venticinque",
|
||||
"26": "Ventisei",
|
||||
"27": "Ventisette",
|
||||
"28": "Ventotto",
|
||||
"29": "Ventinove",
|
||||
"30": "Trenta",
|
||||
"31": "Trentuno",
|
||||
"32": "Trentadue",
|
||||
"33": "Trentatré",
|
||||
"34": "Trentaquattro",
|
||||
"35": "Trentacinque",
|
||||
"36": "Trentasei",
|
||||
"37": "Trentasette",
|
||||
"38": "Trentotto",
|
||||
"39": "Trentanove",
|
||||
"40": "Quaranta",
|
||||
"41": "Quarantuno",
|
||||
"42": "Quarantadue",
|
||||
"43": "Quarantatré",
|
||||
"44": "Quarantaquattro",
|
||||
"45": "Quarantacinque",
|
||||
"46": "Quarantasei",
|
||||
"47": "Quarantasette",
|
||||
"48": "Quarantotto",
|
||||
"49": "Quarantanove",
|
||||
"50": "Cinquanta",
|
||||
"51": "Cinquantuno",
|
||||
"52": "Cinquantadue",
|
||||
"53": "Cinquantatré",
|
||||
"54": "Cinquantaquattro",
|
||||
"55": "Cinquantacinque",
|
||||
"56": "Cinquantasei",
|
||||
"57": "Cinquantasette",
|
||||
"58": "Cinquantotto",
|
||||
"59": "Cinquantanove",
|
||||
"60": "Sessanta",
|
||||
"61": "Sessantuno",
|
||||
"62": "Sessantadue",
|
||||
"63": "Sessantatre",
|
||||
"64": "Sessantaquattro",
|
||||
"65": "Sessantacinque",
|
||||
"66": "Sessantasei",
|
||||
"67": "Sessantasette",
|
||||
"68": "Sessantotto",
|
||||
"69": "Sessantanove",
|
||||
"70": "Settanta",
|
||||
"71": "Settantuno",
|
||||
"72": "Settantadue",
|
||||
"73": "Settantatré",
|
||||
"74": "Settantaquattro",
|
||||
"75": "Settantacinque",
|
||||
"76": "Settantasei",
|
||||
"77": "Settantasette",
|
||||
"78": "Settantotto",
|
||||
"79": "Settantanove",
|
||||
"80": "Ottanta",
|
||||
"81": "Ottantuno",
|
||||
"82": "Ottantadue",
|
||||
"83": "Ottantatré",
|
||||
"84": "Ottantaquattro",
|
||||
"85": "Ottantacinque",
|
||||
"86": "Ottantasei",
|
||||
"87": "Ottantasette",
|
||||
"88": "Ottantotto",
|
||||
"89": "Ottantanove",
|
||||
"90": "Novanta",
|
||||
"91": "Novantuno",
|
||||
"92": "Novantadue",
|
||||
"93": "Novantatré",
|
||||
"94": "Novantaquattro",
|
||||
"95": "Novantacinque",
|
||||
"96": "Novantasei",
|
||||
"97": "Novantasette",
|
||||
"98": "Novantotto",
|
||||
"99": "Novantanove"
|
||||
}
|
||||
@@ -1,116 +0,0 @@
|
||||
{
|
||||
"Synopsis": "あらすじ",
|
||||
"Short Description": "短い説明",
|
||||
"Comment": "コメント ",
|
||||
"Notes": "ノート",
|
||||
"Tag": "タグ",
|
||||
"Point of View": "視点",
|
||||
"Focus": "焦点",
|
||||
"Characters": "キャラクター",
|
||||
"Plot": "プロット",
|
||||
"Timeline": "タイムライン",
|
||||
"Locations": "場所",
|
||||
"Objects": "オブジェクト",
|
||||
"Entities": "エンティティ",
|
||||
"Custom": "カスタム",
|
||||
"0": "零",
|
||||
"1": "一",
|
||||
"2": "二",
|
||||
"3": "三",
|
||||
"4": "四",
|
||||
"5": "五",
|
||||
"6": "六",
|
||||
"7": "七",
|
||||
"8": "八",
|
||||
"9": "九",
|
||||
"10": "十",
|
||||
"11": "十一",
|
||||
"12": "十二",
|
||||
"13": "十三",
|
||||
"14": "十四",
|
||||
"15": "十五",
|
||||
"16": "十六",
|
||||
"17": "十七",
|
||||
"18": "十八",
|
||||
"19": "十九",
|
||||
"20": "二十",
|
||||
"21": "二十一",
|
||||
"22": "二十二",
|
||||
"23": "二十三",
|
||||
"24": "二十四",
|
||||
"25": "二十五",
|
||||
"26": "二十六",
|
||||
"27": "二十七",
|
||||
"28": "二十八",
|
||||
"29": "二十九",
|
||||
"30": "三十",
|
||||
"31": "三十一",
|
||||
"32": "三十二",
|
||||
"33": "三十三",
|
||||
"34": "三十四",
|
||||
"35": "三十五",
|
||||
"36": "三十六",
|
||||
"37": "三十七",
|
||||
"38": "三十八",
|
||||
"39": "三十九",
|
||||
"40": "四十",
|
||||
"41": "四十一",
|
||||
"42": "四十二",
|
||||
"43": "四十三",
|
||||
"44": "四十四",
|
||||
"45": "四十五",
|
||||
"46": "四十六",
|
||||
"47": "四十七",
|
||||
"48": "四十八",
|
||||
"49": "四十九",
|
||||
"50": "五十",
|
||||
"51": "五十一",
|
||||
"52": "五十二",
|
||||
"53": "五十三",
|
||||
"54": "五十四",
|
||||
"55": "五十五",
|
||||
"56": "五十六",
|
||||
"57": "五十七",
|
||||
"58": "五十八",
|
||||
"59": "五十九",
|
||||
"60": "六十",
|
||||
"61": "六十一",
|
||||
"62": "六十二",
|
||||
"63": "六十三",
|
||||
"64": "六十四",
|
||||
"65": "六十五",
|
||||
"66": "六十六",
|
||||
"67": "六十七",
|
||||
"68": "六十八",
|
||||
"69": "六十九",
|
||||
"70": "七十",
|
||||
"71": "七十一",
|
||||
"72": "七十二",
|
||||
"73": "七十三",
|
||||
"74": "七十四",
|
||||
"75": "七十五",
|
||||
"76": "七十六",
|
||||
"77": "七十七",
|
||||
"78": "七十八",
|
||||
"79": "七十九",
|
||||
"80": "八十",
|
||||
"81": "八十一",
|
||||
"82": "八十二",
|
||||
"83": "八十三",
|
||||
"84": "八十四",
|
||||
"85": "八十五",
|
||||
"86": "八十六",
|
||||
"87": "八十七",
|
||||
"88": "八十八",
|
||||
"89": "八十九",
|
||||
"90": "九十",
|
||||
"91": "九十一",
|
||||
"92": "九十二",
|
||||
"93": "九十三",
|
||||
"94": "九十四",
|
||||
"95": "九十五",
|
||||
"96": "九十六",
|
||||
"97": "九十七",
|
||||
"98": "九十八",
|
||||
"99": "九十九"
|
||||
}
|
||||
@@ -1,105 +0,0 @@
|
||||
{
|
||||
"Synopsis": "Synopsis",
|
||||
"Comment": "Opmerking",
|
||||
"Notes": "Notities",
|
||||
"0": "nul",
|
||||
"1": "één",
|
||||
"2": "twee",
|
||||
"3": "drie",
|
||||
"4": "vier",
|
||||
"5": "vijf",
|
||||
"6": "zes",
|
||||
"7": "zeven",
|
||||
"8": "acht",
|
||||
"9": "negen",
|
||||
"10": "tien",
|
||||
"11": "elf",
|
||||
"12": "twaalf",
|
||||
"13": "dertien",
|
||||
"14": "veertien",
|
||||
"15": "vijftien",
|
||||
"16": "zestien",
|
||||
"17": "zeventien",
|
||||
"18": "achttien",
|
||||
"19": "negentien",
|
||||
"20": "twintig",
|
||||
"21": "eenentwintig",
|
||||
"22": "tweeëntwintig",
|
||||
"23": "drieëntwintig",
|
||||
"24": "vierentwintig",
|
||||
"25": "vijfentwintig",
|
||||
"26": "zesentwintig",
|
||||
"27": "zevenentwintig",
|
||||
"28": "achtentwintig",
|
||||
"29": "negenentwintig",
|
||||
"30": "dertig",
|
||||
"31": "eenendertig",
|
||||
"32": "tweeëndertig",
|
||||
"33": "drieëndertig",
|
||||
"34": "vierendertig",
|
||||
"35": "vijfendertig",
|
||||
"36": "zesendertig",
|
||||
"37": "zevenendertig",
|
||||
"38": "achtendertig",
|
||||
"39": "negenendertig",
|
||||
"40": "veertig",
|
||||
"41": "eenenveertig",
|
||||
"42": "tweeënveertig",
|
||||
"43": "drieënveertig",
|
||||
"44": "vierenveertig",
|
||||
"45": "vijfenveertig",
|
||||
"46": "zesenveertig",
|
||||
"47": "zevenenveertig",
|
||||
"48": "achtenveertig",
|
||||
"49": "negenenveertig",
|
||||
"50": "vijftig",
|
||||
"51": "eenenvijftig",
|
||||
"52": "tweeënvijftig",
|
||||
"53": "drieënvijftig",
|
||||
"54": "vierenvijftig",
|
||||
"55": "vijfenvijftig",
|
||||
"56": "zesenvijftig",
|
||||
"57": "zevenenvijftig",
|
||||
"58": "achtenvijftig",
|
||||
"59": "negenenvijftig",
|
||||
"60": "zestig",
|
||||
"61": "eenenzestig",
|
||||
"62": "tweeënzestig",
|
||||
"63": "drieënzestig",
|
||||
"64": "vierenzestig",
|
||||
"65": "vijfenzestig",
|
||||
"66": "zesenzestig",
|
||||
"67": "zevenenzestig",
|
||||
"68": "achtenzestig",
|
||||
"69": "negenenzestig",
|
||||
"70": "zeventig",
|
||||
"71": "eenenzeventig",
|
||||
"72": "tweeënzeventig",
|
||||
"73": "drieënzeventig",
|
||||
"74": "vierenzeventig",
|
||||
"75": "vijfenzeventig",
|
||||
"76": "zesenzeventig",
|
||||
"77": "zevenenzeventig",
|
||||
"78": "achtenzeventig",
|
||||
"79": "negenenzeventig",
|
||||
"80": "tachtig",
|
||||
"81": "eenentachtig",
|
||||
"82": "tweeëntachtig",
|
||||
"83": "drieëntachtig",
|
||||
"84": "vierentachtig",
|
||||
"85": "vijfentachtig",
|
||||
"86": "zesentachtig",
|
||||
"87": "zevenentachtig",
|
||||
"88": "achtentachtig",
|
||||
"89": "negenentachtig",
|
||||
"90": "negentig",
|
||||
"91": "eenennegentig",
|
||||
"92": "tweeënnegentig",
|
||||
"93": "drieënnegentig",
|
||||
"94": "vierennegentig",
|
||||
"95": "vijfennegentig",
|
||||
"96": "zesennegentig",
|
||||
"97": "zevenennegentig",
|
||||
"98": "achtennegentig",
|
||||
"99": "negenennegentig"
|
||||
}
|
||||
@@ -1,105 +0,0 @@
|
||||
{
|
||||
"Synopsis": "Сводка",
|
||||
"Comment": "Комментарий",
|
||||
"Notes": "Заметки",
|
||||
"0": "Ноль",
|
||||
"1": "Один",
|
||||
"2": "Два",
|
||||
"3": "Три",
|
||||
"4": "Четыре",
|
||||
"5": "Пять",
|
||||
"6": "Шесть",
|
||||
"7": "Семь",
|
||||
"8": "Восемь",
|
||||
"9": "Девять",
|
||||
"10": "Десять",
|
||||
"11": "Одиннадцать",
|
||||
"12": "Двенадцать",
|
||||
"13": "Тринадцать",
|
||||
"14": "Четырнадцать",
|
||||
"15": "Пятнадцать",
|
||||
"16": "Шестнадцать",
|
||||
"17": "Семнадцать",
|
||||
"18": "Восемнадцатая",
|
||||
"19": "Девятнадцать",
|
||||
"20": "Двадцать",
|
||||
"21": "Двадцать один",
|
||||
"22": "Двадцать два",
|
||||
"23": "Двадцать три",
|
||||
"24": "Двадцать четыре",
|
||||
"25": "Двадцать пять",
|
||||
"26": "Двадцать шесть",
|
||||
"27": "Двадцать семь",
|
||||
"28": "Двадцать восемь",
|
||||
"29": "Двадцать девять",
|
||||
"30": "Тридцать",
|
||||
"31": "Тридцать один",
|
||||
"32": "Тридцать два",
|
||||
"33": "Тридцать три",
|
||||
"34": "Тридцать четыре",
|
||||
"35": "Тридцать пятая",
|
||||
"36": "Тридцать пять",
|
||||
"37": "Тридцать семь",
|
||||
"38": "Тридцать восемь",
|
||||
"39": "Тридцать девять",
|
||||
"40": "Сорок",
|
||||
"41": "Сорок один",
|
||||
"42": "Сорок два",
|
||||
"43": "Сорок три",
|
||||
"44": "Сорок четыре",
|
||||
"45": "Сорок пять",
|
||||
"46": "Сорок шесть",
|
||||
"47": "Сорок семь",
|
||||
"48": "Сорок восемь",
|
||||
"49": "Сорок девять",
|
||||
"50": "Пятьдесят",
|
||||
"51": "Пятьдесят один",
|
||||
"52": "Пятьдесят два",
|
||||
"53": "Пятьдесят три",
|
||||
"54": "Пятьдесят четыре",
|
||||
"55": "Пятьдесят пять",
|
||||
"56": "Пятьдесят шесть",
|
||||
"57": "Пятьдесят семь",
|
||||
"58": "Пятьдесят восемь",
|
||||
"59": "Пятьдесят девять",
|
||||
"60": "Шестьдесят",
|
||||
"61": "Шестьдесят один",
|
||||
"62": "Шестьдесят два",
|
||||
"63": "Шестьдесят три",
|
||||
"64": "Шестьдесят четыре",
|
||||
"65": "Шестьдесят пять",
|
||||
"66": "Шестьдесят шесть",
|
||||
"67": "Шестьдесят семь",
|
||||
"68": "Шестьдесят восемь",
|
||||
"69": "Шестьдесят девять",
|
||||
"70": "Семьдесят",
|
||||
"71": "Семьдесят один",
|
||||
"72": "Семьдесят два",
|
||||
"73": "Семьдесят три",
|
||||
"74": "Семьдесят четыре",
|
||||
"75": "Семьдесят пять",
|
||||
"76": "Семьдесят шесть",
|
||||
"77": "Семьдесят семь",
|
||||
"78": "Семьдесят восемь",
|
||||
"79": "Семьдесят девять",
|
||||
"80": "Восемьдесят",
|
||||
"81": "Восемьдесят один",
|
||||
"82": "Восемьдесят два",
|
||||
"83": "Восемьдесят три",
|
||||
"84": "Восемьдесят четыре",
|
||||
"85": "Восемьдесят пять",
|
||||
"86": "Восемьдесят шесть",
|
||||
"87": "Восемьдесят семь",
|
||||
"88": "Восемьдесят восемь",
|
||||
"89": "Восемьдесят девять",
|
||||
"90": "Девяносто",
|
||||
"91": "Девяносто один",
|
||||
"92": "Девяносто два",
|
||||
"93": "Девяносто три",
|
||||
"94": "Девяносто четыре",
|
||||
"95": "Девяносто пять",
|
||||
"96": "Девяносто шесть",
|
||||
"97": "Девяносто семь",
|
||||
"98": "Девяносто восемь",
|
||||
"99": "Девяносто девять"
|
||||
}
|
||||
|
Before Width: | Height: | Size: 167 KiB |

|
Before Width: | Height: | Size: 8.3 KiB |